- Member DIN
- S017
You are using an out of date browser. It may not display this or other websites correctly.
You should upgrade or use an alternative browser.
You should upgrade or use an alternative browser.
First Halo Wars wip
- Thread starter SpecOpsSpartan
- Start date
-
- Tags
- first armor set halo wars wip
- Status
- Not open for further replies.
- Member DIN
- S017
Left shoulder pad and lower torso painted. Need to spray a protective coat of clear paint.
what is your plan for the undersuit / abdomen of the suit?
- Member DIN
- S017
Not sure at the moment. Been looking at some compression training suits on line and toying with the idea of getting in contact with Snakepit Studios in a custom built under suit for this type armor.what is your plan for the undersuit / abdomen of the suit?
Last edited:
have you considered flexible filament?
- Member DIN
- S017
For the under suit or armor?have you considered flexible filament.
undersuit
- Member DIN
- S017
Thought about it but I would have to get a tool head for flexible filament for the printer and someone would have to model the design.undersuit
people have had success printing flexibles with bowden extruders but yeah it's though. Undersuit parts from chief in infinite were just posted in regards to 3d models. Great job on the armor so far tho
- Member DIN
- S017
Thanks. I will check them out. I think if done right it would be awesome at least to print the exposed areas in a flexible filament parts and glue then to say a compression suit or something.people have had success printing flexibles with bowden extruders but yeah it's though. Undersuit parts from chief in infinite were just posted in regards to 3d models. Great job on the armor so far tho
- Member DIN
- S017
- Member DIN
- S017
Left Shin taped and painted. Just have to spray the clear coat. Taping this peace just about crossed my eyes. You have to concentrate on the lines of the peace while pin-striping it. I can just about imagine what the chest peace will be like.
Last edited:
- Member DIN
- S017
- Member DIN
- S017
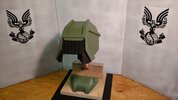
Painting done on front codpiece and bicep armor. Need to clear spray clear coat today. I have installed the light lenses and wiring up lights for the helmet today. Will install the tent on the visor when it comes in on Monday, hopefully it will look OK. If it works out I'll post the helmet Tuesday.
Last edited:
Im guessing your finishing process for the prints is the standard Filler primer then sand, repeat, process? The finish and shine on these parts are fantastic.
- Member DIN
- S017
Primer filler was used at the end of the process. At the beginning I used XTC-3D epoxy. First coat, then sanded with 220 grit sand paper. The 2nd coat of epoxy, then sanded with 320 grit sand paper. About half way through I still wasn't getting quite the finish I was looking for with some of the deep imperfections from the printing process. So I put a 3rd light coat on and sanded with 400 grit. Needless to say there was a lot of sanding.Im guessing your finishing process for the prints is the standard Filler primer then sand, repeat, process? The finish and shine on these parts are fantastic.
I havnt used XTC 3d ever, does it tend to fill in any details in your prints as well?
- Member DIN
- S017
It can if you let it. I brushed it in as light as I could all over the part then as it started to set up I would take tooth picks and cotton swabs and lightly swipe the contours out so it would not build up and fill in.I havnt used XTC 3d ever, does it tend to fill in any details in your prints as well?
- Member DIN
- S017
- Status
- Not open for further replies.
Similar threads
- Replies
- 4
- Views
- 982
Similar threads
- Replies
- 4
- Views
- 982

