Fist time making stuff and I’m planning

Status
Not open for further replies.

RyFISH

Member
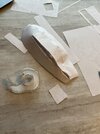
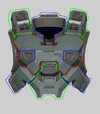
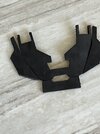
Ok I am a broke high school student so keep that in mind. I want to make a mk VII suit because it looks cool and seems kinda simple. As for details I want a burnt orange primary, dark gray secondary, and white accents (stripes probably). I don’t have a 3d printer but I know a few people who do and I could get a job soon. I was thinking I could make some of the under details and smaller parts from foam of various sizes. I’m open to suggestions and where to even start. I have little experience working with these materials but I’ve make props and things before. I have youtube, you guys, and my construction worker dad so I’m hopeful. Also I’m sorry if this is hard to read I’m kinda dyslexic lol.

I like the official 343 cosplay guide as a reference. (I would link it but if I leave this tab the post won’t save)
 

Attachments

  • AE77730A-2BB2-469D-A089-83347565A9A6.jpeg
    AE77730A-2BB2-469D-A089-83347565A9A6.jpeg
    29.1 KB · Views: 59
  • 7CE6B87D-E225-44AC-84D8-FA9CDED074BD.jpeg
    7CE6B87D-E225-44AC-84D8-FA9CDED074BD.jpeg
    5.6 KB · Views: 50
Hmm I’m thinking I should repurpose some old snow goggles for the visor. Is this a good idea?
 
I ran out of scotch tape. I’m building a mk VII helmet but I’m planning and proofing with paper before making the real deal.
 

Attachments

  • image.jpg
    image.jpg
    1.9 MB · Views: 74
Good luck with the build! Don't forget to do some tests and calibrations with the printer before starting any main pieces, especially large ones. As for the visor, as cool as snow goggles would look, I don't think you'd get enough material out of them due to the gap needed for the nose. You may be able to find people selling vacuum-formed visors, however due to how they are made they might be out of your price range. A simple method would be to use some PETG, bend it to shape and apply a coloured mirror tint on it. This will only work however if it only bends one way
 
Good luck with the build! Don't forget to do some tests and calibrations with the printer before starting any main pieces, especially large ones. As for the visor, as cool as snow goggles would look, I don't think you'd get enough material out of them due to the gap needed for the nose. You may be able to find people selling vacuum-formed visors, however due to how they are made they might be out of your price range. A simple method would be to use some PETG, bend it to shape and apply a coloured mirror tint on it. This will only work however if it only bends one way
Thanks for the tips and suggestions! I hope I can get this finished in time for sometime to show this off
 
I feel confident on making everything but the front plate thing. I need some help with it because I have no clue how to shape these things. Do you start at the top or the middle or something? I got some divide lines tho.
 

Attachments

  • CD9C2241-2AB8-482B-A01C-5678A9D8481A.png
    CD9C2241-2AB8-482B-A01C-5678A9D8481A.png
    423.4 KB · Views: 52
I usually do front to back, doing the front plate first gives a good indicator of how well scaled it is
Edit: also quick aside before staff talk to ya, it’s best to keep everything in one thread so we don’t clutter up the feed
 
I usually do front to back, doing the front plate first gives a good indicator of how well scaled it is
Edit: also quick aside before staff talk to ya, it’s best to keep everything in one thread so we don’t clutter up the feed
Ah ok thanks for the info
 
As Jacob alluded to, there is no need to create a new thread for each question you have about your build. Rather, it is best to have a central, single "Work In Progress" thread about your build where you can ask all the questions and post all the updates about it. This prevents the Forums from getting cluttered with unnecessary and duplicate threads that push down and hide other active threads, and makes all your questions easier to find and answer.

As such I have merged your threads into one consolidated Work In Progress thread here.
 
update: I am going to have my first roll of foam come in next week and I hopefully have a printing method after winter break. So things are looking up and I can finally make some stuff!
 
I was thinking about weathering and chief has bullet holes and other stuff. Do I paint and then weather the armor? Or add holes and scuffs then paint?
 

Attachments

  • 866326F8-5BA0-436E-877B-13F92BB768A1.jpeg
    866326F8-5BA0-436E-877B-13F92BB768A1.jpeg
    55 KB · Views: 54
I was thinking about weathering and chief has bullet holes and other stuff. Do I paint and then weather the armor? Or add holes and scuffs then paint?
It all depends on the weathering. Things like bullet holes, dents and deep scratches you do to the armour before you seal and paint - tools such as a soldering iron/woodburner, knife/heat gun and rotary tool can achieve these sorts of effects. Other things like light scratches where the paint has worn down, you do whilst painting.
 
It all depends on the weathering. Things like bullet holes, dents and deep scratches you do to the armour before you seal and paint - tools such as a soldering iron/woodburner, knife/heat gun and rotary tool can achieve these sorts of effects. Other things like light scratches where the paint has worn down, you do whilst painting.
Thanks man! I was thinking I could use one of my dull arrow tips for some bullet holes. Also how would you use the heat gun?
 
Using a heat gun on foam slightly melts the surface of foam, which is why it's used before sealing the foam. It closes the pores on the surface (known as Heat Sealing), so when you go to seal it with whatever you choose (such as Mod Podge, Plastidip, etc.) it doesn't get absorbed.

If you score the surface lightly with a knife, and heat it for a bit, the cut will open up more, leaving a bigger gash.
Oh neat that’s cool I can’t wait to try out all of these methods!
 
Make sure to test them out on some scraps first! It can take a bit of finesse and trial + error to get the physical weathering how you like. Make plenty of mistakes on some scraps before the real deal.
 
Status
Not open for further replies.
Back
Top