I made the tac soft case for my Jun cosplay, it’s a beginner level project, sewing machine is recommended though you could do it without a if you have a thimble.
This case is lined with a pocket and key ring inside. Though they are both optional.
MATERIALS:
1/2 yrd each of canvas and lining
3 yrds of 1” webbing,
5” of 1/2” webbing,
3’ bias tape
3 plastic buckles
velcro
6” zip
D ring and
I sculpted the Y joint out of styrene and worbla


The pattern:
PLEASE NOTE: SEAM ALLOWENCE IS NOT INCLUDED. Its easiest to trace the true shape onto your fabric then add seam allowance.
(grid is in inches)

Step 1:
cut out all the pattern pieces in both your outer fabric and inner lining. So you have 6 pieces in total.
Step 2:
sew the front to the side of each type of fabric. Sew slow around the corners then notch them so they are smooth.
then topstitch over the front.


Step 3:
Now we add all the details to both inner and outer peices.
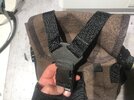
3a: The outside gets a lot of webbing
all the red lines are where you sew.


3b: The lining details are optional:
the D-ring is simply attached with webbing.
to add the zipper you'll need to cut the back piece of lining in two 6 inches from the bottom.

zipper:
to sew in the zipper, you will need a zipper cut down to 6". then sew small scraps of lining to both ends of the zipper

Next, center the zipper on one part of the back piece and sew right sides together. then repeat with the second back piece. topstitch over the zipper.


Thats the main parts of the details done. next it all gets sewn together.
This case is lined with a pocket and key ring inside. Though they are both optional.
MATERIALS:
1/2 yrd each of canvas and lining
3 yrds of 1” webbing,
5” of 1/2” webbing,
3’ bias tape
3 plastic buckles
velcro
6” zip
D ring and
I sculpted the Y joint out of styrene and worbla
The pattern:
PLEASE NOTE: SEAM ALLOWENCE IS NOT INCLUDED. Its easiest to trace the true shape onto your fabric then add seam allowance.
(grid is in inches)
Step 1:
cut out all the pattern pieces in both your outer fabric and inner lining. So you have 6 pieces in total.
Step 2:
sew the front to the side of each type of fabric. Sew slow around the corners then notch them so they are smooth.
then topstitch over the front.
Step 3:
Now we add all the details to both inner and outer peices.
3a: The outside gets a lot of webbing
all the red lines are where you sew.
3b: The lining details are optional:
the D-ring is simply attached with webbing.
to add the zipper you'll need to cut the back piece of lining in two 6 inches from the bottom.
zipper:
to sew in the zipper, you will need a zipper cut down to 6". then sew small scraps of lining to both ends of the zipper
Next, center the zipper on one part of the back piece and sew right sides together. then repeat with the second back piece. topstitch over the zipper.
Thats the main parts of the details done. next it all gets sewn together.
Last edited: