As a quick disclaimer, I did not create this pep file. All credit goes to Darkside501st for making the best looking Grey Fox helmet I could find. For my build I will be using a re-sized version, found here http://www.4shared.com/file/a1uF8P2K/Gray_Fox__Cyborg_Ninja__Helmet.html# . If that link doesn't work I can try to find somewhere else to upload it, but I'm usually on the download side of the internet. Also as a note, I have almost no experience with this kind of electronics. I also apologize in advance, I am a bit long-winded.
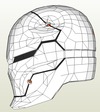
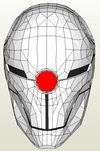
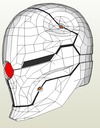
Now for the fun part! Anyone familiar with Metal Gear Solid's Frank Jaeger, AKA "Grey Fox" or "That ninja..." knows that his helmet was just cool. A targeting computer mono-eye in the middle, opening faceplates, and a smooth, aerodynamic shape that probably made cleaning off blood a breeze! In concept, making some of these things happen seems easy enough. Servos with some kind of scissored hinge system to open the side faceplates, possibly something similar for the top, and of course LEDs for the eye. Now, some of you may be looking at the file and saying " There is no way you can fit your head into that opening". And you would be right. on the back side, the three faces below the indention are intended to be a separate piece that, with the use of servos and some wonky looking hinges, is supposed to fold back far enough to allow one to get their head in. As a small note, when putting on a pepped version of the helmet, putting it on back-first rather than face-first allows for more room, and is what has allowed me to scale it down from my second attempt, which was more like a bobble-head.
Now then, onto the complicated stuff ( or complicated to me anyway). The two sensor-looking nubs on the face are intended to be something like http://www.microcenter.com/product/390025/5-Position_Switch , and when both are pressed, the back portion will retract. The back portion seems to be just the right size to stash close to a dozen AA batteries, but could possibly fit something with more powerful if necessary. I was also intending to but the faceplate release switch in the chin, so that something like a 1.5- 2 second press of the button with one's chin would activate the servos without risking it happening during an ordinary conversation. And if there is room, I had considered trying to use some kind of rechargeable battery set with an AC adapter hookup so that batteries never have to be changed out, but it was my understanding those have less power. I would like to possibly have at least 2 rechargeables hooked up to the back end however, as I have no idea how easy it would be to get this thing off if the batteries die while inside. Then again, I have no idea how long the batteries would last anyway. As far as ventilation goes... I'm open to suggestions. I don't see any readily available spots to use fans on, and I would prefer not to cut holes and destroy the overall look of the helmet.
I attempted to do research on my own, but I simply lack enough of the basic skillset to really figure it out. So I now humbly ask for guidance.
And as a last second note, I know this is possibly a horrifyingly overambitious build. I've seen something SIMILAR done before by Diegator, and I've seen some Iron Man helmets with a ton of wiring in them, and some of these ideas are open to reworking as long as they look good.