ItermiinateX
New Member
*PIC HEAVY*
My first step was to use the pepakura files from the Armoury to build the base helmet using 5mm foam. I also built the Elite head pep to make sure the two fit together
I pinned on some strips to make sure it held the right shape before slushing some plaster on the inside. This meant I could remove the strips and have the form maintained still, without obstructing the outer surface.
Using the McFarlane Arbiter, I drew up the patterns for the helmet details, and cute these from more 5mm foam.
Some areas were filled with foam clay, like the gap where the centre edge should be along the top.
To make sure it was smooth for casting, I coated the whole thing in a few layers of polyurethane resin.
I gave it a quick sand and prime next. There was clearly a lot more work to be done than I thought Xs
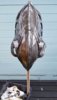
After many hours of fill, sand, prime, repeating, it was finally ready for mould prep. I decided it would be drastically easier if I had a more round mould, so I padded out all the empty space in the helmet, leaving a ridge so I can tell where the helmet begins.
Silicone was mixed and poured over the helmet, allowing it to run across the form to reduce bubbles. After it was coated, I added several thicker layers to fill in the shape and make a more 'even' surface with less undercuts for the jacket.
After the silicone, I made a fibreglass jacket to support the mould while casting, else it'll just flop everywhere. This is by far not a perfect jacket, but I got it to work for me.
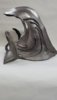
For my first test pull, I wanted to try a cold cast aluminium look. So I poured some aluminium powder into the mould and slushed it around to cover every surface, them made extra effort to tap out all of the excess, so only the thin dust layer was left. The first resin slush also had some powder mixed in, in case I missed a spot of the dusting. Two further resin layers were slushed, with a black pigment this time. The hope is that this will make the aluminium pop if I decide to polish it up later.
After leaving the resin for an hour, I demouled my first cast. Very happy and glad it turned out well overall. Sadly the silicone picked up some of the foam from where I sanded through the resin coat of the master, so that's definitely something to consider in the future. For now, this just means I have to sand each cast to get them more smooth.
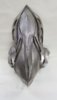
And now for the show cast. I started again with 3 resin slushes, with the first two having the pigment added to them. This cast was sanded a little to remove the foam spots, and them coated in Alclad Gloss Black Base, ready for the top paint.
After that had dried, I hit it with Molotow Liquid Chrome. A light dusting first to get a better adhesion before giving it a heavier spray all over for that super shiny paintjob. Both the Alclad and Molotow were airbrushed for a nice coating without marks.
As the mould and master had some imperfections, I also gave it a pass of weathering with some oil paints. It turns out if I leave enough of the paint on, it makes it look almost bronze / brass coloured, like the Halo 3 version!
And that's my build process! This was moulded and cast to allow me to sell them (currently on Etsy and eBay). Hopefully if I sell enough I can make a mould for the head and sell a bust to go along with it!
You're welcome to leave feedback or ask questions about the process or anything, I'll help if I can. Hope you enjoyed the build log!
PS. If anyone has any models / pep files for the H2 Anniversary Arbiter I'd love to have them so I can build the rest for my own costume <3
Links:
Facebook: Headhunter Crafts
Website: Headhunter Crafts
Instagram: Kyle James (@headhuntercrafts) • Instagram photos and videos
Patreon: Headhunter Crafts is creating Cosplay & crafts | Patreon