Halo 3 Assault Rifle (3D Print)

Status
Not open for further replies.

N8TEBB

Well-Known Member
Member DIN
S410
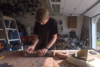
Just a simpler project I've been working on recently. I'll post updates as I make progress.

The goal: 3D Print and paint a halo 3 assault rifle.
Top Front.png


I used this a model from thingiverse:

Assault Rifle [Halo 3] by misterchiefcostuming

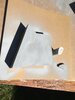
and cut it up into 4 pieces in meshmixer. I printed the pieces on my CR-10 with 5% infill. Only the second and third pieces needed support because of the extreme angle the handle creates.
1
ar 3.PNG
2
ar4.PNG
3
ar2.PNG
4
ar5.PNG


ar1.PNG

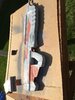
I used CA glue to stick the pieces together, and started to fill in the gaps with bondo.
IMG_3631.JPG

Got lots of sanding ahead of me! I'm going to smooth it all out and use filler primer and spot putty to fill in the print lines. Hopefully I can do that soon.
I still have to make the trigger, the magazine, and (I believe it's the light) at the front. They weren't in the zip file that came with the model, but the pieces I'm missing are fairly simple so I should be able to model them up and glue them on without a problem.
 
this is a really great job at the print and assembly of this fine rifle.. cant wait to see this beauty all painted and ready for service..
 
IMG_3641.JPG


I put air-drying spot putty over all of the areas that I predicted would be hard to fill with just filler primer.

ar6.PNG


Then I sanded it all smooth

IMG_3642.JPG


And sprayed it with filler primer. You can still see quite a few layer lines, but with finer sanding and more filler primer coats they should mostly go away.
 

Attachments

  • ar6.PNG
    ar6.PNG
    3.3 MB · Views: 148
Mask up for that fine dust stuff! The open garage door is a good start but you need to keep the pink powder out of your airways.
Good call man! Can't believe I let that slip my mind. I'm gonna pick a respirator up today hopefully.
 
mag.PNG


I modeled the magazine in fusion 360 because it wasn't included in the thingiverse zip file. I uploaded my STL's to thingiverse: Halo 3 Assault Rifle Magazine by NathanTheTebbs

extra pieces.PNG


I Sliced the Pieces in Cura, and printed them out.

IMG_3647.JPG


Unfortunately I ran out of black filament, so these pieces were printed in white PLA. The only downside to this is if the paint scratches off, the bright white plastic will be visible, instead of blending in with the paint like black plastic would.

I'm going to give these pieces a bit of filler primer and sanding, but they're mostly good to be glued on. (Besides the magazine obviously, which is removable)
 
So I sanded it all down. I'm not sure what the best grit to use is, but I did 120, 220, and 600. It is smooth to the touch but there are a few sanding blemishes here and there, but they're not extreme and I figured it will help with weathering later on. You cant' see them in the picture, but if you look closely in person you can.

I forgot to take a picture of it after I sanded it, but I did a second coat of filler primer to help fill in some of the straggling print lines and scratches. So here's what it looks like now:

IMG_3646.JPG


I also sprayed the trigger and light thingy that I printed so I can glue them on soon.

IMG_3648.JPG
 

Attachments

  • IMG_3649.JPG
    IMG_3649.JPG
    1.4 MB · Views: 130
  • IMG_3648.JPG
    IMG_3648.JPG
    1.8 MB · Views: 122
Looking really good man I'm jealous that you have access to a 3d printer but I love being able to see the possibilities that can stem from the machine keep up the good work I cant wait to see the final product
 
View attachment 296991
I made a really janky temporary stand to hold the rifle while I paint it. This is just the base coat. I usually wait a day before doing a different colour, so painting this thing will be a little slow.
like they always say slow and steady wins the race but have you thought of using a silver metallic coat next so when you add weathering it can show through to look like its the base metal of the weapon showing though?
 
like they always say slow and steady wins the race but have you thought of using a silver metallic coat next so when you add weathering it can show through to look like its the base metal of the weapon showing though?
I Thought about it, but I'm gonna just paint on the metallic look after. Even though it's not as realistic, I think I'll have a little more control over the look. It's also easier and I'm lazy.
 
Last edited:
IMG_3670.JPG

IMG_3671.JPG
IMG_3675.JPG

I'm gonna touch up some stuff and do some black in the grooves in the grey area. I also have to add an amo counter, and then do a bunch of weathering and stuff. Hopefully a dark wash should bring the brightness of the shiny bits down. I'll also highlight the edges in the black area to make them stand out a little more.
 
IMG_3709.JPG

Just gave it a bit of weathering, might do a bit more... not sure. I do still have to paint the amo counter a dark blue. It's almost done!
(edit) it looks better when the lighting isn't so bad. When I take it outside it's easier to see the grey area in the middle.
 
Status
Not open for further replies.
Back
Top