1st Build Halo 3 MK6 armor build

Status
Not open for further replies.
Wow! I look forward to seeing this build play out!
I do as well! Im half way through scaling the armor. Now I just have to figure out how to slice it up for my printer.
 
Well it’s been awhile, but here’s where I’m at

The helmets almost completely done. I’m figuring out the padding and secureing it to my head, but other than that It’s just awaiting lights and other electrical bits to be installed.
A931D01E-96E0-4566-ADB9-1479B01998D4.jpeg


I’ve also done one of the forearms
EE9E01B8-9BD9-4CF4-9E25-86072B7EF1B3.jpeg

And half of the chest front

DD3CABEE-1476-41B2-8564-1F2A2E6C1FF7.jpeg
 
interesting finish on that helmet. i have to say it doesn't look too bad. I'm curious how it will look on the whole suit
 
Four days of printing later and the top half of the back is finally done.
5A9A3CCA-C4A4-46FD-BBD1-2D36D0901FCC.jpeg

F329A054-0F03-4B7D-AC6A-8EBE1F276E24.jpeg


It took a bit of work because the side was covered in a tiny bit of support material.

01AE8849-0A9A-4BEA-99B7-5C724916A610.jpeg


but that’s nothing that a dremel tool with a grout removal tool can’t fix.
image.jpg


I’m going to be covering this entire side in bondo in order to smooth out the appearance and make it look better.
 
what paint did you use? it's pretty close
I used Krylon satin Italian olive. I spent a solid $30 on finding the right and closest color that would stick to line-x. I'm pretty satisfied with it. There are a few detail areas that I have to go over and I would like to add some silver wear marks on the edges, but I'm super satisfied with it so far.
 
Here's a time lapse of one of the torso pieces if you want to see it.
 
Front of the torso is finished printing. It look super good.
E66B0CE0-F9C3-40CE-8664-80C512CA55F8.jpeg
1618549060076.gif


And in case you can’t tell, I no longer care about the color of filament I’m using. Im line-Xing the entire thing and you won’t be able to tell.
 
Torso is done printing!

FC460303-A1F0-4EEC-A971-2D46DDCF73CD.jpeg

5A6051E5-BB7D-4026-A91A-9A10113E3AA0.jpeg


The prints turned out fantastic. The only problem is the bottom pieces between the front and back.


A2799632-7DEE-43B6-AF8B-C512A806DC06.jpeg

I’ll have to reprint those and add some length to them.
 
GIANT UPDATE ALERT

I glued and put the first coat of primer on the torso sections. I was doing the bondo, but then ran out and thought that spot putty would work. Spoiler alert, it did not.
Next, I glued, epoxied, bondoed, sanded, primed, sanded, primed sanded, sanded, sanded, primed, and sanded the forearm pieces. After all of that, there's still more to do since I had a broken nozzle at the time on my printer and did not know.
E40690BB-409B-4DAF-BF5F-CA0E4AB39D67_1_105_c.jpeg
39B123DD-0422-4D37-93E6-2BC5A9E3EEF3_1_105_c.jpeg


After that I did the same pricess on the bicep pieces. They look like this:

D45287E0-8BD7-49CC-87B8-202BE49D0F97_1_105_c.jpeg
692C5C43-61E6-4371-858F-486455D95F61_1_105_c.jpeg


And of course, still more to do on those.

Next up the calf pieces. Those have been an adventure. This is when the bad nozzle truly presented itself causing me to have 3 failed prints on one leg. (Why I didnt check the nozzle earlier I don't know)

F47D4256-9462-4F8A-99CF-885F6157911A_1_105_c.jpeg
9DD87B6E-4FA7-4976-8D1D-B4D98D9E557B_1_105_c.jpeg


These have more work to be done on them still to work out all of the print lines.

Another dilema that I have with the leg pieces is that this part really gets in the way being rigid plastic instead of EVA or rubber.
1E1ADBD7-2AC1-4110-B6F0-49D253358B89_1_105_c.jpeg


I'm trying to find a good way to deal with it. I'm hoping to cut them out without reprinting the entire piece. Then I just have to figure out what to build them out of. I may do neoprene since it's pretty easy to work with and is pretty durable.

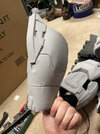
Now off the the shins. I really had to do some scaling work on this one. I am 6' 4" with a size 15 foot. I printed the origional file to test and it's TINY. (Yes I know that I should have rescaled before anything, but this is why it's my first project) So, I resized the piece to fit on my leg and added a cutout on the back of the piece. It looks a little somthing like this.

Screen Shot 2021-05-28 at 4.39.35 PM.png
Screen Shot 2021-05-28 at 4.39.11 PM.png


Here's a shot of when I taped it together for a test fit:

BA7B7130-6A73-4D83-9755-567772C7B640_1_105_c.jpeg


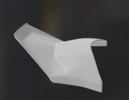
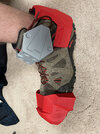
I started working on the boots yesterday. However, I have run into a small problem. The problem is that I have skis for feet. Here's what the files look like when I put them over my boot:

9B942B1B-2A5F-4F67-AA34-1CCBBDB3B52F_1_105_c.jpeg
C6257AF4-BA5F-4335-89F9-A41BE9971D3B_1_105_c.jpeg


It's comically small. I compared it to a refrence photo and it just looks hilarious. These are not the final boots, but they are the same size and shape, so they work for test fitting.

A few miscellaneous images and fun things:

I got a giant pelican case for all of my armor

8BF9963A-8C14-4552-8D13-DCAAF1632BA9_1_105_c.jpeg


I've also used an absolute crap load of filament. This is half of the boxes.
59167200-F3B4-4AAD-903B-80002D3602D6_1_105_c.jpeg


I also began experimenting with finishes. I came across somthing called rapter liner. It's a truck bed liner, but they sell a tintable version that can be used for whatever you want, so I bought a kit of it and started experimenting.

The mixing instructions say to use 10% of their pigment, but after some research, I found that any pure pigment compound works. I went to my local auto paint store and bought the closest color that I could find to the MK6.

Here's my first try on a missscaled bicep piece.

24441E7B-F774-43E0-A358-DC6AFB7E57D2_1_105_c.jpeg
25384A60-1243-485E-A995-96F88529522B_1_105_c.jpeg


I think the texture and color look fantastic. It's super close to the game and reference pictures that I have.

While I do love this finish there is something that I would LOVE to create. I want to try and see how well I can do the green color, but with an iridescent quality. In the books it constantly said iridescent green, and I would assume that from the heat reflective coating that they put on the armor. I'm working with my paint guy and a chemist that I know to see what I can do.


With all that being said, I have some questions that I would love for people who have done this before to answer.

1) What's the best way to pad the inside of the armor? Is it EVA foam? Upholstery foam? Some pictures of how you did your torso armor piece would be great.

2) How did you rig up your harness to attach everything to?

3) What's the best way to accomplish what I am trying to do in my calf armor section?

Thanks guys!


Edit:

I also am going to try and do better and more frequent updates. :)
 

Attachments

  • 39B123DD-0422-4D37-93E6-2BC5A9E3EEF3_1_105_c.jpeg
    39B123DD-0422-4D37-93E6-2BC5A9E3EEF3_1_105_c.jpeg
    262.8 KB · Views: 119
  • Screen Shot 2021-05-28 at 4.39.35 PM.png
    Screen Shot 2021-05-28 at 4.39.35 PM.png
    362.2 KB · Views: 125
  • 1622234577511.jpeg
    1622234577511.jpeg
    416.6 KB · Views: 122
Last edited:
Good work JTF4

I'll try to answer some questions..

1. EVA foam or upholstery foam are both great options for padding. Just add pieces here and there until it feels right. Just remember if the whole interior of the piece is some kind of padding clinging to your body it will get hot... So better to use like "pressure points" when it comes to padding. Like instead of a ring of padding try have three small squares of padding spaced out evenly in the same place you would have put a ring. If this is hard to understand I can try to draw it..

2. I rigged my suit onto load bearing military suspenders attached to a pistol belt. The belt is then attached to my leg pieces. So basically I'm carrying the weight of my leg pieces on my shoulders. My arm pieces are attached to a motorcycle chest/shirt. And my chest piece is just clam shelled, resting on my shoulders.

3. I'm not sure with you calf armor section... but here are two common issues. Most people cut out sections on the back of the calf, both the top and bottom. It's not game accurate, but you won't be able to climb stairs otherwise. The other big one is the thighs. The "black parts" of the inner thighs should be cut out and replaced with a more flexible material. You can replace it with EVA foam. Mine is thin flexible plastic wrapped in vinyl. You will thank me later for this..

I'm intrigued by this coating. At first I was not happy, just because the helmet is so iconically smooth. But, I think with the whole suit done this way you're going to pull of some more ruggid concept of chief, like a battle worn tank. And the chief being a tank is what the devs were going for, so I think once all together it will look cool. I think the undersuit will also play a big role in it too. This ruggid look ontop of some smooth morph suit would probably look weird, but instead having more actual armor underneath, like the motorcross stuff I wear, will help pull the look together.

Sub'd
 
Holy cow! This is an absolute treasure trove of information!

CC57F2CD-A450-4B71-8547-54BEBA406E46_1_105_c.jpeg


This is the helmet with a similar finish. I did this one with linex and I really like the texture. I tried to match the slightly rough texture in the remaster of halo, but it ended up being a little more. Nice thing about it though is the helmet is now insanely strong. I took the thing and threw it up into the air about 10 feet and let it hit the ground and nothing happened. Idk why I did it, I just did it one day.


Do you have pictures of how you padded your build?
 
If those are the boots that you are going to use I'd think that you would want to scale up a bit more yet.

master_colt_117 is the expert when it comes to scaling so you could look at his thread to get some reference images.

Additionally, there was a discussion we had here - MrJamin's 3D Printed MK VI Master Chief - when I was printing my boot pieces.
Did someone mention me?? Idk if I'm a master at scaling but I have rebuilt enough parts to learn my lessons. Haha

Yes, these boots above are scaled way to small. The gaps between all 3 sections even around your host shoe, easily give that away. When the gaps between the toe and heel piece of the boot increases (forced) to "fit" your foot, it's to small. That boot needs to be scale in proportion to where it fits around your host shoe perfectly, BUT doesn't increase the gaps between the pieces out of proportion compared to your model or the character. Make sense?

I would scale the boots at least 12.5 inches long, but I don't know how big your body is. I'm 200lbs and 5' 11.

I can say this, if I ever rebuild my boots, I would even scale mine up a tad more as well and they're already huge in person. Chief has deceivingly large boots! It's actually the base for the entire armor appearance.

IMG-20200515-WA0009.jpg
 
Ah! I see how that's supposed to work. I may try 3d scanning my boots and scaling off of that for fun!

I'll post some images once I scale it.

Thanks for your help!
 
I hot knifed out the inside portion of the thigh piece. There’s still some touch up work to do, but what do you guys think?

Is it worth going through making the cut look clean? Or should I just reprint it?

edit: forgot the image lol

68D565F4-44E1-4137-B4C3-B829AC4F2DA4.jpeg
 
Will the inside be visible, or did it affect the outside too? If it's not visible, you don't have anything to worry about, as long as it's durable.
 
Status
Not open for further replies.
Back
Top