Hi!
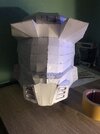
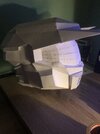
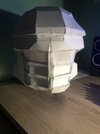
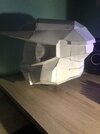
This helmet is my second attempt and Im finally satisfied with the result. Now I’m quite lost and don’t know what to do now to harden it.
What do I have to do now and is the helmet looking ok?
There are several different approaches to pep but the next step is the same in all of them.
TylerBH2014 is correct to say fiberglass resin is the next step. I am currently working on a pep build so I will tell you my methods. Start with a thin layer of resin on the inside. Most people recommend doing small sections at a time to prevent warping. I find resin to be difficult to mix in small batches so, I do whole layers at once and try to position the helmet such that it won't warp while drying. Primarily this means, resin on the inside= place helmet upside down like a bucket catching rain water and balance it. In my experience this will keep the helmet from warping although there are many factors involved. For example, the strength of cardstock used in the paper model, the thickness of the resin layer, the temperature and humidity of the drying environment, etc. For first timer, I would try to do light layer in small sections.
After the inside layer is good and dry, repeat the process with the outside, although the way you position it while drying will have to change. Personally, I made a bulb on the end of a stick and stuck my helmet on that (kinda like a display stand but cheap and crappy). This allowed the outside to dry and helped keep shape.
I do a total of 3 layers of resin on the outside and 2 layers on the inside. Always make sure the previous layer is completely dry before doing the next layer. Also make sure you wear a high quality respirator to protect your lungs from the fumes and work in a well ventilated area.
Some people use the "rondo" as described by
TylerBH2014, however, I have been told that it will make the helmet stiff but brittle and be prone to cracking. The other approach is harder and messier but results in a tougher piece.
Rather than rondo, I use fiberglass mat (or cloth) soaked in resin. Basically, paint some resin inside the helmet and lay a piece of fiberglass mat on it. Then paint more resin over the fiberglass mat. You will learn quickly that this process is very messy mostly because fiberglass mat is not an easy substance to work with. Get some nitrile gloves and be prepared to change them often. Also be careful of fiberglass shards making splinters and getting you or irritating your skin and, of course, wear your respirator.
Finally, as
TylerBH2014 said, use bondo autobody filler to smooth out the edges and shape the helmet so it's all pretty.
There are tutorials on the forum for this process as well as other people's build threads if you need more detail. You can also check out the tutorial vids by c3real kill3r on youtube.
Good crafting!