This was a really cool project, but it came with plenty of stumbles and roadblocks. so im posting this build doc for those who want to learn from my mistakes.
The files im using are free on thingiverse. they are from Oddworks. Really interesting files with multiple moving parts. in my opinion, because of the intricate parts and details, there is much more room for failure in this print, so be warned. The staple feature of this prop is that the shell can be completely removed to show the "internals" of the gun. whether this is lore accurate or not is out of the question, I did however go into this project with the intention of making this DMR as game accurate as possible with the overall color scheme. the only creative liberty i took was the red scope to better match my odst kit.
here are some of the things you will need:
M3 bolts and nuts, at least 50 of them. These are used to hold the entire gun together. some parts are glued together with just super glue or JB weld (i used both) one huge mistake i made was i didnt realize until the very end how bolts and nuts fit into the equation. (i know nothing about construction lol) so i initially just used the screws and was blissfully confused as to why they wouldnt stay tight or actually hold the gun together (that is what the square nut is for, to give it something sturdy to screw into)
2 extension springs for the trigger and mag release
1 compression spring for the sliding bolt
the measurements on the springs nuts and bolts are provided in the thingiverse description, but they are based off of the metric system and are sourced from the UK, so as an american, i had a hard time finding the exact springs used. on amazon i was able to find the right nuts and screws, but the springs i couldnt get the exact suggested size, so i had to physically modify them by trimming with wire cutters and bending the springs to fit. this was a challenge in of itself and i dont recommend it without proper tools haha.
In the end i was unable to get the mag release to function because my filament was structurally weak and kept on snapping, or was otherwise just slightly uneven after printing, so i gave up on that and just did my own magnetic version of a removable mag. the trigger I also had functioning, but after fully assembling and sanding the gun, the spring came loose inside, and since i had already glued the gun together, i couldnt go back and fix it. the only thing i got working according to the files was the sliding bolt haha.
If its relevant, I printed everything in black PLA on an Ender 3 V3 SE, i used 100% scale from the original files, and i didnt change any of the default printer settings. I would however recommend that you do something to add more structural integrity to the print, specifically the outer shell and moving components. likely just adding more wall loops for increased shell thickness. i had the issue multiple times that if the gun wasnt fully assembled, the outer shell was too brittle and would crack or shatter at the slightest movements. I also have the issue that on some of my larger prints, the print comes out slightly skewed. my entire room slopes down a hill at like 3-5 degrees so i thing this is what causes that, and i dont know how to fix it. :/, for this reason i later ditched most of the working internals and opted to just glue everything together rather than relying on the screws.

Assembly is actually very straightforward in my opinion, the only challenge being the addition of the springs and such. (there is no tutorial or build video that i could find), so i had to figure it out myself, as well as using lots of hot glue because parts kept snapping...
I opted to sand the entire rifle once fully assembled to avoid accidentally breaking any more of my printed parts, starting with 320 grit, 420, I then did 2 coats of rustoleum filler primer, and then finished with 1500, and 2000 grit.


I dont think i had the colors perfect, but i went with rustoleum canyon black in satin, and then their charcoal grey for the secondary color. but i think if i would have found a more gun metal looking secondary it would have turned out much better! did 2-3 coats of both the black primary and the grey secondary, allowing for 24 hours to dry.


after this, i went in with rustoleum silver spray paint, spraying some into a plate and then hand painting/dry brushing onto most all the edges and areas i felt would look good to bring out a more battle worn, scratched finish. i added some subtle red, silver and blue acrylic colors for the ammo counter, and "LED lights".
finally, with sheets of plexiglass and red mirrored window tint, i cut out little circles to fit into the scope for that custom lens.
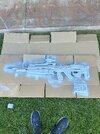
Here is the final product! I really like the end result, just a little disappointed i couldn't get the rest of the features working properly, but hopefully some of you guys can do better than me!
Ill bring this with my completed ODST kit to HCS and Fan X salt lake 2025, hope to see some of you there!


The files im using are free on thingiverse. they are from Oddworks. Really interesting files with multiple moving parts. in my opinion, because of the intricate parts and details, there is much more room for failure in this print, so be warned. The staple feature of this prop is that the shell can be completely removed to show the "internals" of the gun. whether this is lore accurate or not is out of the question, I did however go into this project with the intention of making this DMR as game accurate as possible with the overall color scheme. the only creative liberty i took was the red scope to better match my odst kit.
here are some of the things you will need:
M3 bolts and nuts, at least 50 of them. These are used to hold the entire gun together. some parts are glued together with just super glue or JB weld (i used both) one huge mistake i made was i didnt realize until the very end how bolts and nuts fit into the equation. (i know nothing about construction lol) so i initially just used the screws and was blissfully confused as to why they wouldnt stay tight or actually hold the gun together (that is what the square nut is for, to give it something sturdy to screw into)
2 extension springs for the trigger and mag release
1 compression spring for the sliding bolt
the measurements on the springs nuts and bolts are provided in the thingiverse description, but they are based off of the metric system and are sourced from the UK, so as an american, i had a hard time finding the exact springs used. on amazon i was able to find the right nuts and screws, but the springs i couldnt get the exact suggested size, so i had to physically modify them by trimming with wire cutters and bending the springs to fit. this was a challenge in of itself and i dont recommend it without proper tools haha.
In the end i was unable to get the mag release to function because my filament was structurally weak and kept on snapping, or was otherwise just slightly uneven after printing, so i gave up on that and just did my own magnetic version of a removable mag. the trigger I also had functioning, but after fully assembling and sanding the gun, the spring came loose inside, and since i had already glued the gun together, i couldnt go back and fix it. the only thing i got working according to the files was the sliding bolt haha.
If its relevant, I printed everything in black PLA on an Ender 3 V3 SE, i used 100% scale from the original files, and i didnt change any of the default printer settings. I would however recommend that you do something to add more structural integrity to the print, specifically the outer shell and moving components. likely just adding more wall loops for increased shell thickness. i had the issue multiple times that if the gun wasnt fully assembled, the outer shell was too brittle and would crack or shatter at the slightest movements. I also have the issue that on some of my larger prints, the print comes out slightly skewed. my entire room slopes down a hill at like 3-5 degrees so i thing this is what causes that, and i dont know how to fix it. :/, for this reason i later ditched most of the working internals and opted to just glue everything together rather than relying on the screws.
Assembly is actually very straightforward in my opinion, the only challenge being the addition of the springs and such. (there is no tutorial or build video that i could find), so i had to figure it out myself, as well as using lots of hot glue because parts kept snapping...
I opted to sand the entire rifle once fully assembled to avoid accidentally breaking any more of my printed parts, starting with 320 grit, 420, I then did 2 coats of rustoleum filler primer, and then finished with 1500, and 2000 grit.
I dont think i had the colors perfect, but i went with rustoleum canyon black in satin, and then their charcoal grey for the secondary color. but i think if i would have found a more gun metal looking secondary it would have turned out much better! did 2-3 coats of both the black primary and the grey secondary, allowing for 24 hours to dry.
after this, i went in with rustoleum silver spray paint, spraying some into a plate and then hand painting/dry brushing onto most all the edges and areas i felt would look good to bring out a more battle worn, scratched finish. i added some subtle red, silver and blue acrylic colors for the ammo counter, and "LED lights".
finally, with sheets of plexiglass and red mirrored window tint, i cut out little circles to fit into the scope for that custom lens.
Here is the final product! I really like the end result, just a little disappointed i couldn't get the rest of the features working properly, but hopefully some of you guys can do better than me!
Ill bring this with my completed ODST kit to HCS and Fan X salt lake 2025, hope to see some of you there!