OpticChief
New Member
I wanted to share my current process for forming and dyeing PETG visors, since I’ve been getting a lot of questions about how I achieve bright, even colors with a reflective finish. This method is based on my own trial-and-error and on techniques I learned from Galactic Armory and N8TEBB, whose work I respect a lot.


I then printed a visor buck and spent time sanding it smooth, so the final pull would be clean and free of texture marks.
Once the buck was ready, I used my DT2 Vaquform machine to vacuum-form the PETG over the visor shape.
For those unfamiliar, the DT2 is a desktop vacuum former with preset material profiles, including PETG, which you can customize accordingly.
My basic forming process was:


My first attempt turned out too dark, so this write-up reflects the improved method I learned from that mistake.
For dyeing, I used:


The goal was to bring the water to 180–200°F initially. This helps fully dissolve the dye and ensures an even mixture.
Once the water was near boiling, I turned off the heat and added:


The color intensifier does not make the color brighter; its job is to help the dye bond more effectively with the plastic.
I stirred everything thoroughly until the solution was fully mixed.


Once dry, I set up my airbrushing area and filled my airbrush with:

• Spaz Stix Ultimate Mirror Chrome
This paint goes on the inside of the visor.


You can lightly place masking tape over the painted side and peel it off; this will remove some of the chrome layer without completely ruining the finish.
That said, be careful: this paint scratches very easily, and any imperfections will be noticeable from the outside.
This is my current method for making a dyed, mirrored PETG visor.
I’m still experimenting with other techniques and materials, and as I learn more, I plan to share additional methods with the community.
Big thanks again to Galactic Armory and N8TEBB. A lot of what I practice here is inspired by their work.
If you’re trying this yourself, don’t be afraid to test, fail, and refine; that’s exactly how I got to this point.
1 – Materials & Forming the Visor
To start, I ordered clear PETG sheets from McMaster-Carr.I then printed a visor buck and spent time sanding it smooth, so the final pull would be clean and free of texture marks.
Once the buck was ready, I used my DT2 Vaquform machine to vacuum-form the PETG over the visor shape.
For those unfamiliar, the DT2 is a desktop vacuum former with preset material profiles, including PETG, which you can customize accordingly.
My basic forming process was:
- Heat the PETG to 150°C until it becomes soft and formable.
- Lower the heated sheet over the visor buckle.
- Engage the vacuum to ensure the PETG tightly conforms to the mold's shape.
2 – Preparing for Dyeing
Before dyeing, I need to highlight:My first attempt turned out too dark, so this write-up reflects the improved method I learned from that mistake.
For dyeing, I used:
- JACQUARD iDye Poly – Kelly Green + Color Intensifier
- A gallon steel pot
- A ½-gallon plastic bucket of cold water
- Stove, thermometer, and stirring tool
- Important note:
Ensure the pots and tools you're going to use for or with the dye are not reused for cooking or anything involved later that will be used for consumption.
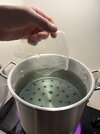
3 – Mixing the Dye Bath
I filled the steel pot about ¾ full with water and placed it on the stove.The goal was to bring the water to 180–200°F initially. This helps fully dissolve the dye and ensures an even mixture.
Once the water was near boiling, I turned off the heat and added:
- About ¾ of the dye packet (I didn’t want a super dark green)
- The entire color intensifier packet
The color intensifier does not make the color brighter; its job is to help the dye bond more effectively with the plastic.
I stirred everything thoroughly until the solution was fully mixed.
4 – Controlling Temperature
After mixing, I turned the stove back on very low, just enough to sustain a constant temperature of 140–145°F:- At 150°F, my PETG started to warp during earlier attempts.
- 140–145°F is safer while still being effective for dye absorption.
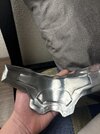
5 – Dyeing the Visor
Once the dye bath was stable, I took a piece of the PETG, which was cut from the outer edges of the sheet that formed the visor, just to sample the colors dipping just to get an idea of what kind of hue of green I wanted for my visor then I began dyeing the visor in short, repeated cycles rather than a single long soak:- Place the visor in the dye bath for 4–6 minutes.
- Remove it and immediately place it in the cold-water bucket for 20–30 seconds.
- Return it to the dye bath.
- Repeat this 4–8 times until I reach a color I am satisfied with.
6 – Drying & Preparing for Mirror Coating
After dyeing, I let the visor air dry for about 2 hours.Once dry, I set up my airbrushing area and filled my airbrush with:
• Spaz Stix Ultimate Mirror Chrome
This paint goes on the inside of the visor.
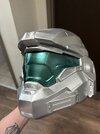
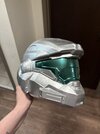
7 – Applying the Mirror Finish
I applied the chrome in very light, even layers, slowly building up the reflective effect:- Don’t spray too heavily at first; multiple thin coats are better than one thick coat.
- You want the front of the visor to gradually become fully mirrored.
Safety first and always! - I am using a 3M Multi-Purpose Performance Respirator Grey P100 mask to ensure that I am not inhaling any nasty and harmful fumes throughout this process
- Any Latex gloves tend to work when handling materials as well
You can lightly place masking tape over the painted side and peel it off; this will remove some of the chrome layer without completely ruining the finish.
That said, be careful: this paint scratches very easily, and any imperfections will be noticeable from the outside.
8 – Conclusion
I’m still experimenting with other techniques and materials, and as I learn more, I plan to share additional methods with the community.
Big thanks again to Galactic Armory and N8TEBB. A lot of what I practice here is inspired by their work.
If you’re trying this yourself, don’t be afraid to test, fail, and refine; that’s exactly how I got to this point.