Dreadnaught
Jr Member
Good stuff, sir. My thanks.
Its not similar in any way besides being a machine gun, the belt box isn't even on the same side. People usually just use it so they don't have to build the core, and they can just add a barrel and a shield. It would end up a lot better if you took the time to build the core. The difference is that it wont shoot fun squishy foam darts. Ive modified tons of nerf guns, I even made a raider pistol, I minimized a double shot to pistol size, no stock or anything, and i made a Longshot into a hammerburst, a maverick into a bolter, and a Fast action lever rifle into the Gnasher shotgun, then made longer shells that held three minimized darts for that shotgun effect.
speaking of your jorge gun, when will we get an update on that! My keyboard is all slobery from the anticipation!I couldn't agree more,
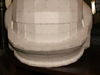
I tried to use this as a base for my mod-build-turned-scratch-build for the chain gun and, literally, the only piece I used was the back hand grip...
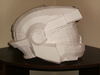
But the chain gun is actually fairly straight forward to build. It is just a few modular parts that you can build up with cardboard, hot glue them together, and, hey, you've got the Jorge gun!
If you need some help, I have the link to the build in my signature!

")