Jorge Armor: WIP

Status
Not open for further replies.
Thanks, 0235. I learned that lesson back when I was still modding metal figures for Warhammer 40K. It only took me sticking half the blade into the same finger twice in one day for me to decide I needed a change.

That style of ruler would be nice. I'll look to see if I can find one.

I've had the thing for close to 10 years, and I don't even remember where I got the shell. It's supposed to be one that the Apache fires. The casing was damaged, and the primer was removed by someone else. Since it's blue, it's nothing more than a training round with no explosive in it. I'm guessing the nose is either steel or a hard aluminum alloy.

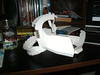
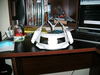
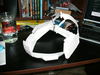
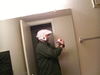
I also just realized that I managed to do something exceedingly dumb. On the helmet's ear piece, the center section is supposed to be recessed. I did not do that on the left ear. Since I can not get to the thing without tearing the whole side of the helmet apart, I guess the right ear will have to be wrong as well.

They preach attention to detail just about every single day in the military... I guess I've been out of active duty way too long.
 
Ok... Ears/cheeks are attached. I went with the brow rather than the chin, since I figured it would be easier to work from the top down. Well, it wasn't terribly difficult to put the brow together. The hard part is getting the bits near the ears to quit fighting me and go together. Somehow, with no major warping anywhere, the sides don't line up properly with the tails of the brow assembly. Shouldn't be too hard to fix, since it's only about an 1/8" at the worst, and squeezing in close enough I can't actually measure how far off it is in the tighter areas.

Maybe when my arthritis is not acting up, and I have a good night's rest under my belt I'll get the stuff worked out.

Now, you guys get to see my bright, sun-shiney self, with the helmet on my mellon. I look irritated because I could't find the way to turn off the flash, so I had to hold my finger over it. My shoulders are wider than that door. I never realized that before.

SANY0244.jpg


SANY0245.jpg


Dread
 

Attachments

  • SANY0244.jpg
    SANY0244.jpg
    93.1 KB · Views: 154
  • SANY0245.jpg
    SANY0245.jpg
    79.1 KB · Views: 144
No update pics tonight; I didn't really make much visual progress. Instead, I ended up fighting the right cheek piece straight. Well, straighter, anyway. It was amazing. I put the thing down last night, happy with my progress, and when I came back to work on it today, the whole things was just off enough that it hurt my eyes without it being obvious where the issue was.

Oh, well. Progress tomorrow, hopefully.

Later,
Dread
 
Thanks for the support, bud. I'm about 3/4 done with the pep, I think. I'm looking ahead now to the first resin coat, and planning how to do that without the thing collapsing on me. I'll probably try to rig some supports, just in case...
 
Ok... Well... This was disappointing. The whole helmet is just... wonky. I don't know how else to describe it. I haven't even put the jaw/chin on, and the whole helmet has some sort of weird twist to it. I flatened the bottom of the brim with a tongue depressor, and now... Whew... Also, I'm stumped on how the numbers can drift in their alignments. I start out with the numbers aligned, and by the time I'm to the end of a long piece, or, by the time I'm adding another piece, things don't line up anymore. Am I just going blind in my old age, or is there something about working with the law of averages to make this work? You know, average a bit this way or that to try to even the stuff up, and then trim any excess?

I'm going to start over, and this time, I'm going to try a different approach. I'm also going to re-read some of the basic pep info to make sure I'm not missing some vital little clue...
 
i recomend that you make sure the numbers are aligned every time before you glue the fold, folding it more or less at an angle to allign the numbers. This will matter when pepping. the missalignment is probably caused by you having more room than you're supposed to due t folds not being at proper angles, which would also cause the twist.
 
I'm thinking a lot of drift crept in both because of the folds and the fact that my hand is not as steady as it used to be. My lines are pretty good, but pretty good still allows a lot of error to build up.

I'm trying to get the pep program to print out the lines in the entire file, rather than just giving me edge numbers for half of it. It'll be after work Thursday before I can dedicate more time to this...
 
Working on take two, now. I've increased the size of the helmet by 10%, which is a standard and simple pep adjustment. I took Roadkill's suggestions and played with the printer settings and got the rest of the Jorge helmet pieces to print. I have another file that has an attachment, since ForgedReclaimer's helmet didn't incude one that I can find. (If anyone happens to have that or know where it is, I would appreciate a point in the right direction.) This one is by Raziel1981 and A_Guardian. I'll be looking to see how it fits, but the detail does look good. The only reason I would prefer to find on by ForgedReclaimer is for continuity purposes.

Thanks ya'll,
Dread
 
Got some work done on the second attempt last night. Pics to follow tonight after work...

As for the order of things, I've changed it up a bit from what I was doing before. I put the lower chin and jaw together first, then did the rest of the neck ring. After that, I assembled the cheek pieces and the main ear arches for support. As I'm going I'm trimming places where the tabs and ends of pieces where they don't quite fit properly. This is usually no more than a millimeter or two of trim, but the numbers are almost all lining up with much better accuracy now, and the tabs are less of a fight to try to fit.

I don't know if my last pictures are a result of awesome camera skills or exceedingly poor lighting, but my first attempt looks much worse in person than it does in the pictures.

Again, pics to follow tonight after work.

Dread
 
I have the same file and it comes with attachment but you have to zoom out to see it. I got it done and it looks great. I can't show you my picture because I'm using my iPod to reply to this. I will upload my pic later
 
If you've got the unfold of Forgedreclaimer's helmet attachment, that would be great, sir. Or were you talking about the other one? Either one will be fine, as long as they fit the helmet properly.

As promised here are my progress pics for my second attempt.

Neck ring, cheeks, ear arches, and jaw/chin, so far... I'm much happier with the way the neck ring joined the backs of the cheeks this time. My last one looked ok on one side, and looked like a kindergartener on crack did the other. Oh, well... Good lessons were learned, and here we go with the second round.

SANY0249.jpg


SANY0250.jpg


SANY0251.jpg


SANY0252.jpg


Thanks,
Dread
 

Attachments

  • SANY0251.jpg
    SANY0251.jpg
    102.7 KB · Views: 160
  • SANY0250.jpg
    SANY0250.jpg
    123.3 KB · Views: 159
  • SANY0249.jpg
    SANY0249.jpg
    126.9 KB · Views: 147
  • SANY0252.jpg
    SANY0252.jpg
    112.7 KB · Views: 155
what I do for files like that is go to 2DPatternWindow>Recalculate Parts Layout... Then when the popup shows up I select Manual (leaving the numbers as they are) and it places the files on the page correctly Make sure "Place parts avoiding page borders". If you're not scaling your helmet leave the numbers the same. just how i do it :)
 
Yeah, I had to break the main piece into four different parts to make it the same scale as the helmet it now... And who would have thought that a 10% size increase would make the thing so much easier to work on?
 
A little progress tonight. I'm not sure if I'm going to work the back of the helmet or the front first after this stage, but it looks as if things are much better this time around. No huge glue globs, I've abandoned the idea of the alternating flaps, and the cheeks are much straighter than they were on the first attempt...

Pics for your viewing pleasure...

SANY0254.jpg


SANY0258.jpg


SANY0259.jpg


Thanks,
Dread
 

Attachments

  • SANY0258.jpg
    SANY0258.jpg
    173.5 KB · Views: 156
  • SANY0254.jpg
    SANY0254.jpg
    41.9 KB · Views: 152
  • SANY0259.jpg
    SANY0259.jpg
    126 KB · Views: 156
Status
Not open for further replies.
Back
Top