ArcaneGhoul
New Member
ArcaneGhoul_ - First Build - MKVII Helmet and Full Suit
Mix of 3D Printing and foam (3D Printer: Bambu P1S, no AMS)
Files from: TitlewaveDesigns on Etsy
Color Scheme: Purple, black, gold
As a 3d print beginner, I've been working on a lot of smaller projects such as things for around my house, a prop sword, etc. As I got more comfortable with my printer and it's capabilities, I decided to work on a Larger project, and undertake a full suit of armor. After chatting with a buddy of mine, I settled on the MKVII armor, and set out on my journey. First and foremost as a disclaimer, I am a massive prop making noob, and while eagerness can make up for some knowledge, I'll still fall short in some areas, but I hope to make a great suit nonetheless.
Now, I know some folk really don't recommend starting with the helmet, but I wanted to go for it since I figure if it turns out poorly, at the very least a helmet looks cool sitting on a shelf. Considering that, I picked up the MKVII files from TitlewaveDesigns on Etsy (https://www.etsy.com/shop/TitlewaveDesigns) and began the scaling process. Following a few different tutorials, I got my helmet down to what I assumed, and later found to be perfect, was my size. I've followed a lot of Youtube guides, so I'll link everything below for any other newbies looking for good video resources.


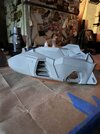
Now, with all my cuts made (with a few restarts to make better posts and holes), I fired up my printer, a Bambu P1S, and let it fly. Two days later, I had all my pieces ready to be glued together. After getting together some supplies, I began to glue until it was together, a whole helmet.
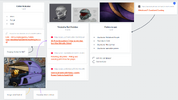
Now, some caveats for this glue job. I've glued a fair number of things, but nothing for cosplay before, so I made some errors. First and foremost, my prints didn't come out completely flush for each piece, leaving some gaps that needed to be filled and one panel drying too quickly and creating an uneven panel connection (Used so much Bondo to clean that up T-T). Foolishly, I figured covering the gaps with tape and filling them with glue would work. Don't do this. The tape, DUH, gets glued to the helmet, and it leaves some crappy residue. Just do your best to get the pieces together, and know that you'll fill it later. Or, do this but do it cleaner than I did so you don't get lumps of glue, etc. With the glue curing, I moved on to the most important, for me, step, color planning. With the input of a few friends, I put together a board of ideas, tutorials, etc. Using a poorly colored-on photo of a MKVII helmet from Branfuhr studios, I had my theme for the helmet (armor color design to come.)

With the glue cured, and some time spent on another project, the helmet was together, and it was time to start sanding. Using 220 sandpaper, I worked the glue mess down to something reasonable, while also clearing up any truly egregious print lines, thankfully of which there are few since my printer is pretty dialed in.

Next was Bondo-ing. For post processing this helmet, I'll be using a method I learned from OddViking on Youtube (tutorial linked below). After doing the first full strength Bondo coverage for the large gaps and letting it cure, you then use a mixture of Acetone and Bondo to create an almost paint, and cover the entire surface. That's my next step, as I am currently waiting for the full strength Bondo to cure. Once that mixture has been painted on, dried, and sanded, I'll move to covering the entire helmet with a healthy layer of Rustoleum Filler Primer, but that's a few days off as I can only work on this a few days a week.

I've got quite a long way to go, but I'll continue to update this thread as I progress, it's awesome to have a record of the process.
Here are the links to the Youtube tutorials I watched! I will update this list as I watch other tutorials as I work.
-Surface Finishing Tutorial (longer, but fully worth the watch, this guy is awesome):
-N8TEBB's full build guide (he's posted a thread on here as well! Just search his name):
-An alternate way to finish the surface of your prints:
-Duplicolor Spray Paint color test/review. (I'm using the purple for my set, so I wanted to see what they looked like):
-3D print metallic painting guide:
-How to scale your 3D printed helmets (I got my helmet to perfect scale on my FIRST TRY using this guide):
Mix of 3D Printing and foam (3D Printer: Bambu P1S, no AMS)
Files from: TitlewaveDesigns on Etsy
Color Scheme: Purple, black, gold
As a 3d print beginner, I've been working on a lot of smaller projects such as things for around my house, a prop sword, etc. As I got more comfortable with my printer and it's capabilities, I decided to work on a Larger project, and undertake a full suit of armor. After chatting with a buddy of mine, I settled on the MKVII armor, and set out on my journey. First and foremost as a disclaimer, I am a massive prop making noob, and while eagerness can make up for some knowledge, I'll still fall short in some areas, but I hope to make a great suit nonetheless.
Now, I know some folk really don't recommend starting with the helmet, but I wanted to go for it since I figure if it turns out poorly, at the very least a helmet looks cool sitting on a shelf. Considering that, I picked up the MKVII files from TitlewaveDesigns on Etsy (https://www.etsy.com/shop/TitlewaveDesigns) and began the scaling process. Following a few different tutorials, I got my helmet down to what I assumed, and later found to be perfect, was my size. I've followed a lot of Youtube guides, so I'll link everything below for any other newbies looking for good video resources.
Now, with all my cuts made (with a few restarts to make better posts and holes), I fired up my printer, a Bambu P1S, and let it fly. Two days later, I had all my pieces ready to be glued together. After getting together some supplies, I began to glue until it was together, a whole helmet.
Now, some caveats for this glue job. I've glued a fair number of things, but nothing for cosplay before, so I made some errors. First and foremost, my prints didn't come out completely flush for each piece, leaving some gaps that needed to be filled and one panel drying too quickly and creating an uneven panel connection (Used so much Bondo to clean that up T-T). Foolishly, I figured covering the gaps with tape and filling them with glue would work. Don't do this. The tape, DUH, gets glued to the helmet, and it leaves some crappy residue. Just do your best to get the pieces together, and know that you'll fill it later. Or, do this but do it cleaner than I did so you don't get lumps of glue, etc. With the glue curing, I moved on to the most important, for me, step, color planning. With the input of a few friends, I put together a board of ideas, tutorials, etc. Using a poorly colored-on photo of a MKVII helmet from Branfuhr studios, I had my theme for the helmet (armor color design to come.)
With the glue cured, and some time spent on another project, the helmet was together, and it was time to start sanding. Using 220 sandpaper, I worked the glue mess down to something reasonable, while also clearing up any truly egregious print lines, thankfully of which there are few since my printer is pretty dialed in.
Next was Bondo-ing. For post processing this helmet, I'll be using a method I learned from OddViking on Youtube (tutorial linked below). After doing the first full strength Bondo coverage for the large gaps and letting it cure, you then use a mixture of Acetone and Bondo to create an almost paint, and cover the entire surface. That's my next step, as I am currently waiting for the full strength Bondo to cure. Once that mixture has been painted on, dried, and sanded, I'll move to covering the entire helmet with a healthy layer of Rustoleum Filler Primer, but that's a few days off as I can only work on this a few days a week.
I've got quite a long way to go, but I'll continue to update this thread as I progress, it's awesome to have a record of the process.
Here are the links to the Youtube tutorials I watched! I will update this list as I watch other tutorials as I work.
-Surface Finishing Tutorial (longer, but fully worth the watch, this guy is awesome):