masterdude13579
New Member
So I started my first 3d printed armour build back in April it has been a long and great journey that i have been preparing for since my first introduction to halo back in 2001 with Halo CE on the original Xbox, since then I have played every halo game released read lots of the books and comics and watched all the shorts / movies even going so far with my love of Halo to get 2 halo tattoos. the entirety of my cosplay has been 3d printed on a Ender 3 v2 with many hundreds of hours spend printing.
Big shout out to Moe Sizzlac for the majority of the files I used were his that he had put on thingyverse. My suit comprises of Halo 3-Mark 6-Master Chief Armor, halo recon shoulders and halo reach EOD helmet.
Being completely new to the world of 3d printing I of course did a few test prints to calibrate the printer and get used to the software for slicing etc this included printing 2 halo reach M9 frag grenades.
Then the true great journey began starting with the EOD helmet i printed it in 13 pieces using the jayce1969 files on thingyverse. my first hurdles here were learning how to join the PLA sections together and how to get them to set with as minimal joint lines as possible, I achieved this using 2 part epoxy then after all the sections were together which took about 4 days I used wall filler to fill any joint gaps and then spent the next few hours sanding until smooth. Then came the painting I went for a dual colour combination of black and purple, I felt using purple for highlighting raised areas worked really well once dried I used a stencil to apply the UNSC letting and a UNSC logo and the numbering. To finish of the painting I used aluminium coloured paint to dry brush the edges to give a weathered effect. The hardest part in my opinion was figuring out how to do the visor unfortunately being UK based meant getting the usual visor material of etsy was out of the question cost wise as importing from the US was very costly so I had to get creative, this part took about a month of searching on amazon and ebay for a suitable visor looking at everything from motorcycle visors to sunglasses which were either to big or small or not malleable enough to fit, I was losing patience and on the verge of giving up completely and residing myself to having a visor less helmet when I discovered my salvation Ski goggles on amazon they were cheap (£8), polarized and malleable as the goggles were designed for impact resistance and lost of wear and to my amazement they fit almost perfectly into the shape required and so my helmet neared completion all that remained was to add padding, fans and a strap, in the end I settled for tactical helmet padding from an airsoft helmet also repurposed said helmets chin strap into my helmet as well and 2 40mm fans that link to a rechargeable 5000mAh battery pack via a usb.


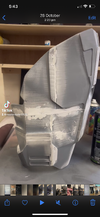
Then it was onto the main body of the build the Torso. Due to size constraints of my printer and the fact I have had to scale all the parts in the body up by 10% top fit my height and build the chest had to be split into 10 pieces and so did the back of the torso this meant a lot of joint seems needed to be hidden and this also then meant lots of filler and sanding which took about 2 weeks on and off. Once that was done it was again time to paint using the same dual colour combination of black and purple and highlighting the edges by dry brushing with aluminium coloured paint. Additional details I added after were the combat knife and the spartan emblem. To join the two half's together to make it wearable I have used 6 Velcro straps that sit in the shoulders and waist joints allowing me to put it on with assistance (unfortunately I am unable to put it on myself as the straps have to be tightened once its on me and I am unable to reach these areas while wearing it).


The arms consisting of the bicep and shoulder piece which is the halo 3 recon variant (also by Moe Sizzlac) and mk6 masterchief forearms. The biceps were hard to print but not impossible with it being printed in 3 sections and then attached to the base layer which is a long sleeved breathable training/running top by 2 velcro pieces and 1 velcro strap which wraps around the bicep to pull it into place. The fore arms had a wrist piece cut out that allowed it to be put on more easily, due to how light they are I got away with only needing 1 velcro strap on the inside of the gauntlet to hold in place then the removeable wrist piece is attached with 3 small sections of velcro. The gloves are standard black neoprene cycling gloves, with a small split in the index finger and thumb allowing you to use things like a phone touch screen while wearing them, with a single piece of hand armour glued on top all of these were painted with same black and purple dual colour and highlited with aluminium paint via dry brush technique.
.png")
.png")
.jpeg")
Now for the legs. The base for the legs was a pair of black work trousers and a elasticated belt. From this I add the thigh pieces which are held in place by velcro that loops over the belt, and the shin/knee piece which velcros on top of a pair of tactical knee pads that I put on first and with them being attached this way gives me a lot of range of motion in the knees. Then using another velcro loop that slides over the buckle of the belt I attach the waist and cod piece over the top to hide the button and zip in the front of the trousers and also most of the velro holding the thigh sections in place. Over the waist section i will also have my tactical pouches which are filled with stickers linked to my socials to hand out and some halo based goodies that I made using the ends of reels on my 3d printer these include spartan dog tags, halo kitty emblems and some other emblems as well to hand to people whose costumes I think deserve a reward for being so cool. Last butt not least pun intended is the butt plate which also attaches via 2 velcro belt loops.


The boots are some spare black steel toed work boots I had lying around and then noble 6 boot pattern armour (by Moe Sizzlac) these were painted only in black then highlighted with the aluminium dry brush technique, and attached with both glue and elastic straps to allow for adjustment and to keep it tight to the boot.

I will be wearing this to my first costumed comicon (first I will be wearing cosplay) at MCM Birmingham and I will be using the Hasbro Limited edition Nerf Needler as my accompanying weapon.


Thank you for reading and I will be happy to answer any questions if I can.
Big shout out to Moe Sizzlac for the majority of the files I used were his that he had put on thingyverse. My suit comprises of Halo 3-Mark 6-Master Chief Armor, halo recon shoulders and halo reach EOD helmet.
Being completely new to the world of 3d printing I of course did a few test prints to calibrate the printer and get used to the software for slicing etc this included printing 2 halo reach M9 frag grenades.
Then the true great journey began starting with the EOD helmet i printed it in 13 pieces using the jayce1969 files on thingyverse. my first hurdles here were learning how to join the PLA sections together and how to get them to set with as minimal joint lines as possible, I achieved this using 2 part epoxy then after all the sections were together which took about 4 days I used wall filler to fill any joint gaps and then spent the next few hours sanding until smooth. Then came the painting I went for a dual colour combination of black and purple, I felt using purple for highlighting raised areas worked really well once dried I used a stencil to apply the UNSC letting and a UNSC logo and the numbering. To finish of the painting I used aluminium coloured paint to dry brush the edges to give a weathered effect. The hardest part in my opinion was figuring out how to do the visor unfortunately being UK based meant getting the usual visor material of etsy was out of the question cost wise as importing from the US was very costly so I had to get creative, this part took about a month of searching on amazon and ebay for a suitable visor looking at everything from motorcycle visors to sunglasses which were either to big or small or not malleable enough to fit, I was losing patience and on the verge of giving up completely and residing myself to having a visor less helmet when I discovered my salvation Ski goggles on amazon they were cheap (£8), polarized and malleable as the goggles were designed for impact resistance and lost of wear and to my amazement they fit almost perfectly into the shape required and so my helmet neared completion all that remained was to add padding, fans and a strap, in the end I settled for tactical helmet padding from an airsoft helmet also repurposed said helmets chin strap into my helmet as well and 2 40mm fans that link to a rechargeable 5000mAh battery pack via a usb.
Then it was onto the main body of the build the Torso. Due to size constraints of my printer and the fact I have had to scale all the parts in the body up by 10% top fit my height and build the chest had to be split into 10 pieces and so did the back of the torso this meant a lot of joint seems needed to be hidden and this also then meant lots of filler and sanding which took about 2 weeks on and off. Once that was done it was again time to paint using the same dual colour combination of black and purple and highlighting the edges by dry brushing with aluminium coloured paint. Additional details I added after were the combat knife and the spartan emblem. To join the two half's together to make it wearable I have used 6 Velcro straps that sit in the shoulders and waist joints allowing me to put it on with assistance (unfortunately I am unable to put it on myself as the straps have to be tightened once its on me and I am unable to reach these areas while wearing it).
The arms consisting of the bicep and shoulder piece which is the halo 3 recon variant (also by Moe Sizzlac) and mk6 masterchief forearms. The biceps were hard to print but not impossible with it being printed in 3 sections and then attached to the base layer which is a long sleeved breathable training/running top by 2 velcro pieces and 1 velcro strap which wraps around the bicep to pull it into place. The fore arms had a wrist piece cut out that allowed it to be put on more easily, due to how light they are I got away with only needing 1 velcro strap on the inside of the gauntlet to hold in place then the removeable wrist piece is attached with 3 small sections of velcro. The gloves are standard black neoprene cycling gloves, with a small split in the index finger and thumb allowing you to use things like a phone touch screen while wearing them, with a single piece of hand armour glued on top all of these were painted with same black and purple dual colour and highlited with aluminium paint via dry brush technique.
Now for the legs. The base for the legs was a pair of black work trousers and a elasticated belt. From this I add the thigh pieces which are held in place by velcro that loops over the belt, and the shin/knee piece which velcros on top of a pair of tactical knee pads that I put on first and with them being attached this way gives me a lot of range of motion in the knees. Then using another velcro loop that slides over the buckle of the belt I attach the waist and cod piece over the top to hide the button and zip in the front of the trousers and also most of the velro holding the thigh sections in place. Over the waist section i will also have my tactical pouches which are filled with stickers linked to my socials to hand out and some halo based goodies that I made using the ends of reels on my 3d printer these include spartan dog tags, halo kitty emblems and some other emblems as well to hand to people whose costumes I think deserve a reward for being so cool. Last butt not least pun intended is the butt plate which also attaches via 2 velcro belt loops.
The boots are some spare black steel toed work boots I had lying around and then noble 6 boot pattern armour (by Moe Sizzlac) these were painted only in black then highlighted with the aluminium dry brush technique, and attached with both glue and elastic straps to allow for adjustment and to keep it tight to the boot.
I will be wearing this to my first costumed comicon (first I will be wearing cosplay) at MCM Birmingham and I will be using the Hasbro Limited edition Nerf Needler as my accompanying weapon.
Thank you for reading and I will be happy to answer any questions if I can.