My first project advice

Status
Not open for further replies.

OJ102

Member
Hi there,

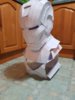
Just before Christmas I decided to take up pepakura crafting as a hobby and thought, in for a penny, in for a pound, so chose to start off with a helmet, as everywhere says they can be the hardest parts.

I chose 250gsm card, I tried 150 as that was the max my printer could take but my first helmet didn't feel study enough. So to get past the printing, and don't laugh, I'm printing it on paper and then gluing it on the thick card.

However it's working well, ive build a helmet and neck seal. I'm now working on the back, chest support and chest plate.

Now here is my first quandary. How do the conponents usually stick together, for example the helmet and detachable face mask. Currently I've got them pinned with magnets loose. In was thinking of embedding small high strength magnets on adjoining faces So they would lock together but could be pulled off. The magnets would eventually be embedded in the fiberglass when I get to that stage. This would also apply to other rigid sections.

The other query is joints. How is that normally done? I'm very new to this so not sure what approaches are feasible if you want to be able to move!

Cheers for any thoughts
 
Welcome to the 405th OJ102, right now my thoughts are based on a few different costumes and general best practices since I'm not exactly sure which armour variant you're working on at this point in time. Photos of your projects in posts always help others to give tips and pointers!

Now here is my first quandary. How do the conponents usually stick together, for example the helmet and detachable face mask. Currently I've got them pinned with magnets loose. In was thinking of embedding small high strength magnets on adjoining faces So they would lock together but could be pulled off. The magnets would eventually be embedded in the fiberglass when I get to that stage. This would also apply to other rigid sections.

Magnets are a very good choice for things like a removable visor that won't be jostled. For larger sections magnets can work well but having a bit of nylon strapping and parachute clips is a quick and easy way to snap pieces together and keep everything adjustable.

The other query is joints. How is that normally done? I'm very new to this so not sure what approaches are feasible if you want to be able to move!

This one is tricky and depends on the joint. If it's something like a fully enclosed knee you can create a hinge between the shin and thigh pieces and then use a flexible material at the back of the knee, some people use dryer vent tubing, I've seen plungers dismantled to use for flexible parts as well. With most ODST, Marine and Spartan armour variants the elbows and knees are luckily not fully enclosed and the joint is free to move with you naturally and all the detailing is done on an under suit.

If you share some photos of your armour so far we might be able to give you a bit more helpful information specific to the variant you're working on. Good luck with your build!
 
Hi OJ102,

Welcome to the 405th and as Turbo said you have many different directions your could go and it really depends on your build. I built spartan armor out of pepakura using 250mil card stock and fiberglassed over it. Thankfully all joint movement ares are open with the MK VI Mjolnir armor. In mu build I just used nylon strapping to attach the thighs to a hidden belt under the cod piece and it works well with a bucket system.

I use different materials under the armor to make it look more realistic but to start out with you might try compression type clothing just for dry fits and positioning.

Good luck with your build and look around on here because there is tons of information here to help you. If need more help or clarification just ask, that's what we're here for.

Keep building and show off your stuff with some awesome pics when you get ready, I'd like to see them!!
 
Hey OJ102, welcome to the 405th. Wow you guys, 250 gsm/mil is pretty thick paper. For those of us inside the US, that translates to 170 lb card stock. Again that is thick paper. I can barely get my 110 lb paper through my printer......You really don't need for it to be so thick to stay ridged, as it's only until you throw on the first few layers of resin and then the fiberglass. 110 lb.....or 170gms for you, should work fine.
Looking forward to seeing your progress.
 
Hey,

Thanks for all the replies! I wasn't sure if I'd even get an answer:D

I'm actually doing an iron man armour, as it was what the pack I bought contained, I was having issues finding free ones... and I was highly sceptical of it it would work so didn't want to be too front heavy on cash.

I'm building the Iron Man mark 4 armour. I'm 73 inches tall so I scaled it to fit 78 inch height so that I could get my head in the thing! Im assuming your meant to use padding inside it else it would be very uncomfee and sweaty!

I would also like the opportunity to outfit with electronics when done, so wanted to ensure their was room.

My first helmet was made using paper, it collapsed under it's own weight but taught me how to build, second one was on 120gsm card, was better but warped somehow. 3rd attempt was the 250gsm + paper layer and it's working very well, it's flexible enough that magnets can pull the edges to a tight seal but rigid enough that once magnetically locked it's solid to carry round.

As with any project every bit I do is giving me ideas for improvements. I've just finished cutting out the back components, about 150 pieces.... I'm getting some 10mm x 10mm x 4mm neodymium magnets that will sit flush inside the armour behind the edges, for anyone not familiar with them one magnet can about lift 2.2kg of weight and if released and allowed to freely hit another, have a tendency to explode and shatter! It's happen a few times to me...

I'm in the UK and can't seem to easily get hold of the fiberglass resins that are recommended, so not sure how strong the resin and fibre will be. I'm guessing a minimum of 2 layers will be needed, something called BONDO is recommended too, I think it was, can't seem to get that outside of US tho..

I'm gonna do the whole suit in card tho first then deal with strengthening, starting with a cube in case I balls it up! I've uploaded what I have atm, I'm proud of it! Tho it's not exactly flawless haha
 

Attachments

  • 20190107_180452.jpg
    20190107_180452.jpg
    1.2 MB · Views: 173
Hey,

So I don't know how to get most of the US 3M products overseas but if you go to a place that specializes in auto repair work like body repair they might be able to help you by selling you the products or even give you the website of a supplier. As far as the resin goes, yes at least 2 layers and the BONDO well that's a type of automotive body filler used to make rough surfaces smooth again. I hope you like sanding though.:)
I like what you have made so far!! It looks really good, so keep up the good work and check around your town for someone with that automotive knowledge. These products are used after just about every fender-bender so I hope that helps you!!

Good luck and never stop building!!
 
Well.....Bondo and Resin are 2 separate things. Bondo, is as Badkitty said, an automotive body filler while Resin is the hardening element for fiberglass. Both types should be available in the UK at any major hardware store. And if you can't find it....Amazon it!!!
 
Hey,

Thanks for all the replies! I wasn't sure if I'd even get an answer:D

I'm actually doing an iron man armour, as it was what the pack I bought contained, I was having issues finding free ones... and I was highly sceptical of it it would work so didn't want to be too front heavy on cash.

I'm building the Iron Man mark 4 armour. I'm 73 inches tall so I scaled it to fit 78 inch height so that I could get my head in the thing! Im assuming your meant to use padding inside it else it would be very uncomfee and sweaty!

I would also like the opportunity to outfit with electronics when done, so wanted to ensure their was room.

My first helmet was made using paper, it collapsed under it's own weight but taught me how to build, second one was on 120gsm card, was better but warped somehow. 3rd attempt was the 250gsm + paper layer and it's working very well, it's flexible enough that magnets can pull the edges to a tight seal but rigid enough that once magnetically locked it's solid to carry round.

As with any project every bit I do is giving me ideas for improvements. I've just finished cutting out the back components, about 150 pieces.... I'm getting some 10mm x 10mm x 4mm neodymium magnets that will sit flush inside the armour behind the edges, for anyone not familiar with them one magnet can about lift 2.2kg of weight and if released and allowed to freely hit another, have a tendency to explode and shatter! It's happen a few times to me...

I'm in the UK and can't seem to easily get hold of the fiberglass resins that are recommended, so not sure how strong the resin and fibre will be. I'm guessing a minimum of 2 layers will be needed, something called BONDO is recommended too, I think it was, can't seem to get that outside of US tho..

I'm gonna do the whole suit in card tho first then deal with strengthening, starting with a cube in case I balls it up! I've uploaded what I have atm, I'm proud of it! Tho it's not exactly flawless haha

Bondo is just a name brand of polyester based filler. Check out ISOPON P38 for a similar product that's available overseas.
 
Both types should be available in the UK at any major hardware store. And if you can't find it....Amazon it!!!
It was amazon I was looking on for supplies, bondo is the recommended body filler but the postage to get it here is 3 times the cost of the product, and customs have a nasty habit of stopping things arriving from the states and slapping on another tax.. it's so annoying when you find something on Amazon and it states it's not available in the UK. To be fair, suppliers from London think Scotland is off shore and add tax to shipping too..it's both sad and funny :D
 
New query:
As I'm folding the multitude of components into shape I'm realising that their will be a lot of negative space within the shell of the items, especially where exterior details are substantial.

has anyone experimented with expandable foam or silicon filler to fill in the cavities prior to using fiberglass, so that the interior of the items is smooth? I was thinking expanding foam so that I can use a scalple to cut off the excess then get a smooth finish. It would also mean I could use a dremmle to cut conduits in it for any electronics so that they are easily secured.

Any thoughts before I run tests?
Cheers
 
You could try furniture foam, cut in to long strips about 2 inches wide. That will hold the armor in place, allow air to filter through, and access to inner area to allow for electronic installs. You don't want to use the expanding foam in close tight areas.....you might damage the suit. People have had pieces bulge outward when the foam began to solidify even when using the least expanding flavor. For smoothing out the interior, you could use some RONDO. Rondo is a mixture of Bondo and Resin. A 1 to 1 ratio mixed, makes a hardening substance that is smooth. Many people use this method on their suits.....I have. Foam suit but a Fiberglassed helmet w/ Rondo interior.
 
I've completed the back and just had a horrifying thought while checking measurements... I think it's too big...

The files I have are based on so someone who is 68 inches tall, I read that your meant to add 4-6 inches on to your height to allow fitting inside.

I'm 72 inches tall, so I set the scale for someone 78 inches, however my head rattles round in the helmet like a bowling ball, ive got about 8 inches from my face to the faceplate, now I want to on for some future electronics, not a wide screen TV!

My helmet is set into 3 components, The Helmet, The faceplate and The jaw. I assumed that I should be able to get the helmet on when it's assembled, but now I'm thinking it should be put on in the 3 parts, so that it won't lift off without taking the jaw off.

Alass this means I have to start from scratch so wondering what people think. The Helmet takes the longest to do so I don't want to do it over and over. Is there a good part to test the scale with?

I'm enjoying making the parts, but I'd also like to have more then a pile of helmets, my house is looking like a trophy hall for someone hunting ironman..
 
I just had to do mine. I know it is the worst feeling in the world! I think adding 8 inches to a helmet is way WAY too much. You may have mistaken mm for in. My pepakura is set to mm as I havent bothered to change it but, look in a mirror and use a ruler next to your head and measure from chin to the top of your head in a straight line. Then add an inch for wiggle room. Somewhere, if you look it up, there is a math equation that if you input your height it perfectly tells you the size to scale your helmet, you may need to dig around Google, but one part was a little confusing, but if you find it, I can help you through it for it worked wonders for me! I'm so sorry that your scaling went wrong and hope you get past this next one perfectly and soon! Good luck and would love to see some progress pictures!
 
I'm building a bit of upper leg just now from thin card to see how it fits, tho I only decreased it by a little I don't think I can fit in it lol good job I like cutting out
 
I'm building a bit of upper leg just now from thin card to see how it fits, tho I only decreased it by a little I don't think I can fit in it lol good job I like cutting out
I wish I had your mental state. I get a peice of paper and I break down crying because of 'nam flashbacks to first grade.
That's why I'm trying to save up for a cricut on sale. It's like a printer, but it also cuts stuff!
 
Well, the leg piece is done, I was right, it's too small, its about 5cm too narrow. The thing is tho.. if I scale that body part up, the helmet is massive and the suit will looks like one of those hood ornament bobble heads!

I set the scale for someone who is 74inches tall...Yet the leg was 15cm wide..
 
Oh my god... at some point between writing my last post and this one I had a reality check.. Bicep is your upper arm NOT Leg haha.

I'm glad I wasn't happy with the last scale as else I would have been making a HULK suit...

I'm still not sure if it's the right size or not as honestly, ive never worn armour, but I'll post an image of it and see what people think. It's a fairly snug fit but I could easily hit the gym for a few years before the bicep space become tight!

I'm currently below my baseline weight, I had surgery a few months back and due to adheasions in my abdomin, I'm not eating much more then my 5 year old.. so I'd like to make sure that it will also go on once I'm fixed haha.

Regardless, the image below is of it on, obviously it's the left bicep, as its on the left arm. Thoughts on of its looking close! Any movements i should ensure it can make?

Cheers
 

Attachments

  • 20190111_063650.jpg
    20190111_063650.jpg
    1.3 MB · Views: 166
Update.

I've been working my way down the suit. Currently got:

Helmet
Chest plate
Back
Left bicep
Left forearm
Left hand (too small)
Right thigh (too big)

I'm not sure what's the issue with fitting, I'm 72 inches tall, I scaled it to 74 to allow for me being able to get inside it, some bits fit well, others feel very small and the thigh could fit me if I put on 30 pounds! The side fits fine, but I've got about 6 inches of space front and back inside the piece. I'm not totally sure tho as my leg bends back 90 degrees then hits the armour. Does this sound about right?

It doesn't explain the mini hands tho! I'll have to remake them 10% bigger and test, thankfully they are fast.

I'm planning to make my way down the right leg to check out length scaling when done, but it's a lot of work to find out it's making a weird body shape.

Can anyone comment on my scaling? Like I said, I'm 72 inches tall, weighing in about 84kg. So no portly areas, but my ironman looks like he ate a cow. The suit is scaled for 74 inches, this was to allow a small amount of foam padding and wiring.

Any advice?
Cheers
 
Status
Not open for further replies.
Back
Top