Bunty Scrungus
New Member
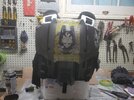
Part 2 of the build mostly on the torso and arms.(Welcome to the shop)

 Starting out strong with my really cute Stencils. (Pink was on sale and I'm cheap) I got a used circuit sticker maker for this.

Made 2 layers for this first white then black, this is the white layer.

There's a few missed steps here and that because I was in a panic, The stencil was taking off a lot of paint with it when I removed it (probably didn't wait long enough for the paint to dry) I got it under control near the bottom but the damage was done so I took more off and called it battle damage

eh I can live with it.

More parts being prepped for paint ( so much sanding)

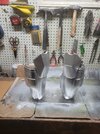
First coat of primer on the butt pack and belt parts.

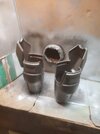
At this point all the parts had a silver undercoat for scratching into later

I figured that the logo as much as I loved it needed to be weathered up a bit to match the rest of the armor ( I went pretty easy on it though)

No pics of the stencil but the UNSC Logo was all the same process (with less panic because I let the paint dry more)

The shoulder ( I honestly think they are as iconic to the odsts as the helmets)

More silver undercoats for parts

I made up some clips that look close to what's in game ( made em a bit thick)

All the parts needed to assemble the belt slightly weathered.

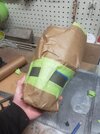
and bam instant crotch protection

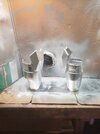
Test fitting the gauntlet seems like a good fit ( This was stuck on there for a bit, almost broke my hand trying to get it back off)

More tape off for rubber parts
with

Without the straps the butt pack looks very suspicious

More yellow and more weathering

Added the straps to the pack ( I still see a face)

Attached the pack to the spine protector

I had this hanging up for a bit for inspiration, its nice to see it all coming together.
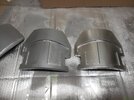
 Bicep plate

Lots more strapping and riveting on the elastic straps (The process is Riveting )
)

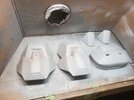
Quick run down of how I prep my 3d parts From right to left Start with a low grit like 80 middle grit was 120 then you end up at 240 before primer.

The shoulder plates are attached with buckles
 Another test fit

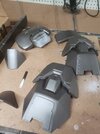
Big ol pile of finished parts

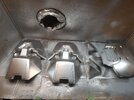
The difference between a prepped part and a fresh of the printer part.
 Got a lot of faith in that coat hanger

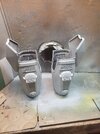
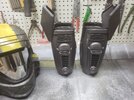
Weathered and clean gauntlet

More yellow Stripes

Shoulders before and after a black wash weathering

Biger Pile of parts

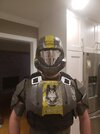
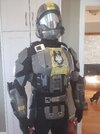
First test fit of everything Torso upper body parts (I was very impressed with the mobility in this)

Made 2 layers for this first white then black, this is the white layer.
There's a few missed steps here and that because I was in a panic, The stencil was taking off a lot of paint with it when I removed it (probably didn't wait long enough for the paint to dry) I got it under control near the bottom but the damage was done so I took more off and called it battle damage
eh I can live with it.
More parts being prepped for paint ( so much sanding)
First coat of primer on the butt pack and belt parts.
At this point all the parts had a silver undercoat for scratching into later
I figured that the logo as much as I loved it needed to be weathered up a bit to match the rest of the armor ( I went pretty easy on it though)
No pics of the stencil but the UNSC Logo was all the same process (with less panic because I let the paint dry more)
The shoulder ( I honestly think they are as iconic to the odsts as the helmets)
More silver undercoats for parts
I made up some clips that look close to what's in game ( made em a bit thick)
All the parts needed to assemble the belt slightly weathered.
and bam instant crotch protection
Test fitting the gauntlet seems like a good fit ( This was stuck on there for a bit, almost broke my hand trying to get it back off)
More tape off for rubber parts
with
Without the straps the butt pack looks very suspicious
More yellow and more weathering
Added the straps to the pack ( I still see a face)
Attached the pack to the spine protector
I had this hanging up for a bit for inspiration, its nice to see it all coming together.
Lots more strapping and riveting on the elastic straps (The process is Riveting
) Quick run down of how I prep my 3d parts From right to left Start with a low grit like 80 middle grit was 120 then you end up at 240 before primer.
The shoulder plates are attached with buckles
Big ol pile of finished parts
The difference between a prepped part and a fresh of the printer part.
Weathered and clean gauntlet
More yellow Stripes
Shoulders before and after a black wash weathering
Biger Pile of parts
First test fit of everything Torso upper body parts (I was very impressed with the mobility in this)
Attachments
-
 20220103_130439.jpg1.7 MB · Views: 204
 -
 20220107_112856.jpg2.4 MB · Views: 178
 -
 20220109_125811.jpg1.8 MB · Views: 166
 -
 20220114_111734.jpg2.2 MB · Views: 159
 -
 20220115_105018.jpg778.1 KB · Views: 161
 -
 20220117_170234.jpg486.7 KB · Views: 162
 -
 20220118_165425.jpg1,020.7 KB · Views: 167
 -
 20220119_115854.jpg806.1 KB · Views: 149
 -
 20220119_125124.jpg902.8 KB · Views: 150
 -
 20220120_100717.jpg430.1 KB · Views: 157
 -
 20220120_153508.jpg2.1 MB · Views: 176
 -
 20220121_103129.jpg735.4 KB · Views: 169
 -
 20220121_123310.jpg584.6 KB · Views: 203
 -
 20220121_123325.jpg563.5 KB · Views: 173