SavageCaliber

New Member
Hey guys I just started working on a new set of Mjolnir to wear to the con this year because I didn’t really like how my last attempt came out. This time I opted to go the Mark IV route using galacticarmorys file set and I thought I make a thread to document the process and the progress along the way. So far, I have printed half of the cod piece, the torso, and am in the process of printing the shoulders and arms as we speak. I the only piece I have started to assemble so far is the torso which I plan to use some 2” nylon straps with some nice metal quick connect latches attached to with Chicago screws across to join the front to the back via the right and left strap pieces an idea which I borrowed from BHE Photos per the pointers he shared. I am planning to work on attaching the nylon straps tomorrow and am waiting to join the back plate to the thrusters until after the screws for the straps have been installed. Pictured is the progress on the torso so far as well as my first attempt at Mjolnir Mark VII which I finished in 2022 and wore to meet Steve and Jen that same year.
I will continue to update and add to this thread with more pictures and how I end up assembling/rigging everything as I go!
IMG_2273.jpeg
IMG_2274.jpeg
IMG_2276.jpeg
IMG_6900.jpeg
IMG_6897.jpeg
 
Not a whole lot more progress to report yet but I have printed the codpiece and belt, It ended being too small and I decided I didn’t like how the butt plate was attached so I decided to print another of the cod piece from my last Mjolnir set the Mark VII instead since I knew I sized that one correctly already and it fit together a lot nicer. I have also printed the forearms and left thigh for testing the fit, finished assembling and painting the Torso portion and have begun painting the Codpiece. Next up will be finishing painting the cod piece, putting one last coating of smooth on epoxy over the torso to further reinforce it and protect the paint, and to print the right thigh, assemble it and then move onto figuring out how to go about the straps for the forearms while the shins are printing.
 

Attachments

  • IMG_2293.jpeg
    IMG_2293.jpeg
    783 KB · Views: 73
  • IMG_2538.jpeg
    IMG_2538.jpeg
    2.4 MB · Views: 78
  • IMG_2539.jpeg
    IMG_2539.jpeg
    1 MB · Views: 71
  • IMG_2624.jpeg
    IMG_2624.jpeg
    2.9 MB · Views: 67
  • IMG_2625.jpeg
    IMG_2625.jpeg
    2.9 MB · Views: 67
  • IMG_2636.jpeg
    IMG_2636.jpeg
    3.4 MB · Views: 71
  • IMG_2638.jpeg
    IMG_2638.jpeg
    2.9 MB · Views: 77
Automotive wheel paint is pretty smart ngl. How glossy did that turn out?
Not super glossy after applying the smooth on, in that last photo you can see the difference, I had only applied the smooth on to the shoulder straps, thrusters, a bit around the top of the right pectoral and around the neck by the 4 red squares so everything else hadn’t gotten the smooth on yet. It honestly would probably look a lot better without the second smooth on coat but lacquer wouldn’t be enough to protect against paint getting chipped during a crowded convention with everyone pushing past people, etc.
 
Hey guys here’s an update on the progress so far.
Progress has been slow with finals coming up but I finished the paint job on my helmet and finished painting the belt/codpiece, thighs, shins, shoes, forearms and hand plates earlier today. As soon as they finish drying I just need to finish installing the straps to rig to the H harness and attach the shoes to the boots. I also picked up wireless voice amplifier that I’m going to install in the helmet and attach to the inside of the torso so that I can be heard with the helmet on.
 

Attachments

  • IMG_0510.jpeg
    IMG_0510.jpeg
    731 KB · Views: 58
  • IMG_0516.jpeg
    IMG_0516.jpeg
    1.2 MB · Views: 55
Made some progress on rigging everything with the harness, just have to rig the right thigh, right shin and then attach and anchor the abdominal plate to the chest and the codpiece. I also installed a voice amplifier with a wireless mic inside the helmet along with a fan. I am still not sure how the upper arms are supposed to get worn so haven’t made any progress on those yet. The galactic armory files had pieces for the straps to feed through specifically for the upper arms but no hint as to how they all fit together . I also have to either try and force the elastic I installed in the forearms to stretch enough that it holds or figure out how I’m going to replace the strap with it being held in by 5 minute epoxy and foam making it difficult to be able to just cut it and replace it because I accidentally sized the elastic strap closest to the elbow on the left forearm to small and it cuts off blood circulation. My idea for that so far is to get an 11” pvc pipe which is a little larger than the upper portion of my forearm and slide that into the elastic and leave it a while to see if it’ll deform the elastic enough to not cut off circulation when worn.
 

Attachments

  • IMG_0756.jpeg
    IMG_0756.jpeg
    1.6 MB · Views: 55
  • IMG_0731.jpeg
    IMG_0731.jpeg
    1.4 MB · Views: 58
  • IMG_0735.jpeg
    IMG_0735.jpeg
    1.5 MB · Views: 56
That's looking super sweet so far! (big fan of the red and black). As far as the shoulder/bicep armor, You should be able to look at reference images and figure out about how its supposed to go together, but I haven't used galactic armory files before so idk if I can be much help. For the forearm armor, are you using the elastic bands as a loop around your arm to keep it from moving? In my experience that generally doesn't work all that well. It definitely helps keep it in place but you'll still have to readjust it a lot. If you use a mechanical connection such as a strap that goes to the bicep armor or magnets on the under suit it usually stays in place a bit better. Hope that helps a bit and I cant wait to see this build come to life!
 
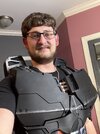
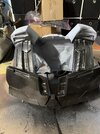
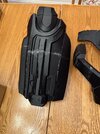
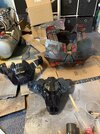
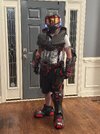
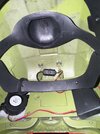
Hey everyone I’m back with the final progress update for my Mark IV build, The first torso I made was definitely too bulky and restrictive being fully welded together and only being able to be put on over head like a shirt. So, I ended up fully reprinting the torso and connecting the front and back via straps with quick release buckles over each shoulder with the collar pieces welded only to the back half below the thrusters to hide said straps and buckles. I got the idea from how BHE Photos did his. I managed to finish the whole thing in time for GalaxyCon Raleigh last weekend and even made a cryst knife (from infinite) and OG M6D magnum to mount to the thighs with a strip of Velcro and made a few vinyl decals to add to the armor the night before when the idea came to me. The decals I made was Emile’s skull which I put on the right shoulder, a small legendary icon which I put on the left shoulder, a small Demon Multiplayer medal which I put on the side of the right thruster, a small tebag which I put on the cod piece (no one noticed it though :( ) and lastly the Swords of Sanghelios emblem but I had made it too big to fit anywhere but across the chest and didn’t want to put anything especially that big on the chest and was too tired at that point to remake it so I ended up not using it. I had loaded the armor into the car right after I put the decals on and unfortunately the NC heat even in the morning was enough to cause the hot glue that I used to hold some straps together to soften up and let go, go figure the few straps I forgot to redo with fabric glue when I had did the rest ‍:rolleyes:
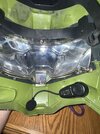
. So, the butt plate of the belt came undone from its hook on one side while I was walking to Steve and Jen’s tables to get a picture with them and the Velcro wasn’t enough to hold the magnum and cryst knife to the thighs with the crowd all pushing past and bumping against them so I ended up having to take those off too, but all things considered it held up pretty well and should be pretty quick and easy to fix and future proof, minus the crowd knocking the cryst knife and magnum off, that is. I will have to come up with a better solution to the Velcro that would be more secure while working in the same way to allow hot swapping of accessories. The heat was also unbearable in the armor even with a fan in the helmet so I ended up having to take it off almost immediately after I got the picture with Steve but I at least got the picture with him in the armor like I wanted and will probably do something along the lines of the RAKSHASA class Mjolnir for my next Spartan build and maybe make an ODST as well just in case as a fall back cosplay since both would be much lighter weight and should be easier to survive in without being cooked alive.
I met a few other Spartans in Steve’s line who also had their armor on but unfortunately didn’t get pictures with any other Spartans this year, but I did get one with a fellow halo fan who stopped me for a photo and my fellow Spartans did give me a few ideas on ways I could perhaps hybridize a few pieces from the Mark IV with the RAKSHASA though. I also settled on having them both sign my near mint Halo 2, 3, 4 and 5 limited editions, my near mint Halo CE and Steve sign my 2022 SDCC exclusive jazware master Chief. I would have liked to have them sign the rest of my joyride, jazware figures and spec ops chief Nendroid but I couldn’t swing it this year at $80 each per an autograph . I also got to give Steve and Jen both the 2 Cortana statues that I made for each of them, Steve displayed the halo infinite Cortana statue I made for him back in 2022 (last time I met them both) on his shelf that’s behind him in some of his interviews for his docuseries so hopefully they both like these ones just as much (I will attach a picture of each of those to this post as well). If you haven’t gotten the chance to meet them yet and ever do get the chance they are both awesome and super friendly people, I attended GalaxyCon as a VIP again this year and both of them were at the VIP party, Steve recognized me from earlier in the day at his table and walked right over shook my hand and said hi and Jen not only said hi but also gave me one of her drink tickets. So, I guess I can now say Cortana/Dr. Halsey has bought me a drink now and as If all that wasn’t awesome enough I had one of my 2 best friends with me at the VIP party and was able to introduce her to both of them as well, which after meeting them she now has started to show an interest in Halo too!

Lastly, before I attach the photos I want to give another huge thank you again to BHE Photos because without him going above and beyond showing me how he rigged up his straps for each piece on his Mark IV build, I would still be stumped trying to make it wearable and it certainly wouldn’t have looked nearly as good as it does using things like the Chicago screws to anchor the straps on the belt and bottom side straps of the torso because I would of never thought of that!
IMG_4313.jpeg

IMG_4316.jpeg

IMG_4325.jpeg

IMG_3188.jpeg

IMG_3189.jpeg

IMG_3186.jpeg

IMG_4397.jpeg

IMG_4395.jpeg

IMG_4396.jpeg

IMG_4399.jpeg

IMG_4350.jpeg

IMG_1106.jpeg

IMG_0313.jpeg
 
That's looking super sweet so far! (big fan of the red and black). As far as the shoulder/bicep armor, You should be able to look at reference images and figure out about how its supposed to go together, but I haven't used galactic armory files before so idk if I can be much help. For the forearm armor, are you using the elastic bands as a loop around your arm to keep it from moving? In my experience that generally doesn't work all that well. It definitely helps keep it in place but you'll still have to readjust it a lot. If you use a mechanical connection such as a strap that goes to the bicep armor or magnets on the under suit it usually stays in place a bit better. Hope that helps a bit and I cant wait to see this build come to life!
Someone in the galacticarmory discord was able to open the models in blender and somehow the files had their orientation in blender within in the model data or something and so it showed up how it was positioned and I was able to use the screenshot they sent to figure out the biceps, they would of never looked right on a normal person that way though so I ended up just scraping the pieces that were intended to have the straps threaded through and instead connected the front and back halves with 2” elastic strap like a clamshell to stretch over my bicep and they stayed in place decently enough once I glued in a added little square of Eva foam to one half that would rest snugly against my arm to force the elastic to stretch a little more thereby keeping it snug without being to tight on my arm. In the end I ended up not even wearing em though because my arms aren’t long enough to wear both the biceps and the shoulders without the shoulders overlapping the bicep plates or the biceps being scooted down my arm closer to the back of the forearm section which wouldn’t look right either. This was how it ended up looking.
IMG_4313.jpeg
 

Your message may be considered spam for the following reasons:

If you wish to reply despite these issues, check the box below before replying.
Be aware that malicious compliance may result in more severe penalties.
Back
Top