Newbie Armor Build P2.

Status
Not open for further replies.

TH3TA

Member
This is the second part of my newbie armor build.
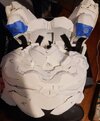
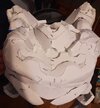
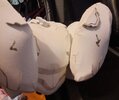
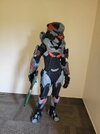
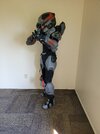
At long last, I've been able to take a break from the cycle of full-time college and full-time 40-hour work weeks. Thanks to getting covid I got a week off. As soon as I started feeling better I finally completed my chest armor. The remaining piece of armor needed to complete after this are the boots, shoulders, and then I have to build one more shin piece since the last one was taken and destroyed by a little piece of **** known as my brother's friend smh. I know nobody really cares but updating and keeping track of progress makes me feel like I'm accomplishing something and keeps me motivated. :)
 

Attachments

  • 20220630_133441.jpg
    20220630_133441.jpg
    1.5 MB · Views: 146
  • 20220630_133402.jpg
    20220630_133402.jpg
    1.4 MB · Views: 146
  • 20220630_133423.jpg
    20220630_133423.jpg
    1.4 MB · Views: 148
You're really good at nailing that overall geometry! May I ask though, how often do you sharpen/replace your knife? A sharp blade makes all the difference when cutting foam, and can give you some really crisp edges that will reduce the need for clean up alter.
 
You're really good at nailing that overall geometry! May I ask though, how often do you sharpen/replace your knife? A sharp blade makes all the difference when cutting foam, and can give you some really crisp edges that will reduce the need for clean up alter.
First of all thanks :0. For cutting pieces, especially large ones I use a scroll saw which is why they look a little rough on the open edges. I will later go back and dremel all of that uneven cut off the pieces. When I do smaller pieces I sharpen my knife every around 15 or so cuts. One day when I have more time I'd love to make an armor set just using blades because they do leave a better crisp result.
 
Ah, I know exactly what you mean. I started using a scroll saw for cutting foam but found that I couldn't control it as well as I wanted without some sort of guide, especially for straight lines. So I switched back to hand cutting foam and using the scroll saw for cutting stacked foam, or for other materials. I think a higher TPI blade and faster speed will help produce cleaner cuts (though it has been a while since I've used it on foam).
 
Ah, I know exactly what you mean. I started using a scroll saw for cutting foam but found that I couldn't control it as well as I wanted without some sort of guide, especially for straight lines. So I switched back to hand cutting foam and using the scroll saw for cutting stacked foam, or for other materials. I think a higher TPI blade and faster speed will help produce cleaner cuts (though it has been a while since I've used it on foam).
Usually, I keep the speed at medium-high. If it goes too high it causes too much shaking and then the cut and control are awful. I definitely do like the clean and crisp cuts of hand cutting so I'll definitely go back to it at some point. At this point though, with the time I'm working with, the scroll saw gets things done a lot quicker for me.
 
Took a break from some armor pieces as I'm going away on vacation next week so I haven't had much time. Instead I worked on my halo assault rifle. Finally finished sanding it over the last few days and working on the paint job. Just finished up the weathering and wear.
I do want to seal this piece. Any suggestions?

20220722_155000.jpg


20220722_155021.jpg
20220722_155030.jpg

20220722_155051.jpg
 
ok so heres a little quirky detail about fusing prints, usually you sand and paint afterwards. If you try to fuse it now, it'll disrupt the paint-job. you can always do it again, but for the seams i'd try using a soldering iron or some sort of bonding agent. Like bondo putty.
Spectacular prints by the way. You got this!
Ah yeah thanks. This is my first 3D printed piece that I've worked with that I've had to assemble so I was kind of going in blind. Thanks for the tips I appreciate it.
 
Forgot to post these. But this was a temporary try on of the pieces. I don't have on the stomach detail, the feet armor, or the butt plate. Additionally I did paint some of the black sections red. I still need to build the harness and then get to work weathering everything. So not quite finished but almost there, I definitely want to be ready for a con coming up late September :)

Also yes I know the thighs are uneven they are not attached to anything and I couldn't do much to keep them up without the harness made lol

20220818_155139.jpg
 
ok so heres a little quirky detail about fusing prints, usually you sand and paint afterwards. If you try to fuse it now, it'll disrupt the paint-job. you can always do it again, but for the seams i'd try using a soldering iron or some sort of bonding agent. Like bondo putty.
Spectacular prints by the way. You got this!
Bondo is key!!! A few layers too. I find that bondo with a primer that is sandable works best. Then a wet layer of bondo with low grit sand paper.
 
Finished weathering all the pieces for now at least and I'll work on the harness starting next weekend. Hopefully all will be ready for the con I want to go to on September 24th. After that I can ease up on the speed of everything and go back and perfect things. Additionally, I'm hoping to work on an under suit at some point.
 
Finished up the harness, for the most part, yesterday and will be doing the final touches this week including the boots. Hoping to have a full suit-up picture by next weekend before Flower City Con. :)
 
Status
Not open for further replies.
Back
Top