So many concept builds going on right now! Your stuff looks great so far, keep it up!
You are using an out of date browser. It may not display this or other websites correctly.
You should upgrade or use an alternative browser.
You should upgrade or use an alternative browser.
Noble 6 Concept Armor Build
- Thread starter ArmoredAmir
- Start date
- Status
- Not open for further replies.
Where did you get the ability module?
That foamwork looks nice and clean. I'm excited on seeing the progress on your build!
Oh Yeah! Love those concept shins
looking great so far, Love how you are nailing the concept pieces. keep up the great work.
So many concept builds going on right now! Your stuff looks great so far, keep it up!
Thank you guys for the love
. Where did you get the ability module?
I got the ability module from Johnson Arms Props he does an amazing job with anything he works on. If you check out his Instagram you won't be disappointed in his work.
Doesn't Johnson Arms just buy people's resin casts and paint them? He does nice paint jobs, but I just wish that he would give people proper recognition, instead of putting his name in big letters, and the person who made the prop's name as a small subtitle.
yep, sadly so. he sells them for REALLY expensive, too.Doesn't Johnson Arms just buy people's resin casts and paint them? He does nice paint jobs, but I just wish that he would give people proper recognition, instead of putting his name in big letters, and the person who made the prop's name as a small subtitle.
but what definitely bugs me most is that most of the time, he gives ZERO recognition to the maker of the cast. he does really good paintjobs, but if it were me, I'd say "And a Huge shout out to ______ , who created and casted this incredible prop!"
believe me, I've done this sort of thing before.
anyway, ArmoredAmir, nice build! I also love asymmetrical builds, and you're rockin' it!
keep it up!
yep, sadly so. he sells them for REALLY expensive, too.
but what definitely bugs me most is that most of the time, he gives ZERO recognition to the maker of the cast. he does really good paintjobs, but if it were me, I'd say "And a Huge shout out to ______ , who created and casted this incredible prop!"
believe me, I've done this sort of thing before.
anyway, ArmoredAmir, nice build! I also love asymmetrical builds, and you're rockin' it!
keep it up!
On Instagram he's good at giving recognition to the maker of the casts. But I understand what you're saying.
Anyways update time! So thanks to college finals and then holidays and work I've been busy but I'm back to it! I made the concept art COD piece to the best of my ability freehanded. Little story behind it, I was making the COD piece thats on most Reach Spartans but about 1/4 of the way through I thought about looking at the concept art for reference and what do you know it has a lot of differences. So now here it is. I'm not too worried about detail on the sides of it because I'll have pouches most likely covering those parts but I'll go back in put some design into it so the sides aren't so plain.


Its starting to get to Crunch time! I'm going to Katsucon which starts on February 17th. I have another costume that needs to get done before that too which isn't nearly as complex but hopefully I'll be able to do it. Then just another I have to just color a wig pink (Props to you if you guess the costume with just that hint). One of my friends also offered to make me a knife that looks like the concept art one since I made him a little something with my 3D printer so hopefully he pulls through and gets it done before Katsucon.
Now to start on the Biceps, then do the Forearms, and finally the Chest. I'm also most likely for now not going to make the abs piece or the spine part mainly due to time but I also already have an armor ability module that will be on the back and then the pouches on the front will hide the abs wrap for the most part and it also will hurt my mobility a lot. Stay tuned to another update soon!
Last edited by a moderator:
Exactly, I like the guy's paintjobs, but he's kidding himself if he thinks that painting something is more work than actually creating the product, and the way he markets his stuff, apparently he does believe that.yep, sadly so. he sells them for REALLY expensive, too.
but what definitely bugs me most is that most of the time, he gives ZERO recognition to the maker of the cast. he does really good paintjobs, but if it were me, I'd say "And a Huge shout out to ______ , who created and casted this incredible prop!"
believe me, I've done this sort of thing before.
anyway, ArmoredAmir, nice build! I also love asymmetrical builds, and you're rockin' it!
keep it up!
Nice, setting a finish date is quite something. Wish you the best of luck!
- Member DIN
- S2424
Setting a date also puts pressure on you to finish.......I know......I set myself up for a ridiculous goal and missed it completely. So if you get it done...great. If you don't.....don't beat yourself up because of it. Don't rush...It will make you sloppy.
Hey all well I managed to meet my deadline by the morning of Katsucon! Some minor issue I had with the COD piece and I should had a way it attached to my upper body so it wouldn't sag. Also should of added more padding in the biceps so they wouldn't of turned so much and just stayed in on position (I had them attached to the chestplate they just turned) I used the Chestplate from my old build since I was decommissioning it (paint chipping and just poorly designing in general). Anyways, heres some photos of almost final result! (I just need to make the Reach chestplate and it'll be done). I'll hopefully get some nice full somewhat professional shots of my armor sometime this month.


Last edited:
Sounds like you had an awesome time! How did you attach your chest pouches? I'm trying to figure out a way to install mine.
So for my pouches they have these clips/buttons on the back of them so I looped them through some nylon straps and those are glued to the chestplate and then it all is held together.
Attachments
Is it Necroposting if you're posting on your own post? Anyways, hello everyone its been a while but I'm back. I feel like I had a bad cosplay burnout in 2018 and didn't do anything for the past year and a half. I decided I wanted to get back into cosplay and to start off I wanted to do a complete overhaul on this suit. Then revisit the ODST suit/post that I made a long time ago.
First off, I never made the Reach Chestplate so I'm currently working on that now. Also the paint job is subpar at best and I can definitely do better and give it a better go and do the paint chipping and such so it matches the armor better. Although I do realize in my suit that the paint scheme doesn't match the concept art at all but I'm going to go through and repaint it. Looks like I'll need some black, gray, white, and olive colors (Maybe a dark olive). The main gray color, I will try to get as close as I can do what Spartan Thorn has in the deliver hope trailer. I'll use liquid latex masking fluid also. I'll do a gunmetal base-coat for everything so weathering and doing the paint chips, should turn out nice, and dry brushing at the end.
As for my weapon, I have a 3D printed Halo 4/5 DMR that I haven't painted yet that I'll use until the Nerf Assault Rifle comes out and I can work with that. The old one that I have that was my first prop I made with Wood and a Nerf Recon it starting to feel outdated. Maybe try and use magnets to hold the boomco Halo 5 pistol to my thigh. My goal is to get this suit able to be Deployment Tier 3 so I need to get a higher standard for myself in parts. I'll probably use a black tactical shirt and pants instead of the spandex that I basically had before. Would like to be able to use the same undersuit for an ODST cosplay too. Maybe wear a layer of paintball chest protection so the abs and back have bulk
Here's a list of the parts and whether or not i'm reusing it or making new one.
I'm 6'2" and I scaled the parts to 1.1, it should be fine.
Photos:


Also my dad hooked me up with 2 full sized Mannequins that are about as tall as me and same build (minus the abs on the chest haha) so sizing and mount parts will be so much easier.

State of old Shoulder pieces

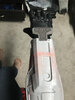
State of Thighs and Shins. Although the shins don't fit on the Mannequin unless I fight it because of the feet so what I may do is cut off the feet of the Mannequin and then have magnets or velcro to hold the feet to the rest of the Mannequin. So the shins go on. But the knees are being redone. One question I do have is since I'm going to repaint old foam parts, should I start with a new base layer of plasti dip or just go straight in with new primer? I think it would be better to get new plasti dip first but not sure.
Hopefully this goes well and please post any suggestions!
First off, I never made the Reach Chestplate so I'm currently working on that now. Also the paint job is subpar at best and I can definitely do better and give it a better go and do the paint chipping and such so it matches the armor better. Although I do realize in my suit that the paint scheme doesn't match the concept art at all but I'm going to go through and repaint it. Looks like I'll need some black, gray, white, and olive colors (Maybe a dark olive). The main gray color, I will try to get as close as I can do what Spartan Thorn has in the deliver hope trailer. I'll use liquid latex masking fluid also. I'll do a gunmetal base-coat for everything so weathering and doing the paint chips, should turn out nice, and dry brushing at the end.
As for my weapon, I have a 3D printed Halo 4/5 DMR that I haven't painted yet that I'll use until the Nerf Assault Rifle comes out and I can work with that. The old one that I have that was my first prop I made with Wood and a Nerf Recon it starting to feel outdated. Maybe try and use magnets to hold the boomco Halo 5 pistol to my thigh. My goal is to get this suit able to be Deployment Tier 3 so I need to get a higher standard for myself in parts. I'll probably use a black tactical shirt and pants instead of the spandex that I basically had before. Would like to be able to use the same undersuit for an ODST cosplay too. Maybe wear a layer of paintball chest protection so the abs and back have bulk
Here's a list of the parts and whether or not i'm reusing it or making new one.
| Part of Armor | Remaking? |
|---|---|
| Helmet | No just new paint scheme, and add the strapping to the helmet like the concept art |
| Chestplate | Yes entirely, going to make foam or 3D printed pouches, also gotta add the knife |
| Biceps | 3D printing new ones thanks to the talented Moesizzlac's model |
| Forearms | 3D printing new ones thanks to the talented Moesizzlac's model |
| Hands | Never had handplates or anything so I'll add them and get new black gloves. |
| Shoulder pieces | New paint scheme |
| COD | 3D printingnew ones thanks to the talented Moesizzlac's model. I'll make some changes to the crotch/groin part though since in the concept it's different. |
| Thighs | Repainting, I might remake them though since there are some noticeable differences from normal reach and the concept. If it affects the Tier 3 for Deployment I'll remake them. |
| Knees | Remaking |
| Shins | Repainting |
| Boots | Remaking, try to match concept art more. |
I'm 6'2" and I scaled the parts to 1.1, it should be fine.
Photos:
Also my dad hooked me up with 2 full sized Mannequins that are about as tall as me and same build (minus the abs on the chest haha) so sizing and mount parts will be so much easier.
State of old Shoulder pieces
State of Thighs and Shins. Although the shins don't fit on the Mannequin unless I fight it because of the feet so what I may do is cut off the feet of the Mannequin and then have magnets or velcro to hold the feet to the rest of the Mannequin. So the shins go on. But the knees are being redone. One question I do have is since I'm going to repaint old foam parts, should I start with a new base layer of plasti dip or just go straight in with new primer? I think it would be better to get new plasti dip first but not sure.
Hopefully this goes well and please post any suggestions!
Last edited:
Armor is already primed technically with plastidip... so you could add another layer of spray paint. I think thats a personal preference either way.
Good point, I was looking at the parts more and it looks like in some parts I never used enough Plastidip to begin with because the paint isn't even entirely and the foam must of been absorbing some paint. So, I'll go and paint a fresh coat on so everything has the same base.
As for my undersuit I plan on using this shirt so I can use it for my future ODST suit also. Most likely these pants or just compression pants like I previously used but a new pair. From my Kylo Ren cosplay I have a neck seal that I'll use with a balaclava. Probably these gloves and glue or use elastic to have the hand plates attached to the gloves. For the boots, I have some black ones I got on discount somewhere and make the shoes so I can slip my boots into them like I did with my old shoes for this build. I was talking with Harri51 and he mentioned since I have a larger torso there's more of a void in the abs and back so I'm going to add the spine pieces to the chestplate.
Got all the Biceps and Forearms printed out and glued together. Seems there's a tiny bit of warping/lifting but filling in the seams with bondo will hide that. After sanding the bondo i'm going to use Primer Filler paint on the parts and see if that helps with the print lines. It probably won't but I'll sand and rinse and repeat 2-3 times and see how it turns out. If it still doesn't look good I'm going to invest in that XTC-3D stuff. I've never used it but heard its nice. Since PLA can take a lot of sanding to get smooth.
Update on the chestplate, I'm about to start with the back part and then I'll add the part the concept art has on the left shoulder blade (Useless Red Circle). Once the chestplate is completed I'll make the attachment that'll hold the 5 chest pouches (Useless blue circle). Haven't started to model the knife yet but will soon. I have Kiwk Seal also to help with the seam lines.
Here's a pic of the DMR. I purchased this file in like 2016 from CGTrader by lexeii1. Printed it all out in around 10 parts then and then slowly sanded and filled in seams. And didn't touch it for about 2 years... until now. I need to reprint the barrel as it fell off but I think it looks good. One more round of bondo, sanding and primer, then paint it and it'll be ready.
I had made the exact same armor, I went off the concept art with my helmet and over the shoulder unit, also have the pouches. The over the shoulder unit wasn't easily visible in that pic so I went over other reach concept art and found one Carter had that had a camera built in. Lmk if you are interested in any of the files!


I had made the exact same armor, I went off the concept art with my helmet and over the shoulder unit, also have the pouches. The over the shoulder unit wasn't easily visible in that pic so I went over other reach concept art and found one Carter had that had a camera built in. Lmk if you are interested in any of the files!
Hey I remember your build! That's awesome to see it all finished, I just browsed through the rest of your build, freaking insane work! I love your paint scheme very nice and beautifully weathered. Yeah the over the shoulder camera would be awesome, to get a good base for the design. Might even go the extra mile and get a gopro in it for con highlights then! The kneepads would be nice since I'm trying to rework mine. Also, if you used spray paint, what color white/gray did you use? It seems to fit almost perfect with what my primary color is going to be. Thank you!
Back with another update! Thanks to Corona my work trip was cancelled so I get more time to work on this suit! The chestplate is at 85% completion for the build (Not including paint). Just need to make the knife, pouches, and the left shoulder camera part. I've decided to redo the thighs and shins also just because. I'll be using Satchmo's unfold of the concept shins and make some slight changes.


The chestplate is using the pouches from the original chestplate which wasn't accurate at all but I'll make foam ones. See the Photo below for details on that. Hopefully the pouches will be able to cover up my abs like they do on the mannequin. It's about my size so it should. I still need to go in and use Kwik Seal on all the seams. I'll get to that. I also 3D printed the other parts that go on the back/spine so I'll have them attached to the chestplate somehow. I don't want anything glued to the shirt unless it feels totally needed. The chestplate looks a bit slanted because I didn't center it on the mannequin when I took the photos. In the middle of the chest plate I have those two rectangles traced out but nothing there. I’m 3D printing those chest details and currently sanding them.

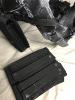
Not sure who made this but I saw it on google and this is the general idea of how I'll make the 5 pouches out of EVA foam. They'll be painted black and have the bungee cord and such on the front 3, I'll either use velcro or magnets to keep them closed. I haven't decided yet.

I posted this photo in the 3D modeling discord a while ago but I have't edited it since but this is how the knife hilt/handle is looking so far. Hilt is 4 inches long. I'm thinking of buying one of those airsoft rubber knifes and somehow glue the blade onto this hilt so it's con friendly. Either that or have no blade but it'll have magnets to be removed from the sheath so I could photoshop a blade in. Haven't started on the sheath yet.
The chestplate is using the pouches from the original chestplate which wasn't accurate at all but I'll make foam ones. See the Photo below for details on that. Hopefully the pouches will be able to cover up my abs like they do on the mannequin. It's about my size so it should. I still need to go in and use Kwik Seal on all the seams. I'll get to that. I also 3D printed the other parts that go on the back/spine so I'll have them attached to the chestplate somehow. I don't want anything glued to the shirt unless it feels totally needed. The chestplate looks a bit slanted because I didn't center it on the mannequin when I took the photos. In the middle of the chest plate I have those two rectangles traced out but nothing there. I’m 3D printing those chest details and currently sanding them.
Not sure who made this but I saw it on google and this is the general idea of how I'll make the 5 pouches out of EVA foam. They'll be painted black and have the bungee cord and such on the front 3, I'll either use velcro or magnets to keep them closed. I haven't decided yet.
I posted this photo in the 3D modeling discord a while ago but I have't edited it since but this is how the knife hilt/handle is looking so far. Hilt is 4 inches long. I'm thinking of buying one of those airsoft rubber knifes and somehow glue the blade onto this hilt so it's con friendly. Either that or have no blade but it'll have magnets to be removed from the sheath so I could photoshop a blade in. Haven't started on the sheath yet.
Last edited:
Getting very close with the chestplate now! Thanks to @Thom A293 hooking me up with the shoulder blade utility piece. Got Kwik Seal around that and the chestplate. Looks eh atm with the Kwik Seal but get some Plasti-Dip on there and it'll look good! The chestplate is ready to paint since I don't plan on attaching the knife until the end.


Also got some photos of me in my full undersuit before I attached the shoulder utility piece. I'm a little annoyed that the zipper is very noticeable but I'll see if I feel comfortable with putting the neck seal I was planning on using over it. The lower part of the Neck seal might get noticeable but I'll see. My abs are fairly noticeable so I'll most likely see if I can do a piece that velcros around my abs that has the reach undersuit ab design. Most likely the pouches won't cover much of my abs, as I feared. Hopefully using @he4thbar's snap fastener tutorial I'll succeed at mounting my biceps, cod, and thighs to the undersuit. Also a picture of the full suit in ArmorSmith, great program.


For my Back, I purchased an armor ability module from Johnson Armory Props a long time ago so I'll throw that on and add some of the needed spine details.

For the front 3 pouches I tried to make a design with just foam to have the pouches open but I had no luck with a good design and thinking about after I Plasti-Dip there'd be a chance over time it would crack due to too much movement. I didn't think this would be a necessary thing to 3D print with a hinge, would be a waste of filament I feel like. Maybe in the future if I really need the pouches I'll do so. I have a 3D model of it. So I've decided to just make the pouches closed. Considering the concept art I'm basing everything off of doesn't have a lot of detail in the pouches, I found another concept art that has alot of detail for the pouches. I still need to go in with a dremel and round some of the edges and then once it's painted attach bungee cord. I'm debating to get some "tactical" fabric or something like it and wrap the pouches in except for the front so it has a more real feeling. Not sure where to look for that fabric but basically the same kind that any tactical pouch would be made of. There's two more pouches on the left side for the concept art so I'll be using these as they are almost a perfect match. I used one of these exactly for my left shin on the original build so should be great.


The Knife is finished and ready to print! It's not going to have a blade and I'll glue the handle and sheath together. And then the mount will be attached to the sheath via magnets. So the knife isn't in the way for transporting and if a con really doesn't like even a fake non bladed knife I can take it off. I printed the handle out but, I based my scaling for this knife off of a knife I used in scouts so it was small (original handle was 4" new one is about 4.5", also more width). The bottom of the handle has no detail since it won't get seen also, save some printing and sanding time. I've scaled it up a bit more and it feels better. Need to print it out once more because there's a weird shift in some of the lower details. If anyone is interested in the files, please let me know! I'm happy to share. I used Fusion360 to model them (Although I'm more a of Solidworks guy but it isn't free).


I also got a voice amplifier that'll allow me to talk and play music out of and it works great! I tested it with my undersuit, chestplate, balaclava, and helmet on. I'll make a little spot it can sit on in my chestplate on the inside instead of being on a strap around my neck. This is easy since I can use it for multiple costumes. If you're interested in how it sounds here's a video test. The speaker wasn't at max volume.
Currently I'm working on the shins using the amazing @Satchmo III's model. He has a lot of great work. Once they're done we'll be going to the COD, then thighs, and then boots based off the concept art. The front of the thighs will be custom since they're different than the standard ones but the rest of it will resemble the default ones. Also I'm open to any suggestions or ideas! As I've said before, I'm trying to make this suit tier 3 worthy, hence why I'm basically restarting it.
Also got some photos of me in my full undersuit before I attached the shoulder utility piece. I'm a little annoyed that the zipper is very noticeable but I'll see if I feel comfortable with putting the neck seal I was planning on using over it. The lower part of the Neck seal might get noticeable but I'll see. My abs are fairly noticeable so I'll most likely see if I can do a piece that velcros around my abs that has the reach undersuit ab design. Most likely the pouches won't cover much of my abs, as I feared. Hopefully using @he4thbar's snap fastener tutorial I'll succeed at mounting my biceps, cod, and thighs to the undersuit. Also a picture of the full suit in ArmorSmith, great program.
For my Back, I purchased an armor ability module from Johnson Armory Props a long time ago so I'll throw that on and add some of the needed spine details.
For the front 3 pouches I tried to make a design with just foam to have the pouches open but I had no luck with a good design and thinking about after I Plasti-Dip there'd be a chance over time it would crack due to too much movement. I didn't think this would be a necessary thing to 3D print with a hinge, would be a waste of filament I feel like. Maybe in the future if I really need the pouches I'll do so. I have a 3D model of it. So I've decided to just make the pouches closed. Considering the concept art I'm basing everything off of doesn't have a lot of detail in the pouches, I found another concept art that has alot of detail for the pouches. I still need to go in with a dremel and round some of the edges and then once it's painted attach bungee cord. I'm debating to get some "tactical" fabric or something like it and wrap the pouches in except for the front so it has a more real feeling. Not sure where to look for that fabric but basically the same kind that any tactical pouch would be made of. There's two more pouches on the left side for the concept art so I'll be using these as they are almost a perfect match. I used one of these exactly for my left shin on the original build so should be great.
The Knife is finished and ready to print! It's not going to have a blade and I'll glue the handle and sheath together. And then the mount will be attached to the sheath via magnets. So the knife isn't in the way for transporting and if a con really doesn't like even a fake non bladed knife I can take it off. I printed the handle out but, I based my scaling for this knife off of a knife I used in scouts so it was small (original handle was 4" new one is about 4.5", also more width). The bottom of the handle has no detail since it won't get seen also, save some printing and sanding time. I've scaled it up a bit more and it feels better. Need to print it out once more because there's a weird shift in some of the lower details. If anyone is interested in the files, please let me know! I'm happy to share. I used Fusion360 to model them (Although I'm more a of Solidworks guy but it isn't free).
I also got a voice amplifier that'll allow me to talk and play music out of and it works great! I tested it with my undersuit, chestplate, balaclava, and helmet on. I'll make a little spot it can sit on in my chestplate on the inside instead of being on a strap around my neck. This is easy since I can use it for multiple costumes. If you're interested in how it sounds here's a video test. The speaker wasn't at max volume.
Currently I'm working on the shins using the amazing @Satchmo III's model. He has a lot of great work. Once they're done we'll be going to the COD, then thighs, and then boots based off the concept art. The front of the thighs will be custom since they're different than the standard ones but the rest of it will resemble the default ones. Also I'm open to any suggestions or ideas! As I've said before, I'm trying to make this suit tier 3 worthy, hence why I'm basically restarting it.
Last edited:
Not a huge update this time in terms of parts built, more on the research/detail side but anything is good! The Knife is printed out but I still have the issue of a slight shift in the lower details. I'll have to reprint the handle once more. It looks like a good size compared to the concept art which is good. Once the chestplate is painted then I'll glue on the knife mount. The sheath holds onto the mount fairly well with just friction so maybe I'll just keep it like that. I also was able to build the COD piece so it's accurate to the concept art for the most part. I just have to add a bit more to detail them. I was using the old thighs on the mannequin because I'm going to try and adjust these ones to look like the concept art and then apply the edits onto my templates. The only difference I can see is just on the front part. The sides seem the same as the default Reach ones.


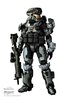
I also found more views/renditions of the concept art I'm basing the build off of so we have a bit more to look at for the future of the suit. Even though the second one doesn't have much detail but it helps seeing the overall shape more. The first one gives me more detail for the boots and then possibly what I'll put as an attachment for the right forearm. Also more undersuit detail for when I tackle that. Wish I could find something of the whole back side but highly doubt it. Bless Isaac Hannaford, as lots of the concept photos I've been looking at and using are made by him it seems so thank you for your talented work.


I also realized on the chestplate on the side, I missed this section which I'll put on the back of both sides of the chestplate. I'll make it out of foam and then wrap it in fabric and then glue that on after painting is done. I'm not sure what it's supposed to be, maybe a back chest guard of sorts or additional armor padding.

More concept art allowed me to get a better idea of the shape for the Concept version of the UA Buckler attachment on the left arm. So I was able to 3D model something but it didn't look good at all. I wasn't able to get the proper curves I wanted due to my 3D modeling skills, but I'll get better. The third photo here is what I made originally for the first time. I used the normal reach UA Buckler attachment and added a bit to it. The last two photos are the final design minus a bit more detail to add. Also where the green foam is, I want to glue on a fake hinge like in the 2nd photo from the main concept art.


The right forearm also has something on it. I wasn't sure at all what it could be so I just made up something originally (3rd Photo). The first photo is from the main concept art I'm using which doesn't really show anything. Second one is from the other art I found. It shows a lot more detail in the second one so I think I'll try to make something similar to it even though I'm not sure what it is. I don't think there's a screen or anything on the forearm. Looking at another reach concept art, it seems like all the Spartan's were going to have this so it could of been what the default forearm would of looked like without an attachment (Or it is one even though it isn't colored red). This concept photo of Emile, Jorge, and Kat also have something similar to the second photo. These photos also have a similar forearm piece so I'll figure it out.


Also noticed I can't use the default Reach hand plates as the concept is different. So I'll have to model this up. The gloves I have are still fine to use. It looks like this hand plate is more of a wrist guard from the end of the hand/wrist to the forearm piece. I can have this attached to some foam and then wrap that with elastic or Velcro so it attached to the wrist wrap of the actual glove. I probably explained that a bit bad but the second pic is the basic idea for it. The photo above with all the concept art Spartans have a different hand plate but I'd rather base it off of the main concept art I'm doing. It doesn't look like it needs to be curved and can be a flat piece. I might be able to add a slight curve if needed. Edit: Just modeled the design. I'll give it a print and see how it looks.


Also update for the shins! I tried 3 different times making one and it wasn't looking good and I didn't want try and get away with poor looking ones considering this suit will hopefully be tier 3. I was able to convert the shins from pepakura to an obj and then my friend helped me in Blender to add thickness and smooth out parts of it so it can print properly. My only issue is that the circled area is a bit "Low Poly" and I was trying different methods of just smoothing that part but I wasn't able to get something I liked. This is my first time using Blender so I have lots to learn. Also considering I only had the .pdo to work with parts are meant to be like low poly and thin so it can be printed out on paper. I printed out the shins at a small scale and the low poly area didn't look bad. But scaled up it may be super noticeable and I'd have to use lots of bondo to clean it up which I don't want to do. Or maybe wrap those parts in a thin thickness foam and it'll be fine but not sure if that'll look janky. I'm putting this part on hold for now so any ideas would be fantastic!


Once all the parts are made I'll make an extensive post of just the abs undersuit and how I'll tackle it but we'll see how that goes. Most likely what I'll do is make the details out of thin foam, and then either wrap it in fabric or just paint it with black Plasti-Dip and use contact cement and glue the parts to a piece of farbic that I can velcro on and off my chestplate without hurting the actual shirt I have for the undersuit. Hopefully I'll still have decent movement in my abs. I don't know where else I can add parts for an undersuit without compromising the shirt and pants for the undersuit since I want to use them for other future builds also.
I also found more views/renditions of the concept art I'm basing the build off of so we have a bit more to look at for the future of the suit. Even though the second one doesn't have much detail but it helps seeing the overall shape more. The first one gives me more detail for the boots and then possibly what I'll put as an attachment for the right forearm. Also more undersuit detail for when I tackle that. Wish I could find something of the whole back side but highly doubt it. Bless Isaac Hannaford, as lots of the concept photos I've been looking at and using are made by him it seems so thank you for your talented work.
I also realized on the chestplate on the side, I missed this section which I'll put on the back of both sides of the chestplate. I'll make it out of foam and then wrap it in fabric and then glue that on after painting is done. I'm not sure what it's supposed to be, maybe a back chest guard of sorts or additional armor padding.
More concept art allowed me to get a better idea of the shape for the Concept version of the UA Buckler attachment on the left arm. So I was able to 3D model something but it didn't look good at all. I wasn't able to get the proper curves I wanted due to my 3D modeling skills, but I'll get better. The third photo here is what I made originally for the first time. I used the normal reach UA Buckler attachment and added a bit to it. The last two photos are the final design minus a bit more detail to add. Also where the green foam is, I want to glue on a fake hinge like in the 2nd photo from the main concept art.
The right forearm also has something on it. I wasn't sure at all what it could be so I just made up something originally (3rd Photo). The first photo is from the main concept art I'm using which doesn't really show anything. Second one is from the other art I found. It shows a lot more detail in the second one so I think I'll try to make something similar to it even though I'm not sure what it is. I don't think there's a screen or anything on the forearm. Looking at another reach concept art, it seems like all the Spartan's were going to have this so it could of been what the default forearm would of looked like without an attachment (Or it is one even though it isn't colored red). This concept photo of Emile, Jorge, and Kat also have something similar to the second photo. These photos also have a similar forearm piece so I'll figure it out.
Also noticed I can't use the default Reach hand plates as the concept is different. So I'll have to model this up. The gloves I have are still fine to use. It looks like this hand plate is more of a wrist guard from the end of the hand/wrist to the forearm piece. I can have this attached to some foam and then wrap that with elastic or Velcro so it attached to the wrist wrap of the actual glove. I probably explained that a bit bad but the second pic is the basic idea for it. The photo above with all the concept art Spartans have a different hand plate but I'd rather base it off of the main concept art I'm doing. It doesn't look like it needs to be curved and can be a flat piece. I might be able to add a slight curve if needed. Edit: Just modeled the design. I'll give it a print and see how it looks.
Also update for the shins! I tried 3 different times making one and it wasn't looking good and I didn't want try and get away with poor looking ones considering this suit will hopefully be tier 3. I was able to convert the shins from pepakura to an obj and then my friend helped me in Blender to add thickness and smooth out parts of it so it can print properly. My only issue is that the circled area is a bit "Low Poly" and I was trying different methods of just smoothing that part but I wasn't able to get something I liked. This is my first time using Blender so I have lots to learn. Also considering I only had the .pdo to work with parts are meant to be like low poly and thin so it can be printed out on paper. I printed out the shins at a small scale and the low poly area didn't look bad. But scaled up it may be super noticeable and I'd have to use lots of bondo to clean it up which I don't want to do. Or maybe wrap those parts in a thin thickness foam and it'll be fine but not sure if that'll look janky. I'm putting this part on hold for now so any ideas would be fantastic!
Once all the parts are made I'll make an extensive post of just the abs undersuit and how I'll tackle it but we'll see how that goes. Most likely what I'll do is make the details out of thin foam, and then either wrap it in fabric or just paint it with black Plasti-Dip and use contact cement and glue the parts to a piece of farbic that I can velcro on and off my chestplate without hurting the actual shirt I have for the undersuit. Hopefully I'll still have decent movement in my abs. I don't know where else I can add parts for an undersuit without compromising the shirt and pants for the undersuit since I want to use them for other future builds also.
Attachments
Last edited:
- Status
- Not open for further replies.
Similar threads
- Replies
- 3
- Views
- 688
- Replies
- 2
- Views
- 594
- Replies
- 2
- Views
- 315
Similar threads
- Replies
- 2
- Views
- 594