You are using an out of date browser. It may not display this or other websites correctly.
You should upgrade or use an alternative browser.
You should upgrade or use an alternative browser.
Noble 6 (S-B312). . .a WIP MY WAY. . . Eventually Pic Heavy
- Thread starter Spartan_127
- Start date
- Status
- Not open for further replies.
Spartan_127
Well-Known Member
OK. I'm trying to get the info from the other site over so it may take a few posts to get it all back in here. I don't know how to do it otherwise. So, I apologize for any and all multiple posts, because I can tell already that this will be a pain in the backside and take a while.
#159
03-10-2013, 09:02 AM
Originally posted by Halex
Originally posted by Trip_Wire_Zer ne
ne
Originally posted by Mstruvmgc View Post
Originally posted by thorn696
Originally posted by vidofnir234 View Post
Thanks for all the support and kinds words everyone. I really appreciate it. Oh! and if I didn't mention it before. It was a young woman that was the drunk. . .
My road to recovery took a little longer than I was hoping because of the wreck, but I am back to work now.
I would like to take the time to thank everyone that is working on getting everything back up and running though. It's really appreciated here by me and I'm sure by the rest of the community. It's good to have a 405th site to go to again.
So, here I am learning (or trying to learn rather) this new site. I'm soooooooooo LOST!!!!!!! LOL! I've not been able to figure a lot out yet. Hope others are having more luck than I am. As lost as I am it's like starting all over again.
Mini Update
As far as progress on my build. Due to the wreck, it did set me way back. It was difficult to stand or even sit for periods of time to try and work on stuff. I have been able to start back on it now though. I have found that latex directly onto foam doesn't work out so well. It just keeps soaking and soaking and soaking up the latex with no visible result. That being said, please learn from my mistakes. I've had to completely redo the foam work again on the undersuit. This time, I covered the foam with spandex by gluing it down with some 77 spray adhesive so it can be sewn onto the undersuit. That way I can apply the latex to the spandex covering the foam instead of the foam itself. (See . . . still learning new things ) I'm still in the process of sewing on parts before I get back to the latex at this point, but hopefully will get it by this next week. Hand sewing is definitely a slow and pains taking process. Props to all the seamsters and seamstresses out there doing it on a regular basis. I do have a bunch of pics I took of this process but am having problems getting them to link right for the post right now. I'll have to figure out what I'm doing wrong some other time and get them posted in the future.
Also, I managed to crack my torso again in a couple spots. LOL! I was trying to take the torso off the dummy and my back felt weird and I felt like I was going to fall backwards and held onto the torso instead of falling. Bad idea. It's fixable though. The one that is the worse is like the other one I have already had to fix on top so no biggie I guess. I also managed to crack a spot on my cod taking it off the dummy. Just a small spot on the front where the so called "buckles" would be. It's fixable. Just seems like I'm taking three steps forward and two steps back right now having to redo and fix things. I'll manage to pull through. I guess it's a good thing I do not have a definitive deadline for this thing being finished or somewhat complete. It really helps to take the pressure off.
Again, thanks to everyone for the support with the whole drunk hitting me thing. It's appreciated very much. Once I actually get this whole new site figured out, I'll get what pics I have of my progress up.
Until Next Time. . . Keep Building and Make It FUN!!!!
03-20-2013, 12:53 AM
Alrighty. Still not into the new look of this site or the feel of it. Still a lot of bugs being worked out at this point, and I'm thankful for all that admin is doing to work it out. However, I'm not giving up although I'm a creature of habit and opposed to change with things I like.
#159
03-10-2013, 09:02 AM
Originally posted by Halex
It's always humbling to see someone say that you've inspired them in some way. Thanks for saying that I did. It's appreciated.That's basically what I was thinking... the obvious worst choice to hit, clearly marked, and still did it. Not their brightest moment, but that's the effect alcohol has on people. Looking forward to the next update as always. Your neatly-done alignment/locking pins/magnets have inspired me to rip out the horribly messy and crooked ones I had in my torso and try again, since they just didn't work well that first time.
Originally posted by Trip_Wire_Zer
neI would take thatday off as well glad to hear you in one piece.
Originally posted by spartan IV View Post
I hope your recovery goes well and i'm glad you see the humor in actually having a cop car hit.
Originally posted by Croc co View Post
dumb a$$ drunk drivers! sham you wernt driving a scorpion tank
Originally posted by Tigersgrace View Post
WOW....just wow. There are no words for the level of stupidity in that guy. Glad to hear that you're ok though.
Originally posted by Mstruvmgc View Post
Well bud Its just good to know that you are safe
Originally posted by thorn696
Get well soon, and stay safe out there.
Originally posted by vidofnir234 View Post
There is no excuse for drunk driving. At all. Glad to hear you're okay, and I hope that guy gets a nice blemish on his record.
Thanks for all the support and kinds words everyone. I really appreciate it. Oh! and if I didn't mention it before. It was a young woman that was the drunk. . .
My road to recovery took a little longer than I was hoping because of the wreck, but I am back to work now.
I would like to take the time to thank everyone that is working on getting everything back up and running though. It's really appreciated here by me and I'm sure by the rest of the community. It's good to have a 405th site to go to again.
So, here I am learning (or trying to learn rather) this new site. I'm soooooooooo LOST!!!!!!! LOL! I've not been able to figure a lot out yet. Hope others are having more luck than I am. As lost as I am it's like starting all over again.
Mini Update
As far as progress on my build. Due to the wreck, it did set me way back. It was difficult to stand or even sit for periods of time to try and work on stuff. I have been able to start back on it now though. I have found that latex directly onto foam doesn't work out so well. It just keeps soaking and soaking and soaking up the latex with no visible result. That being said, please learn from my mistakes. I've had to completely redo the foam work again on the undersuit. This time, I covered the foam with spandex by gluing it down with some 77 spray adhesive so it can be sewn onto the undersuit. That way I can apply the latex to the spandex covering the foam instead of the foam itself. (See . . . still learning new things ) I'm still in the process of sewing on parts before I get back to the latex at this point, but hopefully will get it by this next week. Hand sewing is definitely a slow and pains taking process. Props to all the seamsters and seamstresses out there doing it on a regular basis. I do have a bunch of pics I took of this process but am having problems getting them to link right for the post right now. I'll have to figure out what I'm doing wrong some other time and get them posted in the future.
Also, I managed to crack my torso again in a couple spots. LOL! I was trying to take the torso off the dummy and my back felt weird and I felt like I was going to fall backwards and held onto the torso instead of falling. Bad idea. It's fixable though. The one that is the worse is like the other one I have already had to fix on top so no biggie I guess. I also managed to crack a spot on my cod taking it off the dummy. Just a small spot on the front where the so called "buckles" would be. It's fixable. Just seems like I'm taking three steps forward and two steps back right now having to redo and fix things. I'll manage to pull through. I guess it's a good thing I do not have a definitive deadline for this thing being finished or somewhat complete. It really helps to take the pressure off.
Again, thanks to everyone for the support with the whole drunk hitting me thing. It's appreciated very much. Once I actually get this whole new site figured out, I'll get what pics I have of my progress up.
Until Next Time. . . Keep Building and Make It FUN!!!!
03-20-2013, 12:53 AM
Alrighty. Still not into the new look of this site or the feel of it. Still a lot of bugs being worked out at this point, and I'm thankful for all that admin is doing to work it out. However, I'm not giving up although I'm a creature of habit and opposed to change with things I like.
Last edited by a moderator:
Spartan_127
Well-Known Member
Adding photos as I can. . . please bare with me.
03-20-2013, 12:53 AM
Alrighty. Still not into the new look of this site or the feel of it. Still a lot of bugs being worked out at this point, and I'm thankful for all that admin is doing to work it out. However, I'm not giving up although I'm a creature of habit and opposed to change with things I like.
UPDATE!!
I have a bunch of photos of the under suit process that I am stumbling through now. And believe me. . . I'm stumbling through it! LOL!!! I don't know if there is still a pic restriction or not on the new site, but I'm going to put in as many as I can.
Here's some of the pics from the first process I was trying.


In that process I had the foam glued down to the unitard and tried putting foam over it to seal it all up. I think that I put 7 coats on it and it just kept getting soaked up. I noticed that on the unitard itself though, it was working like I wanted it to. So. . . back to the drawing board. I had a lot of spandex material that I had bought for my son's armor project and never used. This is what I came up with and the steps that I took doing that.


The above pics are of the foam work. I refit everything after pulling the old foam out. I put the torso on it to make sure I had the same fit for the most part. Here are the sections broken down.
The shoulder pieces

The chest and back piece


Sorry. . . I forgot to take a pic of it on the dummy. The chest piece needed to be pretty thin and the back needed to be pretty thick in places and thin in others. I used the green foam (1/2" thick) for the front and the white foam (1" thick) for the back piece. On the back piece where it needed to be thinned out, I took a razor blade and scraped out places little by little.
My next step was to cover the foam pieces in spandex. I laid the foam out on the spandex (I bought about 8 yards of it. . . LOL) and drew around it giving enough room on the edges to wrap it around the foam like so:


After cutting out everything I used some trusty and MESSY 77 spray adhesive

and glued the spandex to the pieces of foam.
The shoulders front and back:


OK. . . Still a 15 photo limit. Continued in the next post.
Last edited by a moderator:
Spartan_127
Well-Known Member
• 03-20-2013, 12:56 AM
Continuing from last post . . .
The chest and back piece front and back:


After doing all that I pinned onto my dummy and put the torso back on so I could see what it all looked like together.


If you noticed in a couple of the pics above, I made a little collar detail piece for under the chest plate. It was just an idea I was toying around with so I came up with something out of 3mm craft foam sheets. I didn't really like the look of it the way that one turned out and I have since redone that whole thing with a little better detail. Here those pics.
The first one:

The reworked version:


Since I've reworked it, I haven't had the chance to cut it to size or put it on the torso to see what it looks like. So no pics of that one yet.
Then, came the time consuming tedious task of hand sewing. I used stretch stitches, whip stitches, back stitches and matress stitches on this thing. If a place needed more stretch then I used the stretch stitch obviously and other places the other two. Most of it is a stretch stitch. The back stitch was used to sew in details to the areas that needed them. Here's the pics.
The shoulder pieces


Continued in Next Post. . . .
Last edited by Spartan_127; 03-20-2013, 01:08 AM.
Attachments
Spartan_127
Well-Known Member
03-20-2013, 12:58 AM
Continuing from Last Post. . .
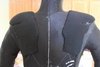
The chest and back piece over the shoulder pieces. I somehow forgot to take pics when it was all sewn together before latex was added. Go figure.


Before sewing down the chest and back piece I decided to add in some more details to the collar area. I made a neck seal and lines extending out from those like I've seen in some game reference pics. I put the zipper on to mimic the thing in the center of the collar with the little raised section. I'll paint it all up later on.


Once I got all that stuff on there, it was time for latex. I've only got a couple of shots of this, because when I took it some other stuff was drying and I couldn't take overalls of everything.


These pics are after two coats of latex. Not everything is fully covered right now. After the first coat I could stipple it on pretty good with some foam insulation that you use for window A/C units that I cut up and it gave a really good texture to it.
Here's another stumbling block for me in this whole experimental undersuit process. I have put on some cotton pads in the area of the upper abs, because I need the detail work to be thin under the control module for the chest armor. After I put it down I coated it when copious amounts of latex. It is turning out how the attempt to just cover foam with latex. If you remember, I am referencing a predator skin build for this process that I found on the RPF. While it may be great for a predator skin. . . . It isn't doing anything for the look of a Spartan's undersuit. Here's what I mean. . . .


I've decided to rip up what I can of that and continue with the spandex covered foam like everything else. At least that way I can control the amount of latex I use and the detail to the pieces. That's what I am in the process of doing currently. That and buying supplies.
My son is out for spring break this week so progress is slowed until he goes back to school next week. I don't want him sitting here at the house all week just watching me work on my Spartan outfit. LOL!! Today I went out and bought some Bulldog Adhesion Promoter and some base paints. I got a black and what I thought would turn out good for a graphite base coat. That color was a bit too silver though when I coated something with it just to see how it would turn out. I can use it for a metalizer though instead of buying the Shrapnel paint I was going to. I found a granite gray paint code tonight and I'm going to go back to the paint shop tomorrow to see it they can mix a quart of that up for me.
I know that it doesn't look like much progress. It's been slow going since the wreck and with everything else going on. I have been busy with redoing everything and I'm trying to make up lost time on my failed methods. Now that I've got a system for the undersuit detailing though, I'm hoping progress will pick up now. Let me know what y'all think and as always . . . all feedback and criticism are welcomed.
Until Next Time. . . Keep Building and Make It FUN!!!!
03-22-2013, 06:35 PM
Hey guys. . . and gals. Here's a pic of the paint that I got the paint shop to mix up as a base.

The color on the left is the one that I will be using as a base for the entire costume. It's a granite gray color by Nason (Dupont). It looks almost black in the pic, but it really is a gray. I think the flake in it is playing havoc on my camera when I try to take pics of it. Just FYI. . . I found out that it is a General Motors color from 2002 when I went to the paint shop with the color code for it. The color on the right is the silver that looked gray when I got it the day before. I was going to get Shrapnel to do the silver metallic parts, but I figured that this will do nicely since I wound up with it. Can't return custom mixed paints so might as well use it since I have a quart of it now. I now have all the paints that I need for what I'm going to do. I have three base colors (granite gray, granite silver and diamond black) that I'm going to put on. My plan is to prime the pieces with black then base-coated granite gray. After that I'll use a spattering technique I've learned to add the silver and blacks to age and weather it. After those are on I'll seal it and start the battle damage and further weathering with air brushing and other stuff.
I'm still working on correcting the area of the under suit that I messed up, but trying to do it right, so progress is slow. Hoping to have something done by the end of next Wednesday that I can take some pics of to show everyone.
Hoping that someone is still following along with me at this point. I know it took me forever to figure out how to view stuff after the update. If you're there, let me know.
Until Next Time. . . Keep Building and Make It FUN!!!!
03-25-2013, 02:45 PM
Originally posted by spartan IV View Post
Thanks for the kind words Spartan IV. I appreciate it.
__________________________________________________ __________________
Mini Update
Yet another mistake on my part. I did a test fit a little bit ago with the cod and torso on over the under suit to see where all the foam needed to be to button up stuff so I can move on to the arms. I found that the way I did the padding that I used this time wasn't exactly like I had it before. I have to go back to the torso and cut it again to give me some more room again. I'm really running out of places to cut on the bottom. I can't do any more under suit work until I get the torso modified. . . . AGAIN. LOL!!! Oh well. . . . see. . . . still learning. I'm going to add a little more than I need this time to make sure I have enough overall for the finished product.
Stay tuned. . . . I'm about to go to the shed to make those modifications before it starts getting too cool to do it. We're at the high temp of 55 degrees right now and I'm burning daylight.
Until Next Time. . . Keep Building and Make It FUN!!!!
Continuing from Last Post. . .
The chest and back piece over the shoulder pieces. I somehow forgot to take pics when it was all sewn together before latex was added. Go figure.


Before sewing down the chest and back piece I decided to add in some more details to the collar area. I made a neck seal and lines extending out from those like I've seen in some game reference pics. I put the zipper on to mimic the thing in the center of the collar with the little raised section. I'll paint it all up later on.


Once I got all that stuff on there, it was time for latex. I've only got a couple of shots of this, because when I took it some other stuff was drying and I couldn't take overalls of everything.


These pics are after two coats of latex. Not everything is fully covered right now. After the first coat I could stipple it on pretty good with some foam insulation that you use for window A/C units that I cut up and it gave a really good texture to it.
Here's another stumbling block for me in this whole experimental undersuit process. I have put on some cotton pads in the area of the upper abs, because I need the detail work to be thin under the control module for the chest armor. After I put it down I coated it when copious amounts of latex. It is turning out how the attempt to just cover foam with latex. If you remember, I am referencing a predator skin build for this process that I found on the RPF. While it may be great for a predator skin. . . . It isn't doing anything for the look of a Spartan's undersuit. Here's what I mean. . . .


I've decided to rip up what I can of that and continue with the spandex covered foam like everything else. At least that way I can control the amount of latex I use and the detail to the pieces. That's what I am in the process of doing currently. That and buying supplies.
My son is out for spring break this week so progress is slowed until he goes back to school next week. I don't want him sitting here at the house all week just watching me work on my Spartan outfit. LOL!! Today I went out and bought some Bulldog Adhesion Promoter and some base paints. I got a black and what I thought would turn out good for a graphite base coat. That color was a bit too silver though when I coated something with it just to see how it would turn out. I can use it for a metalizer though instead of buying the Shrapnel paint I was going to. I found a granite gray paint code tonight and I'm going to go back to the paint shop tomorrow to see it they can mix a quart of that up for me.
I know that it doesn't look like much progress. It's been slow going since the wreck and with everything else going on. I have been busy with redoing everything and I'm trying to make up lost time on my failed methods. Now that I've got a system for the undersuit detailing though, I'm hoping progress will pick up now. Let me know what y'all think and as always . . . all feedback and criticism are welcomed.
Until Next Time. . . Keep Building and Make It FUN!!!!
03-22-2013, 06:35 PM
Hey guys. . . and gals. Here's a pic of the paint that I got the paint shop to mix up as a base.

The color on the left is the one that I will be using as a base for the entire costume. It's a granite gray color by Nason (Dupont). It looks almost black in the pic, but it really is a gray. I think the flake in it is playing havoc on my camera when I try to take pics of it. Just FYI. . . I found out that it is a General Motors color from 2002 when I went to the paint shop with the color code for it. The color on the right is the silver that looked gray when I got it the day before. I was going to get Shrapnel to do the silver metallic parts, but I figured that this will do nicely since I wound up with it. Can't return custom mixed paints so might as well use it since I have a quart of it now. I now have all the paints that I need for what I'm going to do. I have three base colors (granite gray, granite silver and diamond black) that I'm going to put on. My plan is to prime the pieces with black then base-coated granite gray. After that I'll use a spattering technique I've learned to add the silver and blacks to age and weather it. After those are on I'll seal it and start the battle damage and further weathering with air brushing and other stuff.
I'm still working on correcting the area of the under suit that I messed up, but trying to do it right, so progress is slow. Hoping to have something done by the end of next Wednesday that I can take some pics of to show everyone.
Hoping that someone is still following along with me at this point. I know it took me forever to figure out how to view stuff after the update. If you're there, let me know.
Until Next Time. . . Keep Building and Make It FUN!!!!
03-25-2013, 02:45 PM
Originally posted by spartan IV View Post
Good job on staying persistent and being innovative. You have tried many things that have never even occurred to me in the coarse of building my own suit.
Thanks for the kind words Spartan IV. I appreciate it.
__________________________________________________ __________________
Mini Update
Yet another mistake on my part. I did a test fit a little bit ago with the cod and torso on over the under suit to see where all the foam needed to be to button up stuff so I can move on to the arms. I found that the way I did the padding that I used this time wasn't exactly like I had it before. I have to go back to the torso and cut it again to give me some more room again. I'm really running out of places to cut on the bottom. I can't do any more under suit work until I get the torso modified. . . . AGAIN. LOL!!! Oh well. . . . see. . . . still learning. I'm going to add a little more than I need this time to make sure I have enough overall for the finished product.
Stay tuned. . . . I'm about to go to the shed to make those modifications before it starts getting too cool to do it. We're at the high temp of 55 degrees right now and I'm burning daylight.
Until Next Time. . . Keep Building and Make It FUN!!!!
Last edited by a moderator:
Spartan_127
Well-Known Member
03-26-2013, 04:08 PM
Originally posted by Halex
Thanks for the encouragement and kind words. I don't know about bravery. . . cause I was scared!!! I really wanted to leave the torso as was, but couldn't do it. Every time I took a deep breath it would come apart on the bottom on one side when I did a test fit with the under suit on. It went fairly well once I figured out how to keep it spread apart and even on both sides. Keep scrolling. . . .
__________________________________________________ _____________
UPDATE!!!!
Got the torso cut apart yesterday and figured out how to put it back together today. Here's the story with pics.


I had to cut some metal strips to hot glue down to the parts I was spreading out. I tried just using playing card, using popsicle sticks and a couple other things, before I brought myself to using the metal strips. I spaced it out an additional two inches on where I cut it and I glued down the metal to it. After gluing down the metal I slid playing cards in to use as a wall like I did before the first time I cut it. Doing it this way was problematic, because I couldn't get all of angles right. Then, on to the rondo glassing. I really do hate that stuff. It never really sticks where I want it to and goes where I don't want it to.


After I poured copious amounts of that rondo glass stuff in there I trimmed what I could and removed all the cards and glue while it was warm. After it cooled down, I used a dremel to clean up some more so I could put it on for a test fit. There are definitely some spots that I need to clean up and blend better in the bondo stage, along with style lines that need to be made with sanding to match the rest of the torso. At least it has held together and won't fall apart. Plus, it gave me that much needed extra room. Here's the pics of the test fit.


I was having a hard time trying to get the pics to take right. I couldn't get it to show all of the under stuff and I don't have anyone home with me to help with it. Hopefuly, I'll get someone to help me out getting some better pics. Please bear with me.
I still have to hold the belt up to keep it in about the right spot. Once I get to add the foam details to that area it should get rid of that problem. I've found that it you're using latex to cover your under suit details, the hard armor parts like to stick to it almost like glue. It gives some grip and keeps things from sliding around. The torso isn't difficult to put on, but if you don't get it in just the right angle putting on the back of the torso, you're stuck and have to keep trying. Overall, I know I have a lot left to do, and I'm sure my undiagnosed OCD will kick in about certain details and things, but I am pleased with how it's turning out so far. As Thorn always says. . . "Don't Let Your Dreams Fade Away. . . " and that's what I'm doing.
Thanks for following along with me. As always . . . any and all feedback, criticism and suggestions are welcomed. They always help me in some way. Even if you're just saying "Hi Ya". LOL!
Until Next Time. . . Keep Building and Make It FUN!!!!
Originally posted by Halex
Whoa, that's bravery there. My torso's a little snug too but I'd rather deal with it than risk cutting it again to add length. Hope it goes well, and looking forward to seeing some more updates!
Thanks for the encouragement and kind words. I don't know about bravery. . . cause I was scared!!! I really wanted to leave the torso as was, but couldn't do it. Every time I took a deep breath it would come apart on the bottom on one side when I did a test fit with the under suit on. It went fairly well once I figured out how to keep it spread apart and even on both sides. Keep scrolling. . . .
__________________________________________________ _____________
UPDATE!!!!
Got the torso cut apart yesterday and figured out how to put it back together today. Here's the story with pics.


I had to cut some metal strips to hot glue down to the parts I was spreading out. I tried just using playing card, using popsicle sticks and a couple other things, before I brought myself to using the metal strips. I spaced it out an additional two inches on where I cut it and I glued down the metal to it. After gluing down the metal I slid playing cards in to use as a wall like I did before the first time I cut it. Doing it this way was problematic, because I couldn't get all of angles right. Then, on to the rondo glassing. I really do hate that stuff. It never really sticks where I want it to and goes where I don't want it to.


After I poured copious amounts of that rondo glass stuff in there I trimmed what I could and removed all the cards and glue while it was warm. After it cooled down, I used a dremel to clean up some more so I could put it on for a test fit. There are definitely some spots that I need to clean up and blend better in the bondo stage, along with style lines that need to be made with sanding to match the rest of the torso. At least it has held together and won't fall apart. Plus, it gave me that much needed extra room. Here's the pics of the test fit.


I was having a hard time trying to get the pics to take right. I couldn't get it to show all of the under stuff and I don't have anyone home with me to help with it. Hopefuly, I'll get someone to help me out getting some better pics. Please bear with me.
I still have to hold the belt up to keep it in about the right spot. Once I get to add the foam details to that area it should get rid of that problem. I've found that it you're using latex to cover your under suit details, the hard armor parts like to stick to it almost like glue. It gives some grip and keeps things from sliding around. The torso isn't difficult to put on, but if you don't get it in just the right angle putting on the back of the torso, you're stuck and have to keep trying. Overall, I know I have a lot left to do, and I'm sure my undiagnosed OCD will kick in about certain details and things, but I am pleased with how it's turning out so far. As Thorn always says. . . "Don't Let Your Dreams Fade Away. . . " and that's what I'm doing.
Thanks for following along with me. As always . . . any and all feedback, criticism and suggestions are welcomed. They always help me in some way. Even if you're just saying "Hi Ya". LOL!
Until Next Time. . . Keep Building and Make It FUN!!!!
Last edited by a moderator:
Spartan_127
Well-Known Member
#170
04-02-2013, 04:21 PM
Originally posted by drack
Thanks for the kind words, Tom. They're appreciated.
I want to start with bondo and everything too. I know when I get to start doing the bondo and other stuff that things will go a bit faster, because I won't be stumbling through that part. I have to make sure that all the parts will fit the under suit first though.
Originally posted by Halex
Thanks for the compliments, Halex.
According to the can the junk came out of it's Bondo Glass. I mixed in some resin with it to make it Rondo Glass. LOL!!! I got a quart size can of it to use for stuff that needs the extra strength. It's a green gooey looking mess in the can and thick as all get out. Never really wants to go where you want it to either.
__________________________________________________ ______________________
UPDATE!!!!!
So, here's what I've been working on the last couple of days.


I finally figured out how to make the ab section all one piece out of the white one inch foam that I have. I made it exactly how I did the other pieces for the upper torso that is under the torso armor. I cut, shaved and shaped the foam until it looked right to me and then stitched in detail lines to make certain parts stick out. The hip pad areas are another piece of one inch foam that was sewn over the other piece. The piece in the pics around my abs is all one inch white foam and if it were closed in the back, I guess it would resemble a cushy corset. Some parts were thinned down to about a half inch to give room for stuff. It isn't sewn onto the spandex suit yet. In the pics it looks a little puffy in areas because I couldn't get it all pulled tight in the back. So, I'm hoping that it will look better once it is sewn in place. Also, I forgot to put the foam piece on that I made for under the ab plate /control module doing the test fit for the pics. That piece was made out of the half inch green foam that I have on hand. I can't put it all back on right now to show that piece, because I managed to tear up the cod taking everything off. LOL!!! I was mulling over the idea of whether or not I should separate the cod and join it back together like I did the torso to make it easier to put on and take of, because the latex likes to "grab" onto things. Guess my mind has been made up for me now.
I've found that putting all the stuff on with the stuff covered in latex is really frustrating. I've been doing it by myself and the rungs on the bottom of the torso are constantly getting hung up on the back, because the latex grabs whatever touches it. If I had a partner to help me get dressed it would be much easier and without problems, but I'm trying to make sure I can do it all on my own in the event that I don't have anyone to help me when the time comes to dawn the whole suit for something.
In the event that anyone is curious about heat build up. The only "hot spot" I have on it is where I tried to use cotton coated in latex on the ab area. Everything else seems to breath really well right now. I'm planning on wearing some under armor heat gear under all of this in the event I have a wardrobe malfunction so that I'm not free willy if it happens. The under armor in itself should help me to keep a bit cooler. I'll give some more updates on heat build up when I have more done and coated in latex obviously, but for now it is definitely bearable. I do live in Texas though and might just been use to the heat. LOL!
In the next few days I'll be getting the ab sections sewn onto the spandex suit and starting to coat that with latex. Then, I'll go back over the the other sections with latex to start building it up and give it a uniform coating all over with texture. Oh. . . and fix the Cod. Then, I'll move onto the biceps and under suit on the upper arms.
As always, all feedback, criticism and suggestions with this are all welcomed and encouraged. I think that the site is having problems with Noobs and others that have been posting in the Creation Discussion since we came back up not being able to post. But if you are reading this and can't post a suggestion that you want to make for me, try sending me a PM with a suggestion if you have one. I'll see if I can copy it over to my next post and have it entered into the thread for you. I know that the Noob Forum section seems to be down for the count right now. I know that Admin is trying their best to get everything back up and to normal. I've been trying to go to the Noob Forum and can't find anything or post if I do find something. I only see one page of stickies and I've definitely reported it. Just KCCO I guess.
Until Next Time . . . Keep Building and Make It FUN!!!!
04-02-2013, 04:21 PM
Originally posted by drack
Looking really nice man. Can't wait to see some bondo on this bad boy as its long over due
Thanks for the kind words, Tom. They're appreciated.
I want to start with bondo and everything too. I know when I get to start doing the bondo and other stuff that things will go a bit faster, because I won't be stumbling through that part. I have to make sure that all the parts will fit the under suit first though.
Originally posted by Halex
Hi Ya! But seriously, looks good. The fit with the undersuit looks right on, and it's nice to see that the sizing has been spot-on too. Good idea with the metal strips, too. Is that bondo-glass or bondo-hair? I use rondo-hair for most of my hardening and it's indeed a pain to work with. Strong as can be but a major pain.
Thanks for the compliments, Halex.
According to the can the junk came out of it's Bondo Glass. I mixed in some resin with it to make it Rondo Glass. LOL!!! I got a quart size can of it to use for stuff that needs the extra strength. It's a green gooey looking mess in the can and thick as all get out. Never really wants to go where you want it to either.
__________________________________________________ ______________________
UPDATE!!!!!
So, here's what I've been working on the last couple of days.


I finally figured out how to make the ab section all one piece out of the white one inch foam that I have. I made it exactly how I did the other pieces for the upper torso that is under the torso armor. I cut, shaved and shaped the foam until it looked right to me and then stitched in detail lines to make certain parts stick out. The hip pad areas are another piece of one inch foam that was sewn over the other piece. The piece in the pics around my abs is all one inch white foam and if it were closed in the back, I guess it would resemble a cushy corset. Some parts were thinned down to about a half inch to give room for stuff. It isn't sewn onto the spandex suit yet. In the pics it looks a little puffy in areas because I couldn't get it all pulled tight in the back. So, I'm hoping that it will look better once it is sewn in place. Also, I forgot to put the foam piece on that I made for under the ab plate /control module doing the test fit for the pics. That piece was made out of the half inch green foam that I have on hand. I can't put it all back on right now to show that piece, because I managed to tear up the cod taking everything off. LOL!!! I was mulling over the idea of whether or not I should separate the cod and join it back together like I did the torso to make it easier to put on and take of, because the latex likes to "grab" onto things. Guess my mind has been made up for me now.
I've found that putting all the stuff on with the stuff covered in latex is really frustrating. I've been doing it by myself and the rungs on the bottom of the torso are constantly getting hung up on the back, because the latex grabs whatever touches it. If I had a partner to help me get dressed it would be much easier and without problems, but I'm trying to make sure I can do it all on my own in the event that I don't have anyone to help me when the time comes to dawn the whole suit for something.
In the event that anyone is curious about heat build up. The only "hot spot" I have on it is where I tried to use cotton coated in latex on the ab area. Everything else seems to breath really well right now. I'm planning on wearing some under armor heat gear under all of this in the event I have a wardrobe malfunction so that I'm not free willy if it happens. The under armor in itself should help me to keep a bit cooler. I'll give some more updates on heat build up when I have more done and coated in latex obviously, but for now it is definitely bearable. I do live in Texas though and might just been use to the heat. LOL!
In the next few days I'll be getting the ab sections sewn onto the spandex suit and starting to coat that with latex. Then, I'll go back over the the other sections with latex to start building it up and give it a uniform coating all over with texture. Oh. . . and fix the Cod. Then, I'll move onto the biceps and under suit on the upper arms.
As always, all feedback, criticism and suggestions with this are all welcomed and encouraged. I think that the site is having problems with Noobs and others that have been posting in the Creation Discussion since we came back up not being able to post. But if you are reading this and can't post a suggestion that you want to make for me, try sending me a PM with a suggestion if you have one. I'll see if I can copy it over to my next post and have it entered into the thread for you. I know that the Noob Forum section seems to be down for the count right now. I know that Admin is trying their best to get everything back up and to normal. I've been trying to go to the Noob Forum and can't find anything or post if I do find something. I only see one page of stickies and I've definitely reported it. Just KCCO I guess.
Until Next Time . . . Keep Building and Make It FUN!!!!
Last edited by a moderator:
Spartan_127
Well-Known Member
04-08-2013, 05:55 PM
Originally posted by PHIL-907
Thank you kindly, Phil. I appreciate the compliments and sub.
Originally posted by Seth_Knight_of_New_Wales
Hey, Seth. Glad to see you're still around as well. I'm really trying to stick with the site despite the problems.
__________________________________________________ ___________________
Info Update
No pics to share right now guys. Been busy with other things this past weekend and didn't have much time for the suit. I was able to fix what I broke on the cod and I'm in the process of getting everything ready on it to cut apart and join it back together to make it easier to put on and take off. I'll be using the same method that I did for the torso with magnets and alignment posts. I've got magnets curing on L-brackets, alignment posts cut out and ready to use as well as some brackets for the magnets to stick to. Right now the hold up on the cod is the magnets curing on the L-brackets. I don't want to try to use them too soon and they pull off. That would be bad. . . very very bad, because it's already happened to me once today.
After I get the cod torn apart and put back together, I'll get that ab piece sewn onto the under suit and get that part done. I have an odd schedule and a couple turn arounds this week where I won't get much sleep until Thursday night, but I will have three days off this weekend to hopefully work on it and get that part done. I really want to move on to the biceps and forearms, because they will have to be modified somehow in the pep phase to fit me with the scale I have to print them out at.
I suppose that is it for now. I'm really trying to get what I can done and I'm trying my best to stick with updating my thread. It seems to me that the 405th, since the new site was launched, is slowly dying and fading off into oblivion. I don't want that to happen. This place gave me a start into something that I had always wanted to do, but didn't know how to do it and make it cost-effective. I got my start here and want others to have the same opportunity that I was given. To all that are reading, spread the work about the good ol' 405th and maybe we can keep that from happening.
As soon as I've got some more pics to upload, I'll get them posted to show what I've done. As always, all comments, criticism and feedback are welcomed and encouraged.
Until Next Time. . . Keep Building and Make It FUN!!!!
Originally posted by PHIL-907
+1 sub, good Sir! Amazing work on that torso, I can't wait to see this thing done!
Thank you kindly, Phil. I appreciate the compliments and sub.
Originally posted by Seth_Knight_of_New_Wales
Just wanted to check in. You are one of the only ones continuing to upload progress pics of your suit on here, a big round of applause for the bravery
Hey, Seth. Glad to see you're still around as well. I'm really trying to stick with the site despite the problems.
__________________________________________________ ___________________
Info Update
No pics to share right now guys.
Been busy with other things this past weekend and didn't have much time for the suit. I was able to fix what I broke on the cod and I'm in the process of getting everything ready on it to cut apart and join it back together to make it easier to put on and take off. I'll be using the same method that I did for the torso with magnets and alignment posts. I've got magnets curing on L-brackets, alignment posts cut out and ready to use as well as some brackets for the magnets to stick to. Right now the hold up on the cod is the magnets curing on the L-brackets. I don't want to try to use them too soon and they pull off. That would be bad. . . very very bad, because it's already happened to me once today. After I get the cod torn apart and put back together, I'll get that ab piece sewn onto the under suit and get that part done. I have an odd schedule and a couple turn arounds this week where I won't get much sleep until Thursday night, but I will have three days off this weekend to hopefully work on it and get that part done. I really want to move on to the biceps and forearms, because they will have to be modified somehow in the pep phase to fit me with the scale I have to print them out at.
I suppose that is it for now. I'm really trying to get what I can done and I'm trying my best to stick with updating my thread. It seems to me that the 405th, since the new site was launched, is slowly dying and fading off into oblivion. I don't want that to happen. This place gave me a start into something that I had always wanted to do, but didn't know how to do it and make it cost-effective. I got my start here and want others to have the same opportunity that I was given. To all that are reading, spread the work about the good ol' 405th and maybe we can keep that from happening.
As soon as I've got some more pics to upload, I'll get them posted to show what I've done. As always, all comments, criticism and feedback are welcomed and encouraged.
Until Next Time. . . Keep Building and Make It FUN!!!!
Last edited by a moderator:
Spartan_127
Well-Known Member
04-09-2013, 08:50 AM
Posted by Halex
Originally posted by Spartan_127
If you build it, they will come... minus the cornfields, I think that'll happen here. As long as people such as yourself keep posting their quality builds with great pics along the way for those learning the ropes, the site will come back alive. It may be awhile, but it'll come back. In the mean time, this is one of the threads I always look forward to seeing updated. Keep up the good work!
#175
04-19-2013, 08:58 AM
Post by me: Spartan_127
Originally posted by Halex
LOL on the Cornfields and thanks for the kind words. I know people will come back eventually. I just don't want it to be too late before they do.
__________________________________________________ _________________________
Sorry to say this, but no updated progress since last time. It's been busy at work and I've been trying to contact a guy about buying a truck and getting things organized to wire my shed I'm working out of with electricity. We've also been busy with Boy Scouts since the season is coming to an end. I've got all the stuff to do the wiring in the shed now I think. I just need to get out there today and tomorrow to button a few things up before making the box hot. Once that is done. . . Game On!!!!! I'll be able to work around the clock when the rest of the family is sleeping
I'm sure most people (since it has made international news) may have heard about the West, TX incident where there was an explosion at a fertilizer plant. Well, I was on duty the that night and responded to be a part of that one too on the search and rescue operations immediately after the blast. I can't give any specifics so please don't ask, but please keep them in your thoughts, because it is a very extensive blow to their community.
Again, sorry for lack of progress. I really had hoped to be just about done with the entire upper torso (arms and all) at this point, but life comes first. I guess that's the positive side of not having the time crunch or deadline. You can get to it when you get to it. As soon as I get something done as far as new progress I'll get it posted.
Until Next Time. . . Keep Building and Make It FUN!!!!
________________________________________
#176
05-17-2013, 06:08 AM
Posted by Mstruvmgc
Man i have missed so much! This new site is a pain to find stuff sometime lol. Oh well though.
Everything is looking great bud, I love the padding you are doing, thats a great idea. I might try it ;-P
Im glad to see you still working on stuff, i hope to see some new pics soon
________________________________________
Posted by Halex
Originally posted by Spartan_127
I'm really trying to get what I can done and I'm trying my best to stick with updating my thread. It seems to me that the 405th, since the new site was launched, is slowly dying and fading off into oblivion. I don't want that to happen. This place gave me a start into something that I had always wanted to do, but didn't know how to do it and make it cost-effective. I got my start here and want others to have the same opportunity that I was given. To all that are reading, spread the work about the good ol' 405th and maybe we can keep that from happening.
If you build it, they will come... minus the cornfields, I think that'll happen here. As long as people such as yourself keep posting their quality builds with great pics along the way for those learning the ropes, the site will come back alive. It may be awhile, but it'll come back. In the mean time, this is one of the threads I always look forward to seeing updated. Keep up the good work!
#175
04-19-2013, 08:58 AM
Post by me: Spartan_127
Originally posted by Halex
If you build it, they will come... minus the cornfields, I think that'll happen here. As long as people such as yourself keep posting their quality builds with great pics along the way for those learning the ropes, the site will come back alive. It may be awhile, but it'll come back. In the mean time, this is one of the threads I always look forward to seeing updated. Keep up the good work!
LOL on the Cornfields and thanks for the kind words. I know people will come back eventually. I just don't want it to be too late before they do.
__________________________________________________ _________________________
Sorry to say this, but no updated progress since last time. It's been busy at work and I've been trying to contact a guy about buying a truck and getting things organized to wire my shed I'm working out of with electricity. We've also been busy with Boy Scouts since the season is coming to an end. I've got all the stuff to do the wiring in the shed now I think. I just need to get out there today and tomorrow to button a few things up before making the box hot. Once that is done. . . Game On!!!!! I'll be able to work around the clock when the rest of the family is sleeping
I'm sure most people (since it has made international news) may have heard about the West, TX incident where there was an explosion at a fertilizer plant. Well, I was on duty the that night and responded to be a part of that one too on the search and rescue operations immediately after the blast. I can't give any specifics so please don't ask, but please keep them in your thoughts, because it is a very extensive blow to their community.
Again, sorry for lack of progress. I really had hoped to be just about done with the entire upper torso (arms and all) at this point, but life comes first. I guess that's the positive side of not having the time crunch or deadline. You can get to it when you get to it. As soon as I get something done as far as new progress I'll get it posted.
Until Next Time. . . Keep Building and Make It FUN!!!!
________________________________________
#176
05-17-2013, 06:08 AM
Posted by Mstruvmgc
Man i have missed so much! This new site is a pain to find stuff sometime lol. Oh well though.
Everything is looking great bud, I love the padding you are doing, thats a great idea. I might try it ;-P
Im glad to see you still working on stuff, i hope to see some new pics soon
________________________________________
Last edited by a moderator:
Spartan_127
Well-Known Member
05-19-2013, 07:37 AM
Post by Seth_Knight_of_New_Wales
This video helped me tremendously! I had been messing with my new cameo for a couple days and this finally helped me get it to work. THANK YOU SO MUCH.
Also, how is it coming? I know this forum has seen it's better days, but I'm still curious how far you've came with your costume. Once a comunity, always a comunity
-Seth
________________________________________
Post by Seth_Knight_of_New_Wales
Originally posted by elettrozero
AAAAAAhhhhh that's what I was waiting for!! I'm gonna make some pop Korn and just watch your progress
Breaking out the Kettle Korn hey? LOL. Thanks. . . Hope I can give you something more to look at soon.
Originally posted by Morphine
Nice progress there, good clean work. I can see all the pep fans drooling over the machine, lol!
Thanks, Morphine. I appreciate the compliment. LOL on the machine.
Originally posted by DBmike
Torso is looking good. If only someone invented a machine that not only cut out the parts but put it all together for you. Imagine how much time you'd save! Gonna send you a pm soon so you can get a sneak peak at the netting progress
Thank you kindly, Mike. And if someone could make a machine like that and market it on this site, I'd bet we'd all be too broke to build a suit in the first place. . . . LOL!!!!!!! I'll be looking for that message. I really would like to see what you come up with for that.
__________________________________________________ _______________________
Well guys. . . I don't know how I managed this, but I'll be off until next Thursday (Nov 29th). Besides the stuff with Thanksgiving coming up, I'm going to be pepping as much as I can, because I have the spandex suit and latex in the house now to start the under suit. I had to work last night though, so I don't know how productive I can be today. I'm going to put that little cameo machine through its paces today cutting stuff out that I need. I absolutely have to get the torso and cod done before I can start on that under suit though so I can make sure the details will be in the right places. I just hope that I give enough space for the under suit. . . . LOL!!!! Wish me luck. In the meantime. . . . I've made a quick video to kind of demo the machine cutting. I got a couple PMs about it and thought I'd try to do something to show it cutting pepakura since I really couldn't find much when I was searching for it. I apologize for anything being out of focus or just being a crappy video. . . . I've never made one before. . . LOL!!!!!! Not to mention since I've been up for about 20 hours now, I doubt it makes sense. I'm waiting for it to upload to youtube, but it is showing that is going to take FOREVER!!!!!!! to do it. So, I'll edit this again later to put in a link or however that will work. Edit for Video OKIE DOKIE. Here's the video I finally got to upload.
This video helped me tremendously! I had been messing with my new cameo for a couple days and this finally helped me get it to work. THANK YOU SO MUCH.
Also, how is it coming? I know this forum has seen it's better days, but I'm still curious how far you've came with your costume. Once a comunity, always a comunity
-Seth
________________________________________
Last edited by a moderator:
Spartan_127
Well-Known Member
05-23-2013, 09:26 PM
Posted by me Spartan_127
Originally posted by Mstruvmgc
Thanks, man. I appreciate you checking in and following along with the move and all. I've been missing a lot lately here too. I haven't had the time to get on and look anything up. Got injured at work again and waiting to get a MRI done on my left knee to find out the damage. I hope that I can get something else up for anyone that is still following along. More of an explanation below about everything. Thanks again for the kind words.
Thanks for the kind words and I am glad that the video helped you out.
As to the costume. Sadly. . . The last progress pics are as far as it has made it. The foam ab detail that I did hasn't been sewn on yet, and I need to do that so I can progress further. I've had to put the armor and all on hold for a bit while getting other things in order. My wife quit her job a couple months ago so I've been working longer hours to make up for lost income and just haven't had the time to continue with it. It seems like all I've been doing is sleeping and working. She should be starting a new job in the next week or so and after that, I should be able to get back on it. On top of everything, last weekend I injured my left knee at work chasing a guy in a creek bed and the doc won't release me for work pending a MRI. Better safe than sorry I guess though.
I did get power in my shed so now all I need is an air conditioner to help with the Texas heat. I should be able to work out there uninterrupted once I get back on track and hopefully make good progress in a short amount of time. I don't want anyone to think that I've abandoned this project, because I haven't. I think about what I could be doing to it every day. Every day I look at it and want to start doing something to it, but just don't have the time needed. It's sad. LOL!!! Once my wife gets back to work, I'm definitely going to be able to free up time with not having to work everyday and get everything back in full swing.
I really appreciate y'all checking in. Please don't give up on me. I'm trying. LOL!!! Until Next Time. . . Keep Building and Make It FUN!!!!
05-29-2013, 08:01 AM
Posted by Halex
Sorry to hear about the knee! You've been having a bad run here lately. Did you catch the guy? =D
I'm sure nobody's gonna give up on you, but we can't use/borrow/steal your awesome ideas until you post some more! Seriously though (or as serious as I ever get), hope to see you back on here and healthy in short order.
________________________________________
05-31-2013, 04:32 PM
Posted by me Spartan_127
Originally posted by Halex
ROFL!!!! Thanks for the words of encouragement and the "seriousness". Means a lot.
I have been having a bad run this year. Eight years at this department and only one incident before this year. I've already got three this year. Good ol' Murphy's Law I guess is in full swing for me. I did get the guy though. After I got him we couldn't get out because it was 20' deep. We had to call in the Fire Dept and have them bring a ladder. LOL!!!! As far as the knee goes, I got MRI results back. In a nut shell, I managed to sprain it and have normal wear and tear (effusion), but "otherwise normal knee". All ligaments and tendons are as they should be. They're keeping me on light duty for another week and I go to see the doc again next Thursday. Hopefully by then I'll be back to normal.
Again thanks for the kind words and I'm getting back on it ASAP!!!
__________________________________________________________________________________________________________________
To Admin. Sorry for all the multiple posts. I'm not trying to bump my thread. I just wanted to get everything transferred over and didn't know how else to do it. I really appreciate your patience and I really appreciate the decision to move back to the old site. It seems that the 405th has boomed since the revert. Thanks so much for trying your best with the last update attempt. I really appreciate all that y'all did to try and make it work.
Alrighty guys and gals. That's everything that was lost after the site reverted. I have yet been able to do anything because of hectic work schedules and the injury to my knee. I was released at the beginning of this week and have one of those weird work schedules this week. I also have some scheduled overtime and stuff and am going to Austin next weekend with the wife. So, the likelihood of anything being done between now and next week is slim to none. It's been in the 100's this week already and my shed still isn't air conditioned. I need to get that done so I can continue with the latex outside of my house.
I know there are probably a lot of new people that haven't been able to do anything when the site was on beta version. So, to all new comers that may be reading this. Welcome to the 405th. To anyone that didn't get on the other version of the site and is reading this. . . Welcome Back. As always. . . any and all feedback and criticism are welcomed and encouraged. Man. . . . It's good to be back.
Until Next Time. . . Keep Building and Make It FUN!!!!
Posted by me Spartan_127
Originally posted by Mstruvmgc
Man i have missed so much! This new site is a pain to find stuff sometime lol. Oh well though. Everything is looking great bud, I love the padding you are doing, thats a great idea. I might try it ;-P Im glad to see you still working on stuff, i hope to see some new pics soon
Thanks, man. I appreciate you checking in and following along with the move and all. I've been missing a lot lately here too. I haven't had the time to get on and look anything up. Got injured at work again and waiting to get a MRI done on my left knee to find out the damage. I hope that I can get something else up for anyone that is still following along. More of an explanation below about everything. Thanks again for the kind words.
Seth_Knight_of_New_Wales;n1015699 said:Originally posted by Spartan_127
This video helped me tremendously! I had been messing with my new cameo for a couple days and this finally helped me get it to work. THANK YOU SO MUCH. Also, how is it coming? I know this forum has seen it's better days, but I'm still curious how far you've came with your costume. Once a comunity, always a comunity -Seth
Thanks for the kind words and I am glad that the video helped you out.
As to the costume. Sadly. . . The last progress pics are as far as it has made it. The foam ab detail that I did hasn't been sewn on yet, and I need to do that so I can progress further. I've had to put the armor and all on hold for a bit while getting other things in order. My wife quit her job a couple months ago so I've been working longer hours to make up for lost income and just haven't had the time to continue with it. It seems like all I've been doing is sleeping and working. She should be starting a new job in the next week or so and after that, I should be able to get back on it. On top of everything, last weekend I injured my left knee at work chasing a guy in a creek bed and the doc won't release me for work pending a MRI. Better safe than sorry I guess though.
I did get power in my shed so now all I need is an air conditioner to help with the Texas heat. I should be able to work out there uninterrupted once I get back on track and hopefully make good progress in a short amount of time. I don't want anyone to think that I've abandoned this project, because I haven't. I think about what I could be doing to it every day. Every day I look at it and want to start doing something to it, but just don't have the time needed. It's sad. LOL!!! Once my wife gets back to work, I'm definitely going to be able to free up time with not having to work everyday and get everything back in full swing.
I really appreciate y'all checking in. Please don't give up on me. I'm trying. LOL!!! Until Next Time. . . Keep Building and Make It FUN!!!!
05-29-2013, 08:01 AM
Posted by Halex
Sorry to hear about the knee! You've been having a bad run here lately. Did you catch the guy? =D
I'm sure nobody's gonna give up on you, but we can't use/borrow/steal your awesome ideas until you post some more! Seriously though (or as serious as I ever get), hope to see you back on here and healthy in short order.
________________________________________
05-31-2013, 04:32 PM
Posted by me Spartan_127
Originally posted by Halex
Sorry to hear about the knee! You've been having a bad run here lately. Did you catch the guy? =D
I'm sure nobody's gonna give up on you, but we can't use/borrow/steal your awesome ideas until you post some more! Seriously though (or as serious as I ever get), hope to see you back on here and healthy in short order.
ROFL!!!! Thanks for the words of encouragement and the "seriousness". Means a lot.
I have been having a bad run this year. Eight years at this department and only one incident before this year. I've already got three this year. Good ol' Murphy's Law I guess is in full swing for me. I did get the guy though. After I got him we couldn't get out because it was 20' deep. We had to call in the Fire Dept and have them bring a ladder. LOL!!!! As far as the knee goes, I got MRI results back. In a nut shell, I managed to sprain it and have normal wear and tear (effusion), but "otherwise normal knee". All ligaments and tendons are as they should be. They're keeping me on light duty for another week and I go to see the doc again next Thursday. Hopefully by then I'll be back to normal.
Again thanks for the kind words and I'm getting back on it ASAP!!!
__________________________________________________________________________________________________________________
To Admin. Sorry for all the multiple posts. I'm not trying to bump my thread. I just wanted to get everything transferred over and didn't know how else to do it. I really appreciate your patience and I really appreciate the decision to move back to the old site. It seems that the 405th has boomed since the revert. Thanks so much for trying your best with the last update attempt. I really appreciate all that y'all did to try and make it work.
Alrighty guys and gals. That's everything that was lost after the site reverted. I have yet been able to do anything because of hectic work schedules and the injury to my knee. I was released at the beginning of this week and have one of those weird work schedules this week. I also have some scheduled overtime and stuff and am going to Austin next weekend with the wife. So, the likelihood of anything being done between now and next week is slim to none. It's been in the 100's this week already and my shed still isn't air conditioned. I need to get that done so I can continue with the latex outside of my house.
I know there are probably a lot of new people that haven't been able to do anything when the site was on beta version. So, to all new comers that may be reading this. Welcome to the 405th. To anyone that didn't get on the other version of the site and is reading this. . . Welcome Back. As always. . . any and all feedback and criticism are welcomed and encouraged. Man. . . . It's good to be back.
Until Next Time. . . Keep Building and Make It FUN!!!!
Last edited by a moderator:
Spartan_127
Well-Known Member
Looks awesome my friend.
Thank you, kindly, Thorn. Glad you're back with us too. Loved the Fallout build and can't wait for the next one you're putting out.
Charlie117
Member
Yay spartan_127 your back hooray yayyyyyy everyones back yayyyy i missed ya!!! Yay again haha am very happy. Now time to keep enjoying your thread
Spartan_127
Well-Known Member
Yay spartan_127 your back hooray yayyyyyy everyones back yayyyy i missed ya!!! Yay again haha am very happy. Now time to keep enjoying your thread
Yes. We are back!!!! and thanks for the kind words.
___________________________________________________________________________________
Small Info Update
I've got things put back together now and here's another thing to learn from. Please learn from my mistakes. If you stop working on stuff for a month or two and you have something that is separated. . . . PUT IT BACK TOGETHER!!!!!!!
I have had my torso sitting in two pieces and when I went to put it back together, it didn't line up anymore!!!!! After some gentle prying I finally got it lined back up and put back together. I heard a pop somewhere, but I haven't found a break yet so hopefully there wasn't one and it was just the fiberglass.I have my stuff back on the dummy and I'm starting to sew the ab section on. When it's all sewn up, I'll get some pics up for everyone.
I've printed out my bicep files and boy is that going to be a chore. I printed them for height and that makes them way too small for my arms as far as the opening goes. Oh yes. . . . there will be modification.
I also went out today and bought an air conditioner for my shed so I can work out there. Unfortunately this is how things went for me today. I get home. Decide to go get 2x4's and things to install it. Get to Home Depot and they closed an hour before the website showed they closed. Think about going to Lowe's instead. Realize it didn't make a difference either way, because I left my wallet at home. Yes. . . . Epic fail!!!!! LOL!
Anyways. That's where I stand at this time. Hoping to have some progress on everything over the next week for pics. Until Next Time. . . Keep Building and Make It FUN!!!!
Last edited by a moderator:
Thats what happened to me with my suit. Only problem is i also left it in my car for a few days... in vegas weather... so i totally understand lol.
Im glad yours is hopefully okay
Well lamesauce, i know that feeling too lol. Good luck with the AC unit
Im glad yours is hopefully okay
Well lamesauce, i know that feeling too lol. Good luck with the AC unit
Well as usual my instant email notification isn't! So I missed all your updates and glad I did cause I get all this in one go. First off sorry to hear about the knee but glad that seems to be on the mend. I too understand the frustration of heat warping pieces. We haven't got the hottest of weather here but the sun was shining through my sky light and has warped the faceplate on my IM suit, while in the mould!!! All it means is that now when I cast one I have to give it a quick blast with the heat gun to realign it. Also if you do get armour warps use the heat gun to fix them. The bondo is forgiving as all you are doing is putting the fibre glass back into place and the bondo was there in the first place so as long as you're gentle it it will allow it.
I like the fact you are trying something different with the under suit but man your gunna get hot in there! I might look into latex techniques at some point with mine but will see how I get on with my sewn one first.
I like the fact you are trying something different with the under suit but man your gunna get hot in there! I might look into latex techniques at some point with mine but will see how I get on with my sewn one first.
Spartan_127
Well-Known Member
Thats what happened to me with my suit. Only problem is i also left it in my car for a few days... in vegas weather... so i totally understand lol.
Im glad yours is hopefully okay
Well lamesauce, i know that feeling too lol. Good luck with the AC unit
It turned out to be fine. I looked through the whole thing and nothing broke. I took a heat gun and warmed everything up after it was back together just to make sure there would be no more issues. And I did get that AC unit in today. I appreciate the kind words.
Well as usual my instant email notification isn't! So I missed all your updates and glad I did cause I get all this in one go. First off sorry to hear about the knee but glad that seems to be on the mend. I too understand the frustration of heat warping pieces. We haven't got the hottest of weather here but the sun was shining through my sky light and has warped the faceplate on my IM suit, while in the mould!!! All it means is that now when I cast one I have to give it a quick blast with the heat gun to realign it. Also if you do get armour warps use the heat gun to fix them. The bondo is forgiving as all you are doing is putting the fibre glass back into place and the bondo was there in the first place so as long as you're gentle it it will allow it.
I like the fact you are trying something different with the under suit but man your gunna get hot in there! I might look into latex techniques at some point with mine but will see how I get on with my sewn one first.
Thanks for the advice. I did use the heat gun to get everything back to proper alignment once I got it together.
You know. . . If had done what I originally planned to do with the latex (put it directly on the suit) I think it would have been a really good display piece, but it sure as heck could not be worn.
With what I'm doing now by taking upholstery and cushion foams and covering them up with spandex, stitching them onto the undersuit as appliques /detail pieces and covering that with some light layers of latex, it really isn't all that hot. I may have a higher tolerance to the heat, because I'm always wearing restrictive body armor and in 100+ degree heat, but it really isn't bad. I've worn a foam latex suit for something before and it is no where near that bad. I've also planned out where vent locations will be (underarms, chest, groin and leg areas that won't have foam or latex on them. So, I'm hoping that all will be not so toasty once it's finished up. :cool I've never worn a foam armor suit before, but I'd imagine that it wouldn't be more or less worse with heat build up than having to wear a suit of armor made entirely out of foam under the same circumstances. You would be the person that would know for sure on that one though. :cool _________________________________________________________________________
A Little Info
I have about 3/4 of the ab section sewn onto the undersuit. Work was busy this week and didn't allow time to get to all of it. I will finish up that tonight and get some pics of it up.
I managed to get everything for the AC unit in the shed and it is installed and running. The temp thing on it only goes up to 99, but it was close to 120 in there when I turned it on today. It's managed to get it down to 96 degrees now.
So now I have no excuses for not being able to continue with this build. Well, other than the yard that needs to be mowed. Progress is soon to be and I really appreciate everyone still tagging along and reading this thread. It means a lot. In the meantime. . . Here's a pic of my work space for the up and coming stuff. I have electricity and everything accessible to me out there now. :cool I even managed to get it cleaned up and somewhat organized again after getting that AC in.
Until Next Time. . . Keep Building and Make It FUN!!!!
Last edited by a moderator:
averysmallhorse
New Member
It's looking good my friend, what are your shoulders and helmets going to be (sorry if this has already been asked)
Spartan_127
Well-Known Member
It's looking good my friend, what are your shoulders and helmets going to be (sorry if this has already been asked)
Thank you for the kind words. They're definitely appreciated.
I don't believe anyone ever asked me what helmet or shoulders I'll be using. LOL
I think that's because all the files that I am using for this build are on the first page of this thread and there should be a pic of them there too so everyone can see what they look like in pep designer. If by shoulders you're asking about add ons and not the bicep pieces themselves, I do not plan to do anything like that. As I've said before somewhere in this thread, I'm shooting for an accurate as possible Noble 6. I may add the Tac Pad on the forearm and a Leg Pouch just so I can have a place to keep a phone and stuff while wearing it. Beyond that, it's just a plain Jane Noble 6. I'm just shooting for a lot of details in the parts.
Thanks for the questions and everything. Please click the blue link above to see all the files I'm planning on using. At the top of the first page there is also an overall pic of things I've done or am doing. I've been updating it with whatever I'm working on and try to keep it up to date. If there are still any questions about anything I'm using or doing, let me know. Thanks again.
__________________________________________________________________________
Quick Update
I have the ab section sewn on to the under suit now. I would take pics, but when I was putting it on the zipper gave out.
It was a cheap zipper and I was hoping that it would hold up, but apparently not. I'm hoping that JoAnns or something will be open today so I can go get another one to replace it later. Once I get the zipper repaired, I'll get it on me or the dummy and get some pics up.
Last edited by a moderator:
- Status
- Not open for further replies.
Similar threads
- Replies
- 2
- Views
- 579
- Replies
- 2
- Views
- 562
- Replies
- 3
- Views
- 673
Similar threads
- Replies
- 2
- Views
- 579
- Replies
- 2
- Views
- 562