Wet sanding is pretty much like regular sanding, only that you use waterproof sandpaper and keep it wet. The water helps to lubricate and cool the workpiece, so the surface is nicer. It also keeps down dust to pretty much nothing as long as it's wet and keeps the sandpaper from clogging up.
You are using an out of date browser. It may not display this or other websites correctly.
You should upgrade or use an alternative browser.
You should upgrade or use an alternative browser.
ODST Build 1: The Journey Begins
- Thread starter FalseShepherd
- Start date
- Status
- Not open for further replies.
Wet sanding is pretty much like regular sanding, only that you use waterproof sandpaper and keep it wet. The water helps to lubricate and cool the workpiece, so the surface is nicer. It also keeps down dust to pretty much nothing as long as it's wet and keeps the sandpaper from clogging up.
Interesting, so just some waterproof sandpaper and spray it with water? Seems too easy but I will give it a shot when I get back to the helmet next week. Can I do that with my tools or is that a by hand only technique?
You pretty much got it. It doesn't really matter how you get the water on there, but a spray bottle should be good. Just make sure to spray water again occasionally an the water will get filled up with dust and eventually turn into a paste, although that could actually help with polishing on the high grits. It's probably easier by hand, but as long as you can get waterproof sandpaper for your tools, I don't see a reason why it shouldn't work. If you have an electric sander, glueing waterproof sandpaper to the sanding pads with spray adhesive works for a while.Interesting, so just some waterproof sandpaper and spray it with water? Seems too easy but I will give it a shot when I get back to the helmet next week. Can I do that with my tools or is that a by hand only technique?
You pretty much got it. It doesn't really matter how you get the water on there, but a spray bottle should be good. Just make sure to spray water again occasionally an the water will get filled up with dust and eventually turn into a paste, although that could actually help with polishing on the high grits. It's probably easier by hand, but as long as you can get waterproof sandpaper for your tools, I don't see a reason why it shouldn't work. If you have an electric sander, glueing waterproof sandpaper to the sanding pads with spray adhesive works for a while.
Cool I will give it a shot. Thanks!
Thank you! Yes, wet sanding simply means using a wet/dry sandpaper (the package will state this), and while sanding, you just use ample amounts of waterThanks! Also yes I have heard of wet sanding but have no idea what it means. Can you explain it a bit for me?
Also, EVAkura, I'm super jealous of you and your work. Very impressive.
 It helps by keeping the dust down to zero, applying lots of water will keep the sandpaper clean - thus more effective, and your sanded area will be so much smoother!
Was kinda burned out last week but I did some visor prototyping so that got me motivated again. Looks good from a distance but God awful up close. I think I have a good plan though just need to buy new plastic. Third time's the charm!


I did sand and do some wet sanding, I could only find 400 and up for wet sandpaper so it doesn't really help that much for dust control since the rough grits make the most dust... But it does make a nice smooth surface. I wet sanded over the whole thing with 400 grit and 800 grit and then slathered spot putty. Unfortunately, I ran out of time and will have to do the final sanding and spot putty and sanding and primer and spot putty and sanding and primer etc... Next week.
I was hoping to get the helmet at least wearable before they released ODST for MCC PC but it looks like I might be able to almost finish it instead! Seriously, guys get ODST launched for PC.
Hey Gooselli ! Welcome to the forum! Thank you for the compliments! I have worked crazy hard on this set and it's taking forever.
I bet your hayabusa armor looks great! You should make a thread! I can almost guarantee you will get nothing but encouragement. I have read a lot of posts here on the 405th and I can honestly say that this is the most supportive group on the internet. I would love to see your armor progress -and I know many other people here would too!
I bet your hayabusa armor looks great! You should make a thread! I can almost guarantee you will get nothing but encouragement. I have read a lot of posts here on the 405th and I can honestly say that this is the most supportive group on the internet. I would love to see your armor progress -and I know many other people here would too!
- Member DIN
- S434
That is gonna look great when you get it painted FalseShepherd definitly don't knock yourself. pep buckets always look weird before paint. also the scratches on the visor will look pretty cool with the rest of the weathering.
Rock Lobbster
Sr Member
- Member DIN
- S098
Dang! Brand new and starting with pepakura. You're a brave person, this is looking fantastic so far though.
Yeah sanding the bucket is taking a long time. I am getting close to doing the primer check. Hopefully it won't need anymore spot filling bc my tube is empty and I gotta wait till payday to buy more.
he4thbar I suspect the final visor will have some similar scratches and whatnot, the above visor was more of a template/practice run for the tinting and how Im going to cut the plastic to make it fit.
Rock Lobbster , thanks! I am actually kinda intimidated by foamsmithing. Maybe that's weird, but pep seems almost easier (albeit more time consuming).
Hopefully have a good update by the end of the week.
Rock Lobbster
Sr Member
- Member DIN
- S098
Hey man it's all about personal choice. I'm a foamboi myself lol.Yeah sanding the bucket is taking a long time. I am getting close to doing the primer check. Hopefully it won't need anymore spot filling bc my tube is empty and I gotta wait till payday to buy more.
he4thbar I suspect the final visor will have some similar scratches and whatnot, the above visor was more of a template/practice run for the tinting and how Im going to cut the plastic to make it fit.
Rock Lobbster , thanks! I am actually kinda intimidated by foamsmithing. Maybe that's weird, but pep seems almost easier (albeit more time consuming).
Hopefully have a good update by the end of the week.
And your work is beautiful. I suspect I will try some foam work eventually, but for now Im loving the pep!Hey man it's all about personal choice. I'm a foamboi myself lol.
Rock Lobbster
Sr Member
- Member DIN
- S098
I wish I had the patience for pep, it looks rather interesting to do. If I didn't have 3d printers I would totally try it out for the more detailed parts.And your work is beautiful. I suspect I will try some foam work eventually, but for now Im loving the pep!
Post pictures! We love pictures! LOL Hayabusa is an awsome armor set to go with. I almost picked it. Post pictures tho. Do it.....I made an account just for this post, and i just wanna say its looking awesome and i cant wait to see the finished result, im currently working on the hayabusa armor myself, but im too nervous to post pictures of it. though it is coming along very well
Did you do it?
...
...
...
I'll wait
...
...
...
SO, update and question:
It got pretty hard to look at so I went ahead and did a light primer layer. I needed a clean slate to work from. Here is a couple befores:


And afters:


As you can see, its pretty lumpy. I guess I didn't get the top smoothed out quite enough. BACK TO BONDO!
This is what I get for trying to make sure I don't go too heavy on the Bondo.
There are also a few small spots I need to go back over and smooth out, but that will have to wait until next week so I can go buy more spot filler. Also, I need to cut the detail lines in still. I don't think that will be too difficult so Im kinda waiting to make that the "last" ish step before painting.
On to the question(s): Any reason why I wouldn't be able to put bondo directly on top of the primer? Also, should I do some high grit sanding before bondo-ing?
It got pretty hard to look at so I went ahead and did a light primer layer. I needed a clean slate to work from. Here is a couple befores:
And afters:
As you can see, its pretty lumpy. I guess I didn't get the top smoothed out quite enough. BACK TO BONDO!
This is what I get for trying to make sure I don't go too heavy on the Bondo.
There are also a few small spots I need to go back over and smooth out, but that will have to wait until next week so I can go buy more spot filler. Also, I need to cut the detail lines in still. I don't think that will be too difficult so Im kinda waiting to make that the "last" ish step before painting.
On to the question(s): Any reason why I wouldn't be able to put bondo directly on top of the primer? Also, should I do some high grit sanding before bondo-ing?
This is where I ended the week. For context, I work Friday- Sunday and I am pulling overtime on Mondays for a while bc... Money.


I got the Bondo sanded down to 220 grit and am considering doing another layer on the top of the helmet. There are still a few lumps I want to get smoothed out but I like it much better than where it was after the first priming. Next week I will be spot filling, sanding, and priming again. Then I suppose I will have to work on something else... I have been focusing on the helmet for so long I need to remember what else needs doing. It will be good to do some cutting and folding again.
I got the Bondo sanded down to 220 grit and am considering doing another layer on the top of the helmet. There are still a few lumps I want to get smoothed out but I like it much better than where it was after the first priming. Next week I will be spot filling, sanding, and priming again. Then I suppose I will have to work on something else... I have been focusing on the helmet for so long I need to remember what else needs doing. It will be good to do some cutting and folding again.
Attachments
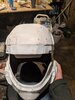
Final update for the helmet for a while. Got it almost done ish. Sanded, primed and going on the shelf for a while. I forgot to cut the detail lines on the front by the "mouth" (?) But I'm not gonna make a whole new post just to post that. I'm finally calling this damn thing done! As much as I love it, it was a ton of work and time.


With the Rookie cosplay guide out now I have so much info to work with. I am very excited to fire up work on other parts of this build now. I think forearms will be next... They have vents
With the Rookie cosplay guide out now I have so much info to work with. I am very excited to fire up work on other parts of this build now. I think forearms will be next... They have vents
Ok so, its been a while. Life has been pretty busy and I have been working a lot. Not necessarily as much on this project as I should however. I did get my right forearm pep'd. I think its pretty good.


I cant do a pic wearing it because the wrist part is exactly the right size for where it is going to sit on my wrist and i can't fit my hand through it. I have to resin and fiberglass and cut it before I can do a wearing it pic.
Scaling the left forearm, I realized that the patterns from the armory have the right forearm twice. There is no different pattern for the left forearm. While the pieces are just mirrors of each other, I would really prefer to have a pattern for each. Does anyone know if there is a way to print out the pattern for a mirrored piece on armorsmith? Otherwise, does anyone have a pep file for the left ODST forearm? I can probs figure it out but I would rather have the right file to work with.
Rock Lobbster
Sr Member
- Member DIN
- S098
FalseShepherd if you go to the armorsmith pattern tab you should have an option to mirror your templates.
- Status
- Not open for further replies.