ODST Build 1: The Journey Begins

Thank you Rock Lobbster . I did find the way to do that. In the mean time, the latest issue is with the "chest base layer". Every single piece in this file does not line up with the one next to it. you can see in the below images that there is no way these two pieces go together.

PXL_20201028_145030795.jpg PXL_20201028_145052666_LI.jpg

These pieces are all from the same pattern, not printed from different scaling iterations. Some of them are from even the same page. When I measure the edges on the armorsmith file even they are different lengths. Not sure what went wrong here or how to fix it...

I printed 46 pages of this damn pattern and none of them seem to fit together...
 
Ok so, its been a while. Life has been pretty busy and I have been working a lot. Not necessarily as much on this project as I should however. I did get my right forearm pep'd. I think its pretty good.

View attachment 298624View attachment 298625

I cant do a pic wearing it because the wrist part is exactly the right size for where it is going to sit on my wrist and i can't fit my hand through it. I have to resin and fiberglass and cut it before I can do a wearing it pic.

Scaling the left forearm, I realized that the patterns from the armory have the right forearm twice. There is no different pattern for the left forearm. While the pieces are just mirrors of each other, I would really prefer to have a pattern for each. Does anyone know if there is a way to print out the pattern for a mirrored piece on armorsmith? Otherwise, does anyone have a pep file for the left ODST forearm? I can probs figure it out but I would rather have the right file to work with.
Looks good :)
 
Couldn't tell you there, I made mine out of foam so I'm just used to my own "user error" haha. I would recommend making the chest base at least out of foam however just for the sake of comfort.
ya know, i considered that maybe I just suck, but my other work is going fine. I have been working on the left forearm and having great success. I actually think its the pattern. I REALLY dont want to make manual adjustments to every damn piece in this pattern...
 
Ok update time. First, progress- I have both forearm pieces pep'd and have begun the resin layers. Its has been kinda cold here in Virginia so I have had to wait a good while between layers. Regardless, they are looking good. The last pic is my low budget system for letting the outside resin layers dry while keeping shape of the piece and not gluing it to a table by accident. It worked pretty well.

PXL_20201106_034321771.jpgPXL_20201106_034330898.jpgPXL_20201105_174849352.jpg

I have also gone back into the "Chest Base layer" pattern and fiddled around some more. I think I fixed my issue. I am not going to go into it too much but if anyone is having a similar problem PM me or something. I rescaled and reprinted that stuff again, but I haven't started cutting and folding yet. I have also been thinking about undersuit layers and whatnot and have a good plan for that. Hopefully, I will be able to get some work done next week on the chest base and get those forearms fiberglassed.
 
Ok, I have actually been working on this, just doing a lot of prototyping and also other projects at the same time. ALso, this update has been in progress for like three weeks I just kept forgetting to take pictures. I have forearms fiberglassed and they are pretty tight. I am going to try to not have to remake them however. The main issue is I want them to be more connected at the back. I do have a plan and we will see if it works. Might be a while before I get to that stage tho.
PXL_20201117_030444126.jpg
I apparently didnt take a picture of the cloth-hinge that I made, but its cool.
I also put the shiny silver layer down and clear coated the "finished" pieces so that when weathering I can scratch down to the shiny silver. That sentence didnt make a lot of sense but I know what I mean. Pieces pictured here:
PXL_20201204_021508008.jpgPXL_20201204_021515110.jpg also somehow, one complete shoulder is missing and I dont know where it went...
I also continued prototyping the visor. I bought some plastic on amazon and began the arduous process of trying to bend it and then tint it. This piece of plastic is my last chance to make a visor before I just buy one off Etsy or something. The blue visor picture is the first one I was able to get out of the plastic, but it ended up being too small to fill my *cough* visor hole.
PXL_20201204_021520926.jpgPXL_20201204_024914614.jpg

The shiny silver one is the one that fits, but I had run out of blue tint so its gonna be silver. This plastic is pretty strong but does NOT want to hold a crease. I was able to put a crease in by heating a butter knife in boiling water and pressing it against the crease line on the visor so that it heated up in one specific area, then folding it over a right angle. The visor before tinting is shown here

PXL_20201125_165944585.jpg

It looks pretty good but on close inspection has some issues. Basically, I am struggling to get the pieces of plastic to stick together as one piece. I am resorting to a clear JB weld that works with "most plastics" and gonna try that. You can see in the blue visor a black smudgy line at the connection point that is a generic JB weld that I used to test the JB weld theory. I am awaiting my clear weld from amazon still but will see if that works well enough. I am excited to see if that works out and have a mostly finished helmet.

I also picked out the base color and secondary color I am going to use. and began prototyping the shoulder base layer that I am going to use to attach the armor. ALSO, I continued working on the pep for the chest base layer and realized that I actually have not fixed my pieces-fitting-together issue. So, I am making manual adjustments to every piece. Which sucks and takes a long time.

Outside of halo, I rewired/installed a bunch of outlets in our kitchen and basement, went back and fixed some poor plumbing fixes I put in last winter that needed review, made a bunch of progress on my next build (I know I'm bad for starting a second before being even close to finished with the first), and have finally finished getting the baby room all ready. And of course work has taken up a bunch of time as well. I hope to make more frequent and less jam-packed updates going forward, and don't be surprised if I stop all together for a while once the baby comes. I do promise, however, that I WILL FINISH THIS BUILD. eventually.

That's all for now!
 

Attachments

  • PXL_20201125_152757264.jpg
    PXL_20201125_152757264.jpg
    3.1 MB · Views: 167
Color scheme update!

This is what I'm thinking so far. This is pre-weathering/distressing. My tape seems to have pulled a small spot of paint off on the shoulder piece but otherwise I think it turned out ok.

PXL_20201209_181021339.jpgPXL_20201209_181025019.jpgPXL_20201209_181029307.jpg

I think I'm too close to this project because I can't help but see all the little areas that aren't 100% perfect. They are driving me crazy. I need to remember that this is my first build and I can't expect it to be perfect.

In other news, the silver visor is still in progress. It may or may not be done by the end of this week.
 
And to follow up: I indeed did get work done on chest base pep and forearms bondo. Not enough progress to be worth taking pictures, but steps in the right direction.
 
Ok. Big news, not a lot of progress though. I have been delayed by the arrival of my first child. He's a cutie and he takes up SO MUCH TIME! Not having to go to work is a good time, but the time I have spent here is not necessarily a "good" time. Good news is he's healthy and gaining weight and everything.
IMG955829.jpg PXL_20201230_002222315.jpg
Bad news is he knows how good looking he is.

ALSO,

I got myself a christmas present:

PXL_20201230_174820383.jpgPXL_20201230_174829325.jpg

3D printer! Woo! I'm pretty new to this world, but its pretty amazing. That doggy is my first test print after building the machine, and leveling the bed. Its pretty good. I'm already super excited to print a million things. I accidently started another print, not realizing how big the file would be. Halfway through the print my screen did this:
PXL_20201230_210714812.jpgPXL_20201230_210709334.jpg

Not sure what it means, but it looks not right. The print is still going so, I'm gonna leave it alone and reset it if the print succeeds or fails. I think I'm feeling good about starting to print something more than a random test object. Unless the printer is broken, then we will put this on hold until I figure out what happened...

NOt to worry though, I am not going to stop working on the ODST suit. Also, I intend to keep making the suit out of pep and bondo. I really like the process and I want to be super proud of myself for making the whole suit out of pep/bondo. I am however, going to start printing other stuff for other builds. I also am going to print the SMG and the SOCOM for my ODST suit. Pep-ing those looks ridiculous. Also, I'm going to start printing other build suff, like my Jedi Clone Wars armor and maybe a mandalorian helmet, Republic Commando helmet... so many helmets... hehehehe

Though printing helmets on this little printer is going to take a while but im cool with it. It will be a fun learning process.

I almost have one forearm sanded and good to go for painting. I just need to find an hour somewhere to sand and spot fill real quick.
 
Congratulations Shepard on the newborn! I wish you the best of luck with your new child.
I wish I could help with the printer but uh... I have no idea. Just keep an eye on it to see if it happens more than once, and if so, you might need to use that warranty.
 
Alrighty folks. I have still been working and have what feels like a big update. First off, for anyone remembers the issues I was having with the files for the "chest base layer":

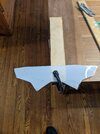
I essentially decided to work with the files that suck and manually edit each piece to make them fit. This was a frustrating and time-consuming process. She ain't pretty, but she is done.

PXL_20210117_182303783.jpg

It looks different than you might remember the piece looking like because I edited out the "straps" that are on either side and I am going to make my own that attach to the chest plate. ALso, with all the finagling it looks kinda weird. Basically, i am hoping to hide the ugly with bondo. And yes, I know that making this piece out of bondo may not be a great idea, but I am not willing to start learning foamsmithing yet. If this piece is too ugly, I may go that route, but Im just not ready to do that yet.

Second, I did the paint job on the other shoulder. I went with a different pattern than the first one because I thought it might look cool to have the asymmetry. I like it. I also weathered the first shoulder and it looks pretty cool. The first one is obviously the left one and the new one is the right.
PXL_20210117_182204079.jpg

Third, I weathered the helmet some. I tried using sandpaper to scratch away at the top layers of paint, but found it difficult to not dig too deep and scratch all the way to the bondo. So, I decided to use a slightly more dangerous method. I got some acetone on a rag and used that to rub away the paint in spots. After that I used sandpaper to make little scratches, and blackwashed a few times. The blackwash is kinda hard for me. I am not sure how much to water down the paint and I don't know how long to let it sit on the helmet. I think I have a good system though - I think it looks pretty good.

PXL_20210117_182430742.jpgPXL_20210117_182438098.jpg

Finally, I sanded, and painted one forearm. I kinda hate it but I think I just need to cut in some details and make it less smooth looking. I have plans to make it a little more realistic looking and a little less smoothly boring. Anyway here's that:

PXL_20210117_182238773.jpgPXL_20210117_182245293.jpg

The other forearm has two layers of bondo and a layer of primer. There are some spots I need to hit again with bondo before spot filling but it is coming along nicely.

For anyone who cares, my son is doing fine and everything with that is fine. The sleep deprivation is getting kinda old, but we are falling into a good routine.

ALso I got Onward for my oculus quest and while the graphics leave something to be desired, its super fun. If anyone here plays Onward and needs a teammate, I am generally available at some times during the day. Hit me up.

I think that is it for now. My printer is currently not functioning and I am in communication with tech support people. Basically, the machine turns on and the screen lights up but just lights up blue and never goes to the home screen. Just stays blank and blue forever. Any tips on that would also be appreciated.

I have also been on the forum a lot looking at some amazing work from everyone else. It both motivates me to work on this and makes me feel bad that I am moving so slowly. Anyway good work all around! Thats it for now!
 
Really liking the progress on this build!
have also been on the forum a lot looking at some amazing work from everyone else. It both motivates me to work on this and makes me feel bad that I am moving so slowly. Anyway good work all around! Thats it for now!
Also don't feel bad for moving slowly, we all work at our own pace. Keep up the great work!
 
Finished the forearms. They look a lot better than they did. I'm pretty happy with them.

PXL_20210128_232426267.jpg

It's pretty cold here like all the time so I'm in mostly pep mode for a while. Currently redoing the chest piece and abs stuff.

Also, voila!

PXL_20210202_163108393.jpg

My first 3d printed prop. It's very rough and needs a lot of cleanup but it's also pretty cool. Got the file off of thingverse.

Hopefully will have more to report after this week!
 
Hhhh-okay. Update time. I feel like I worked a lot on this this past week but not sure how much progress actually got made. First things first, I am working on adding the grills/vents to the forearms. I decided they wouldn't be too difficult to add in and that they were important for the overall look of the piece. So, I printed, cut and painted them and now am gluing them down with some clear JB weld that I have left over from the visor. I don't have enough clamps so I only got one side done tho.

PXL_20210212_030517149.jpgPXL_20210212_030519001.jpg


Next, I started attaching the pieces of shoulder armor together. I wanted to do it in such a way that there was some wiggle between the pieces (give the appearance of being hinged) but still be fairly tight/firm. To do this I am using a cloth hinge system between the pieces. I have access to some super durable CORDURA brand fabric so I am using that and JB Welding it to the pieces. The magnets are used to hold pressure on the fabric while the adhesive sets/cures (don't worry I put some thing cardboard between the magnets and the glue so that I don't accidently jb weld my nice magnets to a random spot on my shoulder armor). The cure time on this stuff is ish 24 hours (longer bc it's so damn cold here) so didn't quite finish that process yet either. But here's that.

PXL_20210212_030610761.jpg

I am also jb welding some magnets into my helmet for attaching my visor. My hope is that the magnets will hold the visor in place tightly but allow me to change out the visor at some point in the future if I decide I want to. I will be attaching reciprocal magnets to my visor next week. But I guess I didn't take a picture of that. Oops.

Also, I printed some of those weird looking buckles that go above the chest plate (special shout out to whoever it was who modeled them) sorry I'm bad at remembering stuff like that. The model is in the armory and it's amazing. Super clean and quick print.

PXL_20210212_030456461.jpg

Also, I modeled my own flat screw heads. I noticed that there are a lot of screws visible on the forearm pieces and I didn't have a good way of recreating that look. So, I hopped into blender and modeled up a Phillips head screw head real quick. I had to scale it up 320% to print it at the right size, so the original model isn't quite ready to be made available. I am going to scale up the blender model then put them up on thingverse if anyone is interested.

PXL_20210212_030512580.jpgPXL_20210212_030540247.jpg


Finally, I made some pep progress on the chest armor. The new plate is much smaller than the first one i made. It seems like it will fit well however and still allow me to have some range of motion in my arms. I also did one of those little side pieces.

PXL_20210208_234850969.jpgPXL_20210212_030601228.jpg

Also, I weathered, backwashed, and clear coated the side plates, cod piece, and both shoulders. I didn't finish off the helmet because I think I need to add a secondary dark color to parts of it.

PXL_20210212_030622801.jpg

I think that's it though...

Next week I'm going to work on printing the other Buck-les and peping the abdominal pieces. Also finish the should pad hinging and maybe look at some strapping. Visor magnets, and maybe finish painting the helmet.

Ok maybe it does seem like a lot when you spell it all out.

Anyone who powered through that whole post deserves a medal. Congrats! Now you can go about the rest of your day. Thanks for stopping by!
 
This thread is more than 8 months old.

Your message may be considered spam for the following reasons:

  1. This thread hasn't been active in some time. A new post in this thread might not contribute constructively to this discussion after so long.
If you wish to reply despite these issues, check the box below before replying.
Be aware that malicious compliance may result in more severe penalties.
Back
Top