Rock Lobbster
Sr Member
- Member DIN
- S098
Why do we always have these conversations?” Vaz asked. “I have moral objections, you say it’s the way of the world, and I end up agreeing with you, doing nothing, and feeling like s**t about it.
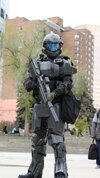
Time for some ONI shenanigans! After the LA event was announced I quickly realized that I needed a suit that could travel, introducing Vaz! The Isaac Hannaford art for Kilo 5 was always a big source of inspiration for me and as a big Kilo 5 fan I was pretty determined to finally tackle this challenge. This will get pretty photo heavy so bare with me!
First, finished build vs the concept art!


Quick Stats
Overall build time: 1 month (It was a heck of a month)
Initial Build: 3 weeks
Upgrades: 1 week
Base:
Sean Bradley Armor kit
3d Printed Components:
Skookum Props: right shoulder, helmet, left knee, codpiece
Myself: Left shoulder, right knee, helmet attachments, MA2B
Let’s get started!
First up was Turbos helmet, I printed it in 2 pieces out of PLA then attached using super glue and my print welding method found HERE.


While that was printing I started working on some knees… a lot of knees. It took a great deal of renditions but I was finally able to get down a design I was happy with. 1 quick print… and it was too small. Slightly scaled up and we were golden!
.jpg")


Next was the shoulders, luckily Turbo was able to give me a hand and use his fusion wizardry to whip me up the right shoulder pad while I worked on the left. The shoulder features a magnetic detachment method so I can separate it for transportation.
Printed with a layer shift that I was able to fix and we were on to the fiberglass resin stage!
.jpg")

All prints got 2 coats of resin on the outside and 1 on the inside to help with sanding and bumps and scratches. While waiting for those to cure I was hopped back onto Fusion 360 to model the helmet attachments that are featured. Both are magnetically attached to the helmet just incase I want to do a “Rookie” ODST using the bucket.


.jpg")
Next up was sanding… a lot of sanding. Started with 60 grit then went 120, 240, bondo and filler primer, then wetsanded 240 320, and 400. Gentle reminder to wear clothes you don’t care about, they will get bondo all over them (also PPE, wear your PPE).


Purchased my soft parts soon after consisting of a chest rig, hip bag, gloves, battery pack for the helmet, and my greatest find, leaf blower straps! Those suckers work PERFECTLY for the shoulder strapping.


2 days later… The Bradley kit arrived! I immediately got to work trimming, sanding, and assembling components. I used M3 screws for the majority of the assembly and (no real surprise here) more magnets! The shins fit together in a “clamshell” design secured by a strap and 2 15lb bar magnets.


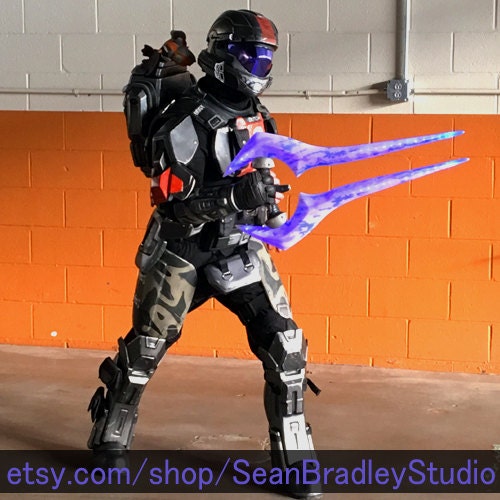
It's finally time for my favorite part, painting! Used a rustoleum matte black primer coat first before hitting everything with Rustoleum slate gray as the base color, I then went back with my airbrush and did the black detailing on all the parts. A silver dry brushed, sponged, and buffed on silver was used for the chipping followed by a black oil wash.


It was time to actually wear it! I used my strapping harness featured HERE to hook everything up then used a ton of parachute clips to rig it up. The harness allows for a sturdy connection and prevents it all from falling down on itself. The chestpiece actually hooks into itself and uses the chest rig as an anchor point for a comfy and secure fit.
.jpg")


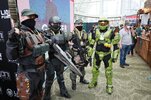
There we have it! My version 1 of Vaz ready to roll for LA!
(Spoiler Alert, we aren’t done yet)


Time for some ONI shenanigans! After the LA event was announced I quickly realized that I needed a suit that could travel, introducing Vaz! The Isaac Hannaford art for Kilo 5 was always a big source of inspiration for me and as a big Kilo 5 fan I was pretty determined to finally tackle this challenge. This will get pretty photo heavy so bare with me!
First, finished build vs the concept art!
Quick Stats
Overall build time: 1 month (It was a heck of a month)
Initial Build: 3 weeks
Upgrades: 1 week
Base:
Sean Bradley Armor kit
3d Printed Components:
Skookum Props: right shoulder, helmet, left knee, codpiece
Myself: Left shoulder, right knee, helmet attachments, MA2B
Let’s get started!
First up was Turbos helmet, I printed it in 2 pieces out of PLA then attached using super glue and my print welding method found HERE.
While that was printing I started working on some knees… a lot of knees. It took a great deal of renditions but I was finally able to get down a design I was happy with. 1 quick print… and it was too small. Slightly scaled up and we were golden!
Next was the shoulders, luckily Turbo was able to give me a hand and use his fusion wizardry to whip me up the right shoulder pad while I worked on the left. The shoulder features a magnetic detachment method so I can separate it for transportation.
Printed with a layer shift that I was able to fix and we were on to the fiberglass resin stage!
All prints got 2 coats of resin on the outside and 1 on the inside to help with sanding and bumps and scratches. While waiting for those to cure I was hopped back onto Fusion 360 to model the helmet attachments that are featured. Both are magnetically attached to the helmet just incase I want to do a “Rookie” ODST using the bucket.
Next up was sanding… a lot of sanding. Started with 60 grit then went 120, 240, bondo and filler primer, then wetsanded 240 320, and 400. Gentle reminder to wear clothes you don’t care about, they will get bondo all over them (also PPE, wear your PPE).
Purchased my soft parts soon after consisting of a chest rig, hip bag, gloves, battery pack for the helmet, and my greatest find, leaf blower straps! Those suckers work PERFECTLY for the shoulder strapping.
2 days later… The Bradley kit arrived! I immediately got to work trimming, sanding, and assembling components. I used M3 screws for the majority of the assembly and (no real surprise here) more magnets! The shins fit together in a “clamshell” design secured by a strap and 2 15lb bar magnets.
It's finally time for my favorite part, painting! Used a rustoleum matte black primer coat first before hitting everything with Rustoleum slate gray as the base color, I then went back with my airbrush and did the black detailing on all the parts. A silver dry brushed, sponged, and buffed on silver was used for the chipping followed by a black oil wash.
It was time to actually wear it! I used my strapping harness featured HERE to hook everything up then used a ton of parachute clips to rig it up. The harness allows for a sturdy connection and prevents it all from falling down on itself. The chestpiece actually hooks into itself and uses the chest rig as an anchor point for a comfy and secure fit.
There we have it! My version 1 of Vaz ready to roll for LA!
(Spoiler Alert, we aren’t done yet)
Last edited: