Painting help

Status
Not open for further replies.
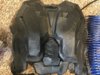
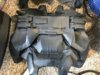
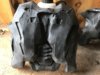
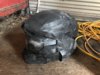
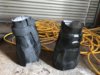
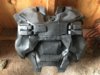
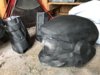
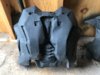
So I have used the pepakura and fiberglass method to make a whole suit of armor. So now I've started painting, started with a base coat of black spray paint on the chest. However I have ran into an issue. I have a series of uneven grooves and drops all around the chest plate (see pictures). I assume this is because of the epoxy resin applied to the outside of the armor, it must have been uneven. So I think I have two options, 1. Attempt to sand the whole chest plate down and then repaint it. 2. Remake the chest plate out of foam hoping that leads to a more consistent texture.
I wanted to know if anyone has experience with this issue and had any advice to supply.
 

Attachments

  • IMG_1504.jpg
    IMG_1504.jpg
    2.1 MB · Views: 238
  • IMG_1503.jpg
    IMG_1503.jpg
    2.8 MB · Views: 237
Hellooo, so with my helmet i used print epoxy and had uneven edges and drips/droops so i tried sanding as much as possible but there is only so much sanding you can do before you ruin whatever you're doing. I do know it wouldn't hurt to try sanding it down but it would be a lot of sanding. I know that primer filler helped a tad on mine. I also think that if you want something durable and a little more uh....flexible in case you fall or something then foam and plastidip will work a CHARM. Did you use filler primer before painting these?
 
Hellooo, so with my helmet i used print epoxy and had uneven edges and drips/droops so i tried sanding as much as possible but there is only so much sanding you can do before you ruin whatever you're doing. I do know it wouldn't hurt to try sanding it down but it would be a lot of sanding. I know that primer filler helped a tad on mine. I also think that if you want something durable and a little more uh....flexible in case you fall or something then foam and plastidip will work a CHARM. Did you use filler primer before painting these?
I just gave them a thorough sanding and repainted them, and I think it did certainly improve things. Took about 3 hours. It's not flawless though.
I did not use filler primer, I used two in one primer and black paint. Krylon brand. I'll upload a few pictures of the updated pieces in a bit.
 
You have officially entered "THE NEXT STAGE" of the pepakura process. Fiberglass resin inside and outside, and fiberglass cloth inside will add strength and structure, and then bondo/ body- filler will help make everything smooth.

Where you're at right now will require 3x10⁷ hours of sanding in various grits. Sand everything until it's smoooooooth as glass and the lines and shapes are clean, then form the body- filler wherever you need it. You can use it to smooth dimples or raise details, and using old playing cards can help give you flat, crisp edges.

Flat, crisp edges and clean lines are what makes the difference between an amateur build and a professional build. Along with other things, I'm sure, but that's the big thing I've noticed.

So that's what I'd recommend. Glass it, then bondo and sand and bondo and sand and bondo and sand, etc... until complete!

It's a lot of work, but you get what you put into it.

It's looking real good, by the way!
Thank you! I sanded them for another good 3 hours yesterday and will be applying a fresh coat of paint today. So I'll see how it looks then.
As for the bondo, I put some on the top of the helmet to help smooth it out, but in general I find it super hard to work with and I always end up sanding 99% of it off in the end anyway, so I think I am doing something wrong on that front.

Use smaller amounts, and spread it on in thin layers. What your mostly using the bondo for is to help turn the piece from a digital, angular thing to a rounded, smooth thing. If you put 35 very thin layers on, you'll end up doing less sanding in the long run.

Does that make sense?
 
Use smaller amounts, and spread it on in thin layers. What your mostly using the bondo for is to help turn the piece from a digital, angular thing to a rounded, smooth thing. If you put 35 very thin layers on, you'll end up doing less sanding in the long run.

Does that make sense?
Yeah I've heard that before, but even with the thinnest layer I can put on I end up sanding most of it, and there are always a bunch of holes.
It'd be better and easier to work with if the consistency was closer to butter instead of a really thick peanut butter.
I put on another coat of paint today and it seems the 6 hours of sanding did it, there are no more drip droops and it looks very even and uniform, I will take a picture later.
 
....I wonder why your bondo is so thick..... it's not a liquid by any means, but should be less viscous(?) Than that... Try stirring it in the can?
 
Last edited:
Could it be the temperature or where you live. I'm in florida so it is hot and close to sea level. My bondo is fairly thick aswell, but not unbearable
 
Could it be the temperature or where you live. I'm in florida so it is hot and close to sea level. My bondo is fairly thick aswell, but not unbearable
It has been in the 40s here for the last week, I'm in the midwest.
The temperature is definitely having an effect on the coloration of the paint, it's creating different shades of black. I might wait until it's a bit warmer outside, maybe around mid 50s or low 60s, to keep painting
 
....I wonder why your bondo is so thick..... it's not a liquid by any means, but should be less viscous(?) Than that... Try stirring it in there can?
I considered adding water to it to try and thin it a bit, but didn't know if it was a good idea or not.
I have an additional question, should I apply a varnish to my armor when the paint job is complete? I've heard some people do it and some don't.
 
you don't need to apply a varnish after paint. however if you want to make your suit water proof and protect the paint, it is suggested to go over it with a clear coat when you are done with paint. but really its up to you.
 
I considered adding water to it to try and thin it a bit, but didn't know if it was a good idea or not.
I have an additional question, should I apply a varnish to my armor when the paint job is complete? I've heard some people do it and some don't.

I know you are into the painting stage now, so this is a tad late, but I just wanted to chime in for your future projects!
You do not want to add water to body filler. It will absorb into the talc powder (which makes up a good portion of the “filler”), and can cause issues with cracking, non-curing, etc.
I personally wouldn’t recommend thinning your filler (this is coming from an Autobody tech who works with the stuff on a very regular basis). If it gets much thinner than its normal consistency, it will easily get too runny and create more work for you overall.
That being said, you can add some polyester resin into it (filler is literally polyester resin thickened up with talc powder and hollow glass beads), which will make it slightly thinner, just don’t go too crazy with it haha.
 
Status
Not open for further replies.
Back
Top