[PICTURE HEAVY] Sean Bradley ODST Kit Build (First Halo Cosplay!)

Status
Not open for further replies.

TheAstroBot

Member
Hey guys! So, let me preface this with a few things:

1) I'm far from an experienced Cosplayer- And this is actually the first kit I've ever done.
2) I ended up changing a few of the designs and choices made by the original prop maker, due to either experience, available resources, or other constraints.

So, my helmet arrived half a month prior to my armor, giving me plenty of time to work on it. At first, the dremel work was quite a pain in the ass, but slowly eased up over time. Once that was done, Sanding took little to no time, and painting went over smoothly (Besides an unfortunate instance of masking the helmet wrong for the stripe, which I'd corrected in time for the shot with the painted helmet on). I still need to properly install the visor, and paint the rimming black, as well as put in some more battle damage, as my hesitance towards how much damage I wanted on the helmet actually yielded less than I'd hoped, but I digress.


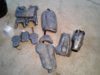
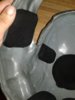
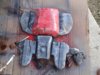
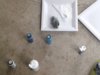
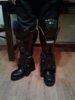
I don't really have much on the legs, as I'd forgotten to take photos. However, those turned out well, as you can see in the fitting. The belt practically went the same, too- Minus the sewing. I ended up using rivets and some other things to add what I felt like a more military feel- Metal fasteners of sorts, and I really liked that. Now, interestingly enough, I ended up painting the belt plates first, to prevent the nylon from being painted over, and I'm quite happy I'd done that.
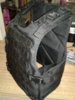
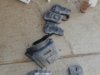
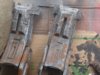
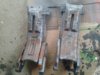
The gauntlets had been split up into two parts- The bracers and the elbow cap. I ended up only riveting the elbow caps on one end, to create a hinge with elastic to open the parts up.
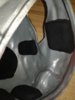
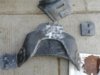
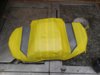
Thighs ended up using a different kind of fastener to secure the parts to my inner thigh. I cut up velcro fasteners both for ease of removal, as well as the fact that I wasn't too keen on the idea of parachute buckles pressing into my thighs for three days of trooping at DCC.
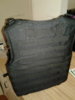
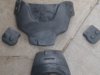
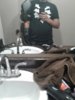
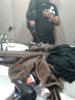
The Chest and Back Plates ended up going exactly how the instructions wanted- So I saw no reason for posting the exact same thing as I'm sure everyone on this site and their mother has seen.
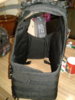
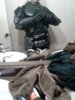
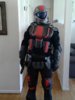
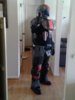
The last two images were fittings for all of the armor I'd completed, as well as just the chest and back, as in the first one, the securing on the chest wasn't done yet. The other was after I'd finished the securing.

Shoulder Armor isn't done yet simply because I have yet to secure it to the knee pads I bought as padding (I can't find the forum where I saw it, but if I do, I'll link it). I also have a 3D Printed Magnum I'm using as a sidearm prop.

So, what do you all think? I'm rather proud of this set up, all in all.


20170420_161443.jpg


20170422_092332.jpg

4%2F22%2F17 - 2.jpg

T
20170426_180548.jpg
20170427_200754.jpg
20170427_204158.jpg
20170427_204150.jpg
4%2F30%2F17 - 1.jpg
4%2F30%2F17 - 2.jpg
4%2F30%2F17 - 3.jpg
5%2F2%2F17 - 1.png
20170502_213151.jpg
 

Attachments

  • 20170425_192226.jpg
    20170425_192226.jpg
    559.9 KB · Views: 371
I didn't see the shoulders. Was it not included in the kit? Or they have not arrived yet?
 
I didn't see the shoulders. Was it not included in the kit? Or they have not arrived yet?

I have them, but I haven't secured them to the padding I'm using for the shoulder pads yet, and at the time of the fitting, I didn't even have the pads, nor see a reason to use some temporary rigging. Those are the last parts (Besides painting and the top pads to the torso armor) to be done- Which is to say, I'll probably get to work on those once I get home.
 
Quick little update, guys. Did one more test fitting with the shoulder pads attached, as well as several fastener ideas I had with Velcro. These are just the photos I took, and I should have more tomorrow.
 

Attachments

  • 20170504_174800.jpg
    20170504_174800.jpg
    532.1 KB · Views: 488
  • 20170504_210513.jpg
    20170504_210513.jpg
    431.2 KB · Views: 450
  • 20170504_210354.jpg
    20170504_210354.jpg
    475.3 KB · Views: 359
need better pictures......It looks great but we can't see too much of the details.
 
Hey, guys! I wanted to say, I completed the rough suit!
By rough suit, I mean the suit without any additions I had planned, such as ammo packs, padding, bandoleers, and accessories. I got to go out to my local Free Comic Book Day event and had a blast, taking a few photos with people, and even met a guy who'd made a Andrew DFT Reach ODST suit and had converted it into a Deathstroke cosplay- But sadly, I didn't get a photo due to the fact I was in line, and couldn't really step out for a longer chat or photos. Anyhow, I thought you'd like to see the rough suit! I still have a few paint apps and cosmetics to add, but this suit as is is able to be worn to events no problem.


What are you thinking undersuit wise?

I used black thermals for the undersuit! I also used some padding I bought from Lowes to supplement a proper undersuit feel for my shoulder parts.
 

Attachments

  • 20170506_114312.jpg
    20170506_114312.jpg
    348.1 KB · Views: 588
  • 20170506_114302.jpg
    20170506_114302.jpg
    355.9 KB · Views: 532
Update! I'm not dead!

So, I recently purchased a few 'ammo packs' to attach to my suit rig, but I'm not fully sure how I intend to attach them. I ended up picking up a few small pistol magazine holsters that I want to attach to the chest, as well as a tactical pouch for the thigh (The practical use being storage for my phone, wallet, ect.). I'm torn between using rivets to just pop them into place (The rivets going on the inside of each pouch), or perhaps using velcro- The only downside to each of these being the former prevents the pouches from being removed, the latter leaving ugly and obvious velcro patches on the gear. Any ideas?

((P.S.- Repainting this kit! Didn't like how the topcoat of paint turned out, due to the darker primer I'd used. Also planning on using Cherry Red or Scarlet acrylics and earthy weathering colors to make this suit feel really worn. Any ideas on how I could make a camoflaouge pattern with acrylic paint, as well?)
20170531_015534.jpg

20170531_015552.jpg
a
20170531_015601.jpg
 
Last edited:
Strong magnets? I don't know if they would hold well enough though. If you could find some cool hardware to attach with, like some kind of buckle or something, it might look like less of an eyesore when the patches aren't attached.
 
Hey, hey. Got another update, this one I'm extremely proud of.

I managed to get everything together for black washing my gear, which I managed to have everything completed except for the back of the neck collar, the back plate, and the chest plate, which I need to disassemble before I repaint them and black wash. By then, I'll hopefully have a nice scarlet or cherry red acrylic paint for the suit, as well as have the scratches and all that done. Still spit balling ideas for the pouches, but I'll come up with something. Until the next update, friends.
 

Attachments

  • 20170603_203139.jpg
    20170603_203139.jpg
    384.8 KB · Views: 361
  • 20170603_193406.jpg
    20170603_193406.jpg
    404.8 KB · Views: 346
Okay, so! Really small update here, but one I'd kinda like to mention anyways as it makes a difference. In the original build, I was using a kinda flimsy belt (Refer to the first image to see it on the suit, the second actually shows the old grey belt I was using in comparison to the new), which caused problems because of how much slack it had. I'm now replacing it with a nicer Leather belt that, when I tested it, held up the thighs, buckle/codpiece, and the butt plate far better. I'm not planning on wearing the hip plates- Make way too much noise for my tastes, since they bang around off of the thighs.

Another important thing is that I'm ordering a Tactical vest to mount all of my chest & back armor to, in order to make it easier for me to put on/take off all of that armor, and shave off considerable time and effort for putting this suit on and taking it off.

As I said, small update, and I'm off to look into some more designs and features I want to add to my suit- As well as decide on where to buy a prop M7S. I'm not sure if I'd rather pick up a Brahnfur Studios kit, or go to Tactonyx and look into getting one with a BR scope to make it look like something out of SPV3 (Which, I LOVE the look of the Suppressed SMG in the mod). Catch all of you cool cats on the flipside (Or whenever I have something worthwhile to update)!
 

Attachments

  • 20170506_114302.jpg
    20170506_114302.jpg
    355.9 KB · Views: 429
  • 20170612_154503.jpg
    20170612_154503.jpg
    1.4 MB · Views: 357
Alllllrighty, update time! This update is more focused on practicality as opposed to designs and looks. I recently ordered helmet padding, as well as a tactical vest to mount my chest and back plating to. The helmet padding has been added (Save one pad), and I still need to take apart the chest and back before I can paint and mount all the gear- Which will hopefully be done once I have a day to sit down and just work on this, as I've been working about a week straight to have money for my tickets to Denver Comic Con in 2 weeks.

(Helmet Padding link: Amazon.com : Myheartgoon Tactical Airsoft Helmet Accessories Cs Helmet EVA Mats, Vel cro 19 Pads Set for the Army ACH MICH Fast Helmet free Vel Cro, Black : Sports & Outdoors))
((Vest Link: Amazon.com : Yakeda Tactical Vest Outdoor Vest Field Play, Army Fans Outdoor Vest Cs Game Vest, cs Field Vest, expand Training Field Equipment Fishing Vest Cosplay of Counter Strike Game--322 : Sports & Outdoors))

Sorry about the ass quality of the chestplate on the vest- My hand was shaky from excitement, haha. The vest is quite nice, and has a plethora of extra pouches that I'm unsure if I want to add to the set to make it look nice. The helmet's padding is about an inch thick, and is nice and sturdy when coupled with the velcro, so I have no fears of something going wrong with that. I added one more piece to the chin, and still have an extra pad that I'm still deciding where I want to add it to make the helmet a bit less wobbly, as I have a kinda small head. Anywho, thanks for checking in, and as always, I'll see you all with another exciting update!
 

Attachments

  • 20170617_150036.jpg
    20170617_150036.jpg
    640.3 KB · Views: 408
  • 20170617_150029.jpg
    20170617_150029.jpg
    544.7 KB · Views: 365
  • 20170617_150021.jpg
    20170617_150021.jpg
    552.8 KB · Views: 430
  • 20170617_144122.jpg
    20170617_144122.jpg
    621.6 KB · Views: 360
  • 20170617_144116.jpg
    20170617_144116.jpg
    538.6 KB · Views: 351
  • 20170617_144109.jpg
    20170617_144109.jpg
    515.6 KB · Views: 331
  • 20170617_143904.jpg
    20170617_143904.jpg
    251.9 KB · Views: 449
  • 20170617_143835.jpg
    20170617_143835.jpg
    217.2 KB · Views: 364
Looking very nice there. There are various militaristic looking snaps, and buckles that could be used to attach your pouches. Another option is putting heavy duty snaps on. They will still look clean but will give you a good attachment point that is removable.
 
Update time, my friends. With Denver Comic Con a mere 5 days out, it's time to put the finishing touches onto this suit. So, today was mostly spent weathering and painting my gear to make those nice and pretty details 'pop', and to do that I purchased several colors of white and brown. Most people would prefer a silver paint to weather their gear, but I felt that white would be more flashy as far as a stressing to the metal, as well as I was concerned that a silvery color wouldn't show up too well against the similar colored armor, and not be bright enough. However, I am super happy with this.

For the weathering, I ended up mixing several whites to create a somewhat glossy/pearly white color, which I then dabbed steel wool into, and brushed it along the edges, then going for the inside once there was less paint to form the look of more stress around the edges, but still some on the inside. Then, I'd take a clean steel wool and scratch at the paint until it was somewhat faded in appearance.

The mud was done similar to the fashion of blackwashing- Brown paints that were thinned, and then had a paint sponge dipped in.The only real difference is the fact that I flicked the sponge in the drippy paint solution to make it have the effect of spattering (which was supplemented by a few little thicker paint blobs, which made it look grainy and textured, like unmixed sediment). Often, I'd find myself lining up pieces to make sure the splatters followed the same direction. Honestly, I think the chestplate looks the best out of all the parts I'd dirtied up- The spatter and wear looks very nice, in my opinion!

Of course, I'm sure you all may notice the writing on the back- "Feet First- 405th". The idea was inspired by a youtube video I'd seen of a meetup in Hawaii, where the ODST there had the same thing painted on his helmet. This cool idea coupled with the fact that the biggest piece of criticism on ODST suits being that the back armor are semi-bland due to no attention created this idea- The term being added onto the back to make it actually have detail, something I'm proud of. I plan to continue painting tomorrow, as well as finish things up on Thursday with all the rigging for the vest.

Thanks for stopping in, and have a wonderful day!
 

Attachments

  • 20170625_185619.jpg
    20170625_185619.jpg
    561.1 KB · Views: 351
  • 20170625_183313.jpg
    20170625_183313.jpg
    638.1 KB · Views: 382
  • 20170625_183309.jpg
    20170625_183309.jpg
    551.5 KB · Views: 374
  • 20170625_115600.jpg
    20170625_115600.jpg
    442.9 KB · Views: 320
  • 20170625_115556.jpg
    20170625_115556.jpg
    513.1 KB · Views: 322
  • 20170625_115525.jpg
    20170625_115525.jpg
    482.3 KB · Views: 358
  • 20170625_115532.jpg
    20170625_115532.jpg
    1 MB · Views: 338
  • 20170625_115547.jpg
    20170625_115547.jpg
    860 KB · Views: 335
  • 20170625_102618.jpg
    20170625_102618.jpg
    749 KB · Views: 359
Status
Not open for further replies.
Back
Top