Rakshasa build

IMG_5281.jpg
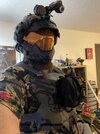
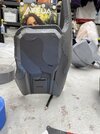
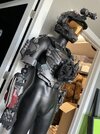
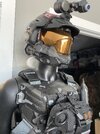
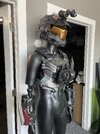
Printed out the chest piece and got it semi-assembled a month back, was finally able to dedicate a little time recently to working on it!

IMG_5292.jpg
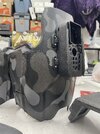
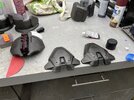
This is a preliminary pass, showing what I have currently to work with. Bicep and hand plates were printed on SLA, Chest pieces were all printed FDM
IMG_5288.jpg
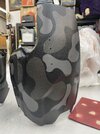
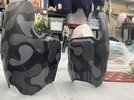
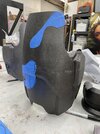
Knee piece was printed SLA as well, and has been processed enough to get molded, working on the mold some this week, a friend is helping me with getting that all done, and once we have our first pull from the mold, I share some more on it!
 
Little progress has been made this month, I was able to get the chest piece painted and all assembled! The straps also came in, I'm using These Straps from Amazon to act as rigging straps as well as just necessary straps for the undersuit details. I got 2" and 1.5" straps. Currently waiting for more silicone for the other halves of my molds (Mold maker has left the state for her new career but she was able to get a majority of the work done for me) So once I get those other halves poured I'll be sure to update on that! Otherwise, still printing calves and bicep armor, thighs next, and finally boots (Since I kind of want to remodel my boots).

Pretty minimal update, but I'll hopefully have more again soon.
 

Attachments

  • IMG_5532.jpg
    IMG_5532.jpg
    1 MB · Views: 90
Loving this build so far . I was thinking of going with an army green pattern for my next suit but seeing thus just makes me want to it all grey and black multicam. Keep up the awesome work and progress posts mate.
 
Little progress has been made this month, I was able to get the chest piece painted and all assembled! The straps also came in, I'm using These Straps from Amazon to act as rigging straps as well as just necessary straps for the undersuit details. I got 2" and 1.5" straps. Currently waiting for more silicone for the other halves of my molds (Mold maker has left the state for her new career but she was able to get a majority of the work done for me) So once I get those other halves poured I'll be sure to update on that! Otherwise, still printing calves and bicep armor, thighs next, and finally boots (Since I kind of want to remodel my boots).

Pretty minimal update, but I'll hopefully have more again soon.
I think the Hawaiian undersuit is the best undersuit!


Hype Hype Hype Hype

This is just a quick little hype video I made, Still working on getting parts molded, I'll be buying more silicone tomorrow and getting the molds finished so I can actually get some pulls! Looking forward to it! after that I'll print some more components and that will be the upper body finished, then I start legs! Thinking about foaming the thighs for some flexibilty (I'd like to actually be able to kneel in this suit lol
 
I'M NOT DEAD YET!!

It's been a while and I've been trying to do a little work at a time to try to get some progress made on Rakshasa. Today I was able to get some remarkable progress! From base layer applied on Friday, and walking in today, I was able to apply 2nd coat of paint, and then final coat.

The thighs were masked off in the same blotchy style I've been doing for the rest of the armor pieces, and after paint I was able to bolt on the Tac pad attachment to the thigh!

While I was waiting for paint to dry on knees I went ahead and spent a little time working on the Tac pad more, and was able to make a little light and panel for the pad so that I could turn it on whenever I wanted and have a cool design on the face! Really fumbled my way through figuring it out, but was able to get something in the end that I was really happy with!

I pre-weathered the face of the tac Pad, but I'll be doing a general weathering pass over everything once all the parts are painted and assembled.
 

Attachments

  • IMG_6337.jpg
    IMG_6337.jpg
    1.9 MB · Views: 60
  • IMG_6335.jpg
    IMG_6335.jpg
    1.8 MB · Views: 58
  • IMG_6334.jpg
    IMG_6334.jpg
    1.5 MB · Views: 54
  • IMG_6320.jpg
    IMG_6320.jpg
    1.6 MB · Views: 51
  • IMG_6317.jpg
    IMG_6317.jpg
    1.7 MB · Views: 64
  • IMG_6316.jpg
    IMG_6316.jpg
    1.8 MB · Views: 53
  • IMG_6344.mov
    8 MB
  • IMG_6345.mov
    5 MB
Putting parts on a mannequin really brings a suit build to life. more than half of the suit isn't even on him yet and manny the mannequin is looking great. I'm working on some of the strapping this week, all armor pieces except for codpiece and grenadier shoulder are complete. I'm wanting to really get the waist strapping solidified so I can figure out how I would like the Thighs, Shins, and knees to attach to the undersuit. I've been keeping a close eye on ATX Spider's build thread. I'd like to ultimately do a sewn undersuit at least for the vest, but I have some other options I'm exploring.

My ultimate goal is to have this suit finished and in a wearable state before Halloween. I've been invited to go to a very exciting convention and I'm hoping to wear and debut this suit at it. I will post more as I get more complete as always.

Goals as of right now:

1) get cod piece and shoulder finished and assembled
2) finalize helmet (hearing and speaker primarily as well as fans)
3)Strapping for midsection as well as finalizing attachment points for thighs/shins
4) I have been graced with a beautiful ODST Radio backpack model and am very excited to include it into this build
5)WEATHERING (Most likely the final process I will go through before suit is truly in a wearable state.) He's not going to be damaged so much, but he's going to get a healthy dose of mud and dirt and grime and maybe a scratch here or there but very light
 

Attachments

  • IMG_6354.jpg
    IMG_6354.jpg
    1.7 MB · Views: 71
  • IMG_6350.jpg
    IMG_6350.jpg
    2 MB · Views: 78
  • IMG_6349.jpg
    IMG_6349.jpg
    1.8 MB · Views: 80
Photo dump time:

recently work has been a little chaotic, but I've been able to get some work in time to time on my Rakshasa build. I decided that I wanted to move to a Radio pack and used Mickey's pack from halo3 ODST as the model for mine!


IMG_6586.jpg

Very happy with how the backpack came out, it offsets the weight of the chest piece really nicely as well, so the whole chest feels more balanced when wearing it.

I also added some Glowsticks to the chest pack to look more accurate to the chestpiece in game. I added a foam cutout for the pack as well to make it look more full, just to add some real-ness to the pack. The LED in the glowstick will look fine over time, the glow is not as nice as it is in the pictures after the natural glow from the stick wears off, but it's fine since I haven't had to drill into the glowstick and paint it like I had originally intended.

IMG_6660.jpgIMG_6659.jpg

And most recently, I've been able to work on the grenade shoulder since the armor sat a little lower than I liked it to be. I broke my connection points and lifted the piece up a little higher, then after re-attaching, I started to add the grenades to the shoulder plate. This was just done with a 2" nylon strap and some elastic, hand sewn so I could size it how I liked it to sit. The clothespin is temporary, once the other grenades are dry I'll add them in and then rivet the fabric onto the armor piece so it's solid and won't slump off the armor piece while moving.

IMG_6686.jpg
 
Wow, I just looked through this whole thread and I am very impressed!
I really love the finish on your paintjob (and of course the detailwork itself), how did you achieve that textured effect? It really adds a lot to the overall look and I would love to do something like that too.
 
Wow, I just looked through this whole thread and I am very impressed!
I really love the finish on your paintjob (and of course the detailwork itself), how did you achieve that textured effect? It really adds a lot to the overall look and I would love to do something like that too.
Texture has been really fun! I've used super 77 adhesive spray for a lot of the armored texture. Spraying it as a splatter instead of mist leaves a ton of splotches and dots and replicates that armored look perfectly! Combine that with a bed liner spray and follow it all up with spraypaint of your choice and it's perfect! Be sure to let it de-gas for like 24-48 hrs though!
 
This thread is more than 5 months old.

Your message may be considered spam for the following reasons:

  1. This thread hasn't been active in some time. A new post in this thread might not contribute constructively to this discussion after so long.
If you wish to reply despite these issues, check the box below before replying.
Be aware that malicious compliance may result in more severe penalties.
Back
Top