Foam Reach chest armor rebuild

vTRONCATv

Member
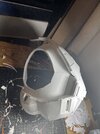
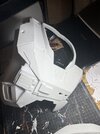
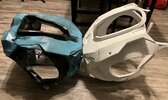
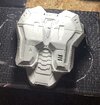
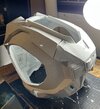
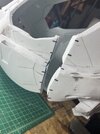
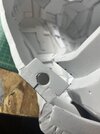
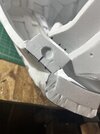
After attending FanExpo in Denver with my suit, I realized how awful wearing a Pep chest armor is, and how much of a hassle it is to make repairs.

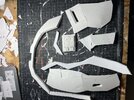
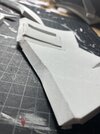
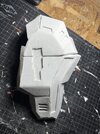
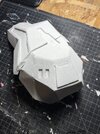
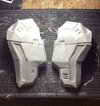
Therefore, I will be rebuilding the chest armor out of foam so I can sculpt all the details I couldn’t with pep (and have a more comfortable time).

This thread will simply chart my process, from printing templates to painting and detailing.
 
After printing and cutting the templates onto heavyweight cardstock, I trace the pieces onto 5mm and 10mm foam. I put most pieces onto 10mm as it is thick and durable, and use 5 for smaller detailed areas and places that don’t need strong support.

Rather than cut out every individual piece and glue them together, I cut out adjacent pieces on one larger piece of foam, and score and taper the back side of the foam to shape it properly.
1DA6F3AC-E5CE-4F79-B690-34CB24899293.jpeg
 
After a couple nights of cutting pieces and scoring and beveling, this is the progress I have made. Tonight I aim to get more cut out and potentially finish the left front side
 

Attachments

  • 1084D70E-1B59-403F-8CF7-59920016EEFB.jpeg
    1084D70E-1B59-403F-8CF7-59920016EEFB.jpeg
    1.6 MB · Views: 79
  • F62A1C47-4D6B-42B0-8F6D-AC5BB26E622F.jpeg
    F62A1C47-4D6B-42B0-8F6D-AC5BB26E622F.jpeg
    1.5 MB · Views: 80
It looks like it's coming together well! Looking forward to seeing how you put together the spine of the back, that was the hardest part for me to make and I still had to do a lot of improvisation for it to work.
 
It looks like it's coming together well! Looking forward to seeing how you put together the spine of the back, that was the hardest part for me to make and I still had to do a lot of improvisation for it to work.
Thank you! I’m likely going to make the lower part of the spine attached to the undersuit rather than the chest so I can have better articulation
 
Tonight I was able to cut out the majority of the left front side. It makes it more manageable when parts are broken down into sections. This will make it easy tomorrow when I assemble them onto the main piece.

I also find that the second half assembling of any part goes smoother because you get the errors out of the way on the first half. In this case, I was able to make the beveled cuts ahead of glueing larger pieces together, so it will look cleaner than the right side (see attached photo of a clean ass beveled cut), although after sanding and smoothing both sides will look just fine.
 

Attachments

  • D22855DD-B7C7-4EDD-9D22-0A18DBC05C6A.jpeg
    D22855DD-B7C7-4EDD-9D22-0A18DBC05C6A.jpeg
    4 MB · Views: 78
  • 831465A2-CE51-441B-86D3-CD382B4FC12F.jpeg
    831465A2-CE51-441B-86D3-CD382B4FC12F.jpeg
    1.5 MB · Views: 61
Tonight I was able to make considerable progress. Almost the entire front and sides are assembled, leaving only the rear and a small part of the lower front. I was able to throw it on for an in-progress test fit

As far as sizing, it’s ever so slightly larger than the Pep chest armor, as can be seen in the photos. The overall shape appears different, but I’m going to attribute that to the back not being assembled, and therefore the piece not being pulled into its proper shape.

Something I am going to have to consider soon is where I am going to cut it so I can wear it. My current plan is to cut across the tops of the shoulders, just behind the collar, and put neodymium magnets inside pieces of foam.

This weekend’s objective is to cut and assemble at least one half of the back.
 

Attachments

  • 0C2A62F6-985A-4FD0-A4C9-43808F036A77.jpeg
    0C2A62F6-985A-4FD0-A4C9-43808F036A77.jpeg
    1.7 MB · Views: 90
  • 0E6F150D-DF8A-4F5F-9829-F2AC71F74439.jpeg
    0E6F150D-DF8A-4F5F-9829-F2AC71F74439.jpeg
    1.7 MB · Views: 97
  • 7701BDA9-16E1-49CA-A756-7D4EA6DA89EA.jpeg
    7701BDA9-16E1-49CA-A756-7D4EA6DA89EA.jpeg
    2.3 MB · Views: 88
  • EAC7DE1D-6CC4-47A9-B676-FC44166121CF.jpeg
    EAC7DE1D-6CC4-47A9-B676-FC44166121CF.jpeg
    2.2 MB · Views: 88
This looks amazingly detailed and you've inspired me to add some more detailed bits to my foam armor, looking forward to seeing this finished!
 
Tonight felt like it took a lot of effort to yield a small piece, even though that’s not the case.

I assembled the right half of the back of the armor. It took a while because I used a combination of 5mm and 10mm foam and included as many subtle details as I could. It’s definitely going to need some foam clay and dremel work, but that’s just part of the process.

Tomorrow I aim to complete the other half of the back, which will ideally be faster since I have a more concrete strategy.

On a good note, my LEDs arrived in the mail so I can light this thing up when it’s completed.
 

Attachments

  • 8EC0A41F-0CDF-48F7-874D-0AE03F3B8F64.jpeg
    8EC0A41F-0CDF-48F7-874D-0AE03F3B8F64.jpeg
    1.9 MB · Views: 58
  • 42B99B7E-C6BB-49E6-BB7D-EE2C601024E9.jpeg
    42B99B7E-C6BB-49E6-BB7D-EE2C601024E9.jpeg
    1.7 MB · Views: 62
Tonight the other half was completed…these are most definitely going to require foam clay and dremel work to reach a quality I am content with. Tomorrow’s task is to complete the center of the back, which will nearly conclude the construction step of this build!
 

Attachments

  • 9DAB3E09-DDF8-4DF9-A751-536E989DBD63.jpeg
    9DAB3E09-DDF8-4DF9-A751-536E989DBD63.jpeg
    2.4 MB · Views: 58
The back is assembled and ready to be attached to the main piece, which is tomorrow’s task. All that remains is the lowest portion of the front, at which point it will be time to fill and dremel this piece.
 

Attachments

  • 64B85143-59B4-4433-AB13-531AAC8EE144.jpeg
    64B85143-59B4-4433-AB13-531AAC8EE144.jpeg
    2 MB · Views: 68
The main part is now together, with just a bit of the from remaining before refinement can begin.

Something I’ve been thinking about is the way I’d like to make this wearable. I definitely want to use magnets to attach the pieces, but I’ve not arrived at where I want to separate the armor at. Any suggestions are welcome
 

Attachments

  • F2065DAB-2705-4A50-BFA8-C4C81318C187.jpeg
    F2065DAB-2705-4A50-BFA8-C4C81318C187.jpeg
    2.1 MB · Views: 63
Tonight, I made cuts along the bottom of the torso, one on either side. I then dremeled a small pocket for magnets to sit in, which will simply snap on and off to make wearing it easy.

I also test fit all my armor with the chest, and confirmed my fear that this thing is too large. I scaled it about 10-15% too large and I’m really pissed about it. Not only does it look glaringly obvious to me that it’s too large, but it rubs against my waist armor ever so slightly, and that’s going to aggravate me to no end. I want to rebuild the entire thing at the correct scale. I’m going to rebuild the entire thing at the correct scale, but first, I’ll just deal with it and wear it to HCS this weekend and hope all goes well.

I’ll continue to post progress of this torso in here, but I’ll also be starting the V3 of the chest in this same thread.
 

Attachments

  • 0EFC0AB5-8BAB-4A56-B0BF-DC60E3EBC5F3.jpeg
    0EFC0AB5-8BAB-4A56-B0BF-DC60E3EBC5F3.jpeg
    2.6 MB · Views: 62
  • F5397D6D-A4F4-41DE-B8D7-9AB70CAD34D5.jpeg
    F5397D6D-A4F4-41DE-B8D7-9AB70CAD34D5.jpeg
    1.3 MB · Views: 62
  • 04F71E73-F185-489E-8BEA-C49FA06093CC.jpeg
    04F71E73-F185-489E-8BEA-C49FA06093CC.jpeg
    1.4 MB · Views: 59
  • CB743C20-2FBB-4516-A344-3B0EBA8A9EAC.jpeg
    CB743C20-2FBB-4516-A344-3B0EBA8A9EAC.jpeg
    1.5 MB · Views: 60
ahh finding out a major foam piece is too large is the worst!! I feel your pain man. At least building the new one will go slightly faster because you know how it goes together now haha
 
This thread is more than 8 months old.

Your message may be considered spam for the following reasons:

  1. This thread hasn't been active in some time. A new post in this thread might not contribute constructively to this discussion after so long.
If you wish to reply despite these issues, check the box below before replying.
Be aware that malicious compliance may result in more severe penalties.
Back
Top