Props Reach Era MG Turret Build

vTRONCATv

Member
After my first outing with my armor, I realized how much better it would be with a prop weapon. Being a Halo and Dark Souls fan, I’m fond of ridiculously large weaponry. Therefore, I’ve elected to make a full scale MG Turret for my first prop weapon.

This thread will be a documentation of my build progress, from paper templates to completion. Ideally, this will be complete within a couple months.
 
First, I traced over a concept image of the turret, while also looking at images of in-game shots of it. I then printed it at the full scale as it is described in Wiki files, which is just about 5 feet long.

Attached are pictures of the printout, with myself (5’6”) for scale, as well as Mud the cat for scale.

The next step is to get PVC pipe to create the skeleton of the prop.
 

Attachments

  • C7C7B234-C4BB-41EB-BF0A-F04B29778B08.jpeg
    C7C7B234-C4BB-41EB-BF0A-F04B29778B08.jpeg
    2.4 MB · Views: 88
  • EF06590B-DC12-470A-A83B-D67F105D623E.jpeg
    EF06590B-DC12-470A-A83B-D67F105D623E.jpeg
    2.4 MB · Views: 87
  • 0A648FF0-3A19-46D9-B449-CEAD484EBED7.jpeg
    0A648FF0-3A19-46D9-B449-CEAD484EBED7.jpeg
    3.4 MB · Views: 86
weapons are awesome to have, and this one is going to look Hella cool, however with the coolness of weapons also comes the pain of carrying it around all day, you gona try and attach it to your armor or just lug it by hand?
 
weapons are awesome to have, and this one is going to look Hella cool, however with the coolness of weapons also comes the pain of carrying it around all day, you gona try and attach it to your armor or just lug it by hand?
I want to say I’ll just carry it around by hand, but perhaps adding a strap or another method of attachment should be worked into it…thanks for the idea
 
I’ve gathered the PVC pipe, which will serve as the skeleton of the turret. I am using 1” diameter pipe, as this is a bit thinner than the barrel at this scale.

To make this more transportable, I’m using a threaded joint so I can build the barrel and receiver as their own pieces, and screw them together when I’m using it.
 

Attachments

  • E0C40FBA-1ED9-4421-936B-9931509D8444.jpeg
    E0C40FBA-1ED9-4421-936B-9931509D8444.jpeg
    3.8 MB · Views: 70
  • 63EF910E-876B-4B09-B693-D411315554E5.jpeg
    63EF910E-876B-4B09-B693-D411315554E5.jpeg
    4.2 MB · Views: 65
  • 788F0209-C723-4C7E-B394-DFC781DB2D10.jpeg
    788F0209-C723-4C7E-B394-DFC781DB2D10.jpeg
    3.6 MB · Views: 72
I am going to make assembly easier by cutting smaller pieces off the main template. I’ll then trace these pieces onto insulation foam and cut a very basic shape out.

I’m beginning with the back: the rear grip and part of the frame
 

Attachments

  • image.jpg
    image.jpg
    2.4 MB · Views: 60
I pulled a fast one and started with the barrel instead. It still requires sanding and the smaller details, but it’s a good foundation. At first the DFT method was a bit daunting, but even now I feel far more confident in my ability to make this look great.

I am now only going to use PVC pipe for the muzzle of the barrel, the gas tube on the bottom, and a threaded joint on the shaft of the barrel so I can still detach it for transport.

As many of us know, (and if you don’t, heed this warning) insulation foam will corrode with many adhesives. I used Loctite spray adhesive for foam and it is fantastic. Coating both pieces with a modest amount creates a nearly instant strong bond.
 

Attachments

  • 91148A72-2108-48C7-B24D-E65A17078B89.jpeg
    91148A72-2108-48C7-B24D-E65A17078B89.jpeg
    2.7 MB · Views: 67
  • FE081FEC-1E05-4988-8C9E-6337D5629F4D.jpeg
    FE081FEC-1E05-4988-8C9E-6337D5629F4D.jpeg
    1.6 MB · Views: 62
commenting to keep up to date on this. might inspire me to make one because I am not smart enough to figure out how to start something like you are already doing lol
I’m just figuring this out as I go, so when you make one you’ll avoid the mistakes I encounter!
 
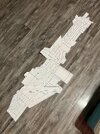
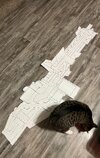
This will be a bit longer post, as I want to describe how I’m forming each section of this as I go. First, have a progress pic of where I’m currently at.
C633EFB2-803F-49A9-99B1-D5A5DFFFAC85.jpeg


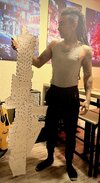
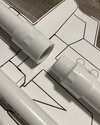
I will use the most recent piece I added, the heat shield, to describe the process.
This image highlights the area I’m working on, and provides reference images of the piece from different angles.
EEE81029-4902-4298-A048-6EC3E39A81FE.jpeg


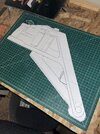
The first thing I do is carve the large, basic shape out of the insulation foam. According to the scale I am building at, and the thickness of the foam, 4 identical pieces are cut and stacked to make this part. I disregard any minor inconsistencies when cutting the biggest shape, as it will be sanded later. I then glue the 4 pieces together
20AA556B-8421-49D9-804B-E84DFDCC1CCA.jpeg
EA631766-552D-47CB-B2AD-792DAAA3C260.jpeg


Once I have the basic shape glued and assembled, I take my paper template and cut it into smaller details. Notice in the reference how the heat shield bevels near the top, just above the vent holes. This detail is drawn onto the outside faces of the piece.
B03894D2-E5F7-48F2-A33C-F37991638AFD.jpeg
844369A9-AAE2-4A5B-981D-B5FAF9638DC3.jpeg

0CFB91EE-878F-4C77-A36C-BA1AD54B45DB.jpeg


The reference also shows a strong bevel on the back of the piece, and a curve inward on the bottom rear sides. These details are hand drawn onto the back face of the piece. The part I am going to cut off is indicated by the parallel pen lines.
3FB37C82-85ED-4D52-BF73-BEEAF9D0C60A.jpeg


I then cut off those sections with my snap blade. Again, I’m not concerned with making them perfect, because in the last step, I sand all the faces and dremel in the details. I am using a hand sander with 120 grit for a vast majority of the sanding. It is very easy to remove too much foam too fast, so take your time with it.
F9BCDBD4-C2B1-4BCB-B852-4FFD668BD0AA.jpeg
0B044B48-AFD0-4DFC-9E0A-D5C14F5436F1.jpeg

F475FC7E-AF2E-4F98-8524-5E49314E856A.jpeg


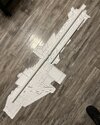
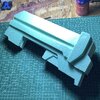
After the part is sanded and detailed, I attach it to the larger piece. This is how I plan to assemble the rest as I work my way to the rear of the turret. Once I finish all the major construction, I’ll go back and add the minute details (rivets, bolts, etc.) and glue down any loose areas.
2EBF0A79-9274-4801-A635-8B7FEBF7C28C.jpeg
 
This thread is more than 8 months old.

Your message may be considered spam for the following reasons:

  1. This thread hasn't been active in some time. A new post in this thread might not contribute constructively to this discussion after so long.
If you wish to reply despite these issues, check the box below before replying.
Be aware that malicious compliance may result in more severe penalties.
Back
Top