- Member DIN
- S314
What's up gamers! I'm finally doing the thread on my newest build! It's my reach Noble six spartan that will be a combo of 3d printing and foam work.
Goal:

(feel free to friend me on xbox!!)
So far I'm furthest on the helmet that I printed using the files from Moeslizzac on Thingiverse! He's a legend who's put out really great files! Thingiverse - Digital Designs for Physical Objects <-- check him out

First I took the file into Prusaslic3r and cut it into parts with my in-slicer cutter!

It still didn't fit so I re rotated and cut it into quarters!

Now I'm ready to print!!

First print off the printer was Awesome!!! but a little small for my head. Resizing and reprinting with armorsmith helped with that. I made the helmet as small as I could on my head so I dont get bobblehead syndrome but I have a really large head.

(ripped game files for reference on the left.)
I got the armor files from nerdforgedesigns on etsy! Reach Male CUSTOMIZABLE Spartan Base Armor Set 3D printable | Etsy
After printing I got to sanding with 60 grit,120,220,400 and then I wet sanded with 2000 grit sandpaper!

Here it is pre-sanding on my head,

post sanding!

I then slapped some filler primer and spot putty on there and sanded it down again with all the grits of sandpaper. 60 grit was probably too much and made more work for me than I needed but the end result was really nice

this is after another coat of filler primer and more sanding.
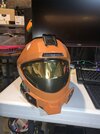
I managed to get my attachments modeled and primed with the helmet.

and I hit it with a coat of grey normal primer. After that, I was able to paint it black for an undercoat. I used a semi- gloss black.

a couple of coats of that and it was ready for cat approval!!!

These attachments were purchased from RockLobbster's Etsy shop and I printed them! They were great but I eventually got the itch to model my own. I'm hoping to model my own helmets soon!!!

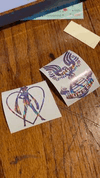
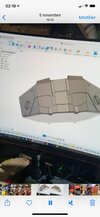
Here's the model I made! It will have lighting channels and be fully mountable! While doing that I needed to figure out a way to mount this to the side of my helmet. I took Moe's model and imported it into Blender. There I was able to boolean a block to the side and get a perfect cutout following the curve that let me place the auntie dot comms on the right angle.

I was happy with the fit and angle it provided.

With all this Cat approved, I moved to giving it a coat of orange.

all masked off and ready to go! (don't pay attention to the comms unit. I should have masked it better lol.)

Just a light first coat was nice to allow me to let it dry for 30 minutes and then return to go over it again. Before I went to paint I put the can in luke-warm water to heat it up a little. This let me provide more even coats.

more coats. Unmasking was weird and showed a lot of places where paint leaked through.

Looks good though! I was able to fill in where the orange leaked into the black with acrylic paint and while the acrylic had a different, more matte appearance, that was all remedied when I hit it with a top clear coat after I finished all the paint.

Moving forward I needed to do the white decals. Not wanting to waste tape by taping the whole helmet, I used butcher paper taped over the huge areas and painters tape only to make the edges of around the white.

It went well! Unmasked below!

I painted in areas that used to be orange with black acrylic paint where they needed it! it worked out great! Next, I needed to add the green and I used the same masking and painting technique. To make this symmetrical was difficult.

By this time I had other prints started and sanded. I wanted to test something so I started with just blasting them with a coat of filler primer first!


it was alright. Showed a lot of flaws that would be filled in with spot putty. This shows off how great nerdforge's models are though!! what a legend! Here's my model primed. It seems to work better with lower layer heights.

I also wanted to try regular bondo and filler putty on the biceps and see what's easier to use. it's spot filler putty. use it. don't be shy. not having to mix things is WONDERFUL.

spot putty and filler primer on the right. Bondo on the left.
I also made the UA attachment for the helmet just as a challenge!

It's a very sloppy model construction wise but it works so I'm not complaining!

Here's the print and here it is getting smoothed!

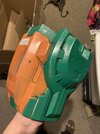
By this time I also got the Auntie dot coms painted and weathered and I weathered the helmet. But not before I found some great window tint that works great for a visor!! Plus I test mounted the comms.

Works great and doesnt go see-through with camera flash!

I used Rub'n'buff on a rag to silver the edges for weathering and then gave the parts a great blackwash!

Idk about you but I think that looks pretty good. On the side, I upgraded my Ender 3 with the Ender Extender kit to make it large enough to print a full helmet in one go!

(regular sized benchy for scale) I'm very excited! changing and updating the firmware was a hassle but now I know some useful skills!

I could have printed the whole recon in one go!
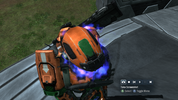
I'm also following RandomRangers youtube tutorials on foamsmithing! images for that to come but I'm basically building two suits at once lol. Anyway here are some wrap up pictures that I've taken with this recon that are a lot of fun")


and a little sneak peek at my next thing

see you in the next posts! If you have any questions please feel free to ask!!
Goal:
(feel free to friend me on xbox!!)
So far I'm furthest on the helmet that I printed using the files from Moeslizzac on Thingiverse! He's a legend who's put out really great files! Thingiverse - Digital Designs for Physical Objects <-- check him out
First I took the file into Prusaslic3r and cut it into parts with my in-slicer cutter!
It still didn't fit so I re rotated and cut it into quarters!
Now I'm ready to print!!
First print off the printer was Awesome!!! but a little small for my head. Resizing and reprinting with armorsmith helped with that. I made the helmet as small as I could on my head so I dont get bobblehead syndrome but I have a really large head.
(ripped game files for reference on the left.)
I got the armor files from nerdforgedesigns on etsy! Reach Male CUSTOMIZABLE Spartan Base Armor Set 3D printable | Etsy
After printing I got to sanding with 60 grit,120,220,400 and then I wet sanded with 2000 grit sandpaper!
Here it is pre-sanding on my head,
post sanding!
I then slapped some filler primer and spot putty on there and sanded it down again with all the grits of sandpaper. 60 grit was probably too much and made more work for me than I needed but the end result was really nice
this is after another coat of filler primer and more sanding.
I managed to get my attachments modeled and primed with the helmet.
and I hit it with a coat of grey normal primer. After that, I was able to paint it black for an undercoat. I used a semi- gloss black.
a couple of coats of that and it was ready for cat approval!!!
These attachments were purchased from RockLobbster's Etsy shop and I printed them! They were great but I eventually got the itch to model my own. I'm hoping to model my own helmets soon!!!
Here's the model I made! It will have lighting channels and be fully mountable! While doing that I needed to figure out a way to mount this to the side of my helmet. I took Moe's model and imported it into Blender. There I was able to boolean a block to the side and get a perfect cutout following the curve that let me place the auntie dot comms on the right angle.
I was happy with the fit and angle it provided.
With all this Cat approved, I moved to giving it a coat of orange.
all masked off and ready to go! (don't pay attention to the comms unit. I should have masked it better lol.)
Just a light first coat was nice to allow me to let it dry for 30 minutes and then return to go over it again. Before I went to paint I put the can in luke-warm water to heat it up a little. This let me provide more even coats.
more coats. Unmasking was weird and showed a lot of places where paint leaked through.
Looks good though! I was able to fill in where the orange leaked into the black with acrylic paint and while the acrylic had a different, more matte appearance, that was all remedied when I hit it with a top clear coat after I finished all the paint.
Moving forward I needed to do the white decals. Not wanting to waste tape by taping the whole helmet, I used butcher paper taped over the huge areas and painters tape only to make the edges of around the white.
It went well! Unmasked below!
I painted in areas that used to be orange with black acrylic paint where they needed it! it worked out great! Next, I needed to add the green and I used the same masking and painting technique. To make this symmetrical was difficult.
By this time I had other prints started and sanded. I wanted to test something so I started with just blasting them with a coat of filler primer first!
it was alright. Showed a lot of flaws that would be filled in with spot putty. This shows off how great nerdforge's models are though!! what a legend! Here's my model primed. It seems to work better with lower layer heights.
I also wanted to try regular bondo and filler putty on the biceps and see what's easier to use. it's spot filler putty. use it. don't be shy. not having to mix things is WONDERFUL.
spot putty and filler primer on the right. Bondo on the left.
I also made the UA attachment for the helmet just as a challenge!
It's a very sloppy model construction wise but it works so I'm not complaining!
Here's the print and here it is getting smoothed!
By this time I also got the Auntie dot coms painted and weathered and I weathered the helmet. But not before I found some great window tint that works great for a visor!! Plus I test mounted the comms.
Works great and doesnt go see-through with camera flash!
I used Rub'n'buff on a rag to silver the edges for weathering and then gave the parts a great blackwash!
Idk about you but I think that looks pretty good. On the side, I upgraded my Ender 3 with the Ender Extender kit to make it large enough to print a full helmet in one go!
(regular sized benchy for scale) I'm very excited! changing and updating the firmware was a hassle but now I know some useful skills!
I could have printed the whole recon in one go!
I'm also following RandomRangers youtube tutorials on foamsmithing! images for that to come but I'm basically building two suits at once lol. Anyway here are some wrap up pictures that I've taken with this recon that are a lot of fun
and a little sneak peek at my next thing
see you in the next posts! If you have any questions please feel free to ask!!
.jpg")
.jpg")
.jpg")
.jpg")