Thanks man! they work pretty seamlessly in practice from my dry run last fall, and they behave pretty dang close to how they look floating on the thigh in game which was a neat touch imo, the bolts on the weapons and the mounting attachments are slightly innaccurate but the tradeoff was definitely worth it to just be able to slam them onto my thighs and not worry about it. And much appreciated on the helmet- It'd be nothing without the insane amount of talent and forethought titlewave put into the model though, really a pleasure to print assemble and finish.Clever idea with the fidlock snaps - it'll look clean mounted up like that! But the helmet though??? It's looking SO clean!!
You are using an out of date browser. It may not display this or other websites correctly.
You should upgrade or use an alternative browser.
You should upgrade or use an alternative browser.
1st Build Scrapper and Gears' ODST Build(s)
- Thread starter scrapper
- Start date
-
- Tags
- 1st build odst armor
Back again with more progress! I have the last couple pieces drying and curing now but I couldn't wait to show off how this sidekick is coming along. Paints are Krylon Camoflauge ultra flat olive, black plasti dip and tamiya TS-38 "gunmetal". File once again is Agular MK50 Sidekick. (and no my finger is not on the trigger in the second photo, don't worry, i just had to angle weird to show off the slide)


This getting to this point made another older issue resurface- the swap from hard to soft holster. the sidekick is large enough that the adjustable soft holster does not contain it! I'll have to make some sort of extension piece to accommodate. All in good time. Hurtling towards something usable as a kit now which is very exciting!
-Scrapper
RestlessEclipse
New Member
That sidekick came out real clean, very impressive work! I'm curious, how was the printing/assembly process for it?
Thanks so much! It wasn't too bad I'd say, greens i gave a very light coat of filler primer and a light sand, the rubberized grips just are raw prints plastidipped(rubber can hide MANY sins LOL) and the gunmetal parts I think I did two spray filler passes on each, the tamiya is a spray laquer technically so it has some properties that help it level itself which definitely helps too. Most of the real small freeblie parts I think I just gave a spray filler pass and then painted without sanding, the tamiya does that well with it! Assembly was a dream honestly- most of Aguilar's weapon files go together pretty intuitively from the ones I've printed and this one is definitely not the exception, the a lot of the little details are glue-in but theres plenty of pieces that just kinda hold themselves together and help with making it function which I personally find really cool- the safety works, the trigger springs with a rubber band, spring loaded mag release, picatinny rail for mounting the lower addons etc. I'd say if I was just focusing on the sidekick and not the full armor build, print time included it would probably be a 3-4 day project with time for paint to dry.That sidekick came out real clean, very impressive work! I'm curious, how was the printing/assembly process for it?
Gearsofhalo
Well-Known Member
On my front - I have designed myself a chest emblem. I'm Southern-Italian-American so I feel like I wanted to represent my culture through Halo in my insignia. I feel like Halo seems to be very global in its depiction of how humanity has stepped forward. (plus we don't get represented in anything that isn't stereotypical or "wise-guy" lol) So I took the Italian Cornicello (horn) necklace "warding off evil" concept and designed a Halo-fied version of it. One is given a circle background and one is given two flanking olive branches (the symbol of a hope for peaceful dissolution of strife). As a whole the one with the branches signifies hoping for peace but being willing to ward it off, should opposition strike. Which I feel like is befitting. The horn also has the feeling of movement of the drop pods. I really am happy with it. But cannot decide on with* the branched or without* I could use a little help by committee if anyone wants to help decide! THOUGHTS?


Hey now we get exactly one (1) italian marine we never actually see in combat evolved! LOL. You know my thoughts on this though so I'll reserve opinions for others! Good seeing that chest so close to finish though I gotta say.On my front - I have designed myself a chest emblem. I'm Southern-Italian-American so I feel like I wanted to represent my culture through Halo in my insignia. I feel like Halo seems to be very global in its depiction of how humanity has stepped forward. (plus we don't get represented in anything that isn't stereotypical or "wise-guy" lol) So I took the Italian Cornicello (horn) necklace "warding off evil" concept and designed a Halo-fied version of it. One is given a circle background and one is given two flanking olive branches (the symbol of a hope for peaceful dissolution of strife). As a whole the one with the branches signifies hoping for peace but being willing to ward it off, should opposition strike. Which I feel like is befitting. The horn also has the feeling of movement of the drop pods. I really am happy with it. But cannot decide on with* the branched or without* I could use a little help by committee if anyone wants to help decide! THOUGHTS?
View attachment 373511
View attachment 373512
Late night post because i just pulled one of my 30 thousand projects off the printers- mods and additions to my ODST! Today's edition- chest capsules. Most people will know these from rookie's (and even more on dutch's) chest in H3ODST.

I thought It'd be a great modular piece to add as a piece of kit but definitely didn't want to permanently damage my chestplate to mount something i would definitely only be using as an optional add on.
My desired design and function specs:

plenty of topography here to grip onto for registration!
Using my trusty ruler and caliper i took some rough gestures of sizing and designed my own case, roughly 2.15*2.15*6", I figure its a good balance between in-game scale and usability. When I was happy I added a touch of extra heft on the back (about 7.5 mm, the reason will become clear in a moment)

Brought it into meshmixer with the base titlewave file for the ODST chest, aligned it how i wanted and cut into the thickened back with a boolean difference to get the proper registration shapes, then added some mounting spots for 15mm magnets:

idea here being magnets would be mounted on the interior of the chestplate in a (non-permanent manner ideally) that you could use to easily snap these on and off of the chest. Seeing as i want this to be strong as of now i'm waiting on the next pelican (amazon delivery van) to drop a stockpile of "I wasn't asking"pull strength magnets in the next few days. What i have in my current magnet collection will have to work for now initial testing!
I pulled the protos off the printer a short while ago, realized the lids needed a bit more wiggle tolerance and started reprinting them as im gluing magnets into these. the initial proof of concept, needing stronger interior mags:

Registrations worked like a charm, both physical and magnetic! will update on this in a couple days when the better mounting magnets are in and the caps are properly seated. Might make a thinner variant as well, I'll see what the cards have in store.
Til the next manic posting!
-Scrapper
I thought It'd be a great modular piece to add as a piece of kit but definitely didn't want to permanently damage my chestplate to mount something i would definitely only be using as an optional add on.
My desired design and function specs:
- non-invaisive mounting- when taken off the chest needs to be undamaged
- functionality- these shouldn't just be blocks that look the part- ideally they should be hollow and openable so that they can store things. (I don't think these would be able to hold MUCH by size and mounting but every bit of storage and functionality is nice right?)
- quickly removable for ease of use- ideally these can be grabbed off and tossed on easily, nothing finnicky that needs to be treated preciously, in line with the other mounting points on the suit, something that perhaps pulls into alignment automatically and has some sort of physical registration to help keep it aligned and in place.
plenty of topography here to grip onto for registration!
Using my trusty ruler and caliper i took some rough gestures of sizing and designed my own case, roughly 2.15*2.15*6", I figure its a good balance between in-game scale and usability. When I was happy I added a touch of extra heft on the back (about 7.5 mm, the reason will become clear in a moment)
Brought it into meshmixer with the base titlewave file for the ODST chest, aligned it how i wanted and cut into the thickened back with a boolean difference to get the proper registration shapes, then added some mounting spots for 15mm magnets:
idea here being magnets would be mounted on the interior of the chestplate in a (non-permanent manner ideally) that you could use to easily snap these on and off of the chest. Seeing as i want this to be strong as of now i'm waiting on the next pelican (amazon delivery van) to drop a stockpile of "I wasn't asking"pull strength magnets in the next few days. What i have in my current magnet collection will have to work for now initial testing!
I pulled the protos off the printer a short while ago, realized the lids needed a bit more wiggle tolerance and started reprinting them as im gluing magnets into these. the initial proof of concept, needing stronger interior mags:
Registrations worked like a charm, both physical and magnetic! will update on this in a couple days when the better mounting magnets are in and the caps are properly seated. Might make a thinner variant as well, I'll see what the cards have in store.
Til the next manic posting!
-Scrapper
Updates to my late night posting- decided to make the thin-line version of the pouches too that would be more aesthetically "accurate" as a swapout, they're on the printer as we speak, I'll have a set of those by the time I sit down for dinner.

(since all of these use boolean differences having large, strong magnets that can be moved around a bit on the inside of the chest is critical because I'm manually positioning these digitally both to position on the chest and bore the magnet holes)
I also took a moment to develop one using the same magnetic mount thats more in the "dutch" doubled up style:


one of these'll go on the printer as soon as I pop the others off. the centauri is working on something else today My main concern on this is the leverage generated by the second pouch just kinda attached onto the side, hopefully the angle i mounted it at helps it from catching and the stronger internal magnets coming in tomorrow will further assist. Sure I could mathematically simulate the mechanics but sometimes the best check is the test print though. This is Halo, not mechanics of solids class!
(since all of these use boolean differences having large, strong magnets that can be moved around a bit on the inside of the chest is critical because I'm manually positioning these digitally both to position on the chest and bore the magnet holes)
I also took a moment to develop one using the same magnetic mount thats more in the "dutch" doubled up style:
one of these'll go on the printer as soon as I pop the others off. the centauri is working on something else today
My main concern on this is the leverage generated by the second pouch just kinda attached onto the side, hopefully the angle i mounted it at helps it from catching and the stronger internal magnets coming in tomorrow will further assist. Sure I could mathematically simulate the mechanics but sometimes the best check is the test print though. This is Halo, not mechanics of solids class!
Last edited:
I know im updating a LOT here on this but that's the speed of rapid prototyping! double capsule is on the bed right now but i just pulled the thinner capsules off the printer. these are definitely more accurate anda touch lighter, of course you're sacrificing some storage space but the bigger one will have its uses in the modularity too, I really like the look of these. on the right of the image is the thinline version with cap and the left is the larger one with more storage.

The difference is approx 3cm front to back of internal storage and external bulk. Closeups of the smaller:


As you can see, you can still fit a reasonable amount in there, considering the size and the fact that its held up with magnets and a couple contours of geometry especially.
Closeups of the larger/OG from last night:


Much more storage space but you can see the rougher interior on this one from playing around perhaps a bit too much with the placement and going too ambitious Oh well! both will have uses. Now we wait for the double test piece, probably will post again tonight since i am excited about this. If you didn't guess i have more marine updates coming down the pipeline VERY soon as well, so we'll be seeing a post about that soon too.
See you all in like... 6 hours? I guess?
-Scrapper
The difference is approx 3cm front to back of internal storage and external bulk. Closeups of the smaller:
As you can see, you can still fit a reasonable amount in there, considering the size and the fact that its held up with magnets and a couple contours of geometry especially.
Closeups of the larger/OG from last night:
Much more storage space but you can see the rougher interior on this one from playing around perhaps a bit too much with the placement and going too ambitious
Oh well! both will have uses. Now we wait for the double test piece, probably will post again tonight since i am excited about this. If you didn't guess i have more marine updates coming down the pipeline VERY soon as well, so we'll be seeing a post about that soon too.See you all in like... 6 hours? I guess?
-Scrapper
Attachments
Ok, large magnets were dropped off and i wasable to try the double capsule out today:

Not bad right? looks great, as long as youre looking at a pic of it and not in person on a moving person. even with the larger magnet the nature of the part seems to not like the current distribution of weight. i have two competing solutions to this issue.
First solution: up the magnet size in the upper half of the pouch: the pouch seems to like detaching at the top, swinging using the lower connection as a vertex and falling off. if that holds, it'll be much easier to hold:


old top and new top magnet for this one.
Second idea and honestly probably a sounder one, make the other pouch's back thicker too and add a third magnet. this is probably a more stable option so i'll be ideating this tonight and hopefully will have a solution tomorrow. we'll see!
-Scrapper
Not bad right? looks great, as long as youre looking at a pic of it and not in person on a moving person. even with the larger magnet the nature of the part seems to not like the current distribution of weight. i have two competing solutions to this issue.
First solution: up the magnet size in the upper half of the pouch: the pouch seems to like detaching at the top, swinging using the lower connection as a vertex and falling off. if that holds, it'll be much easier to hold:
old top and new top magnet for this one.
Second idea and honestly probably a sounder one, make the other pouch's back thicker too and add a third magnet. this is probably a more stable option so i'll be ideating this tonight and hopefully will have a solution tomorrow. we'll see!
-Scrapper
Ok, rigged everything up digitally, printed the proto and i think the three point contact is the way to go.

prob the neatest final model with the boolean difference out of the lot too. toob a couple hours to pump out on the centauri carbon while my bambu is printing an MA5C!


with the right magnets paired to the back this thing should have no issue holding on and popping off perfectly fine. this double set will be going off to Gearsofhalo for his loadout, I'm gonna be keeping the rookie style single capsules as my optional pieces personally. next post will most likely be back to the marine! been working on the back and figuring out if I'm using the same shoulder strap modding I did for my own ODST (which I've already spent the time and TPU on LOL) or if I'm gonna make another set on a newer mod I made up the other night. Test fitting will let us know soon!
-Scrapper
prob the neatest final model with the boolean difference out of the lot too. toob a couple hours to pump out on the centauri carbon while my bambu is printing an MA5C!
with the right magnets paired to the back this thing should have no issue holding on and popping off perfectly fine. this double set will be going off to Gearsofhalo for his loadout, I'm gonna be keeping the rookie style single capsules as my optional pieces personally. next post will most likely be back to the marine! been working on the back and figuring out if I'm using the same shoulder strap modding I did for my own ODST (which I've already spent the time and TPU on LOL) or if I'm gonna make another set on a newer mod I made up the other night. Test fitting will let us know soon!
-Scrapper
Had to take some photos for my application today, just finished the MA5C last night so I figured I'd grab a shot with it while I was in armor!

Used this file by CreativeCache101 on makerworld at 100%. Naturally if you've read this thread and have learned anything about me you know I further modified it for functionality, my mods allowed me to add a working light into the front I can easily remove to replace the batteries when needed and allows me to start up with a touch without compromising the aesthetic of the piece.
Used this file by CreativeCache101 on makerworld at 100%. Naturally if you've read this thread and have learned anything about me you know I further modified it for functionality, my mods allowed me to add a working light into the front I can easily remove to replace the batteries when needed and allows me to start up with a touch without compromising the aesthetic of the piece.
Ok finally had a moment to test fit and i think we're just gonna go with the new mods i did for the over shoulder. for my needs slicing off the front "lobe" helped bring in the chest to make it scale properly (thinking of adding them back in as a secondary piece on almost like a hinge but we'll see on that) but on the marine it's very much more needed. my new angle vs the original file:

the back and neck registrations are untouched, but it should fit the frame a bit better like this. I'll start printing when im off MA5C production duty lol.
On an ODST "Scrapper" note, my chest capsule project gave me some other thoughts. Titlewave Designs is gracious enough to include quite a few accessory kits for various permutations of the ODST helmet in with the PRO files. my main reservation against doing them is they all seemed to require some form of destructive mounting- either glue or screws or what have you, and if the part has light effects( buck's comms unit for example) it would probably require some sort of wiring be fed to the inside of the helmet for powering on and off. Absolutely well designed, I just didnt want to commit to perma mounting anything on my helmet. If you guessed I decided to bring even more magnets to the party, you'd be correct!

these two magnets seem to hold it up pretty well, its got the cutout there where the lens goes for the lights and a bit of a spot for an LED. I found a super small solution online thats essentially an LED strapped to a button cell battery with a twist on feature so we'll see how that goes, probably will make a small fitment to help place it and facilitate ease of turning on and off and removing for battery replacement. Here it is with a quick guide coat of color to help give the basic visual idea:


Like I said, seems to hold pretty damn well and pops off without damaging the helmet which is all I could really hope for. might make a couple other edits to the add ons but we'll see!
updates soon!
-Scrapper
the back and neck registrations are untouched, but it should fit the frame a bit better like this. I'll start printing when im off MA5C production duty lol.
On an ODST "Scrapper" note, my chest capsule project gave me some other thoughts. Titlewave Designs is gracious enough to include quite a few accessory kits for various permutations of the ODST helmet in with the PRO files. my main reservation against doing them is they all seemed to require some form of destructive mounting- either glue or screws or what have you, and if the part has light effects( buck's comms unit for example) it would probably require some sort of wiring be fed to the inside of the helmet for powering on and off. Absolutely well designed, I just didnt want to commit to perma mounting anything on my helmet. If you guessed I decided to bring even more magnets to the party, you'd be correct!
these two magnets seem to hold it up pretty well, its got the cutout there where the lens goes for the lights and a bit of a spot for an LED. I found a super small solution online thats essentially an LED strapped to a button cell battery with a twist on feature so we'll see how that goes, probably will make a small fitment to help place it and facilitate ease of turning on and off and removing for battery replacement. Here it is with a quick guide coat of color to help give the basic visual idea:
Like I said, seems to hold pretty damn well and pops off without damaging the helmet which is all I could really hope for. might make a couple other edits to the add ons but we'll see!
updates soon!
-Scrapper
Update time!
First off, finally got a moment to test fit some marine parts- we're reprinting the TPU over shoulder straps with the new remix! Am i happy to be reprinting? meh. Whatever gets the job done! gonna be doing more painting on the back, chest and shoulder plating this week, we'll see where that gets us.
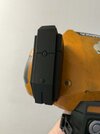
On the magnetic comms unit- we've got something good I think!


Still needs weathering in chipping and washes to match the helmet ubt the lights are working and its light enough that it can hold itself on solidly which is exactly what we're looking for.

Interior view, you'll notice the small 3d printed insert i designed to fit the cutout Titlewave put in the part:

I found these great little twist action battery cell LEDs which allowed me to make the lights small enough that the unit is self contained. I'm using two of these to hit the right spots on this, the fit is decent enough that it can be pulled out easily to turn on and off while not being loose enough to fall out otherwise.

Quick view of the individual unit lights. decent for what was needed!
More updates to come on the marine and whatever additional ODST equipment ideas and functionalities I hallucinate in the meantime.
'Til then.
-Scrapper
First off, finally got a moment to test fit some marine parts- we're reprinting the TPU over shoulder straps with the new remix! Am i happy to be reprinting? meh. Whatever gets the job done! gonna be doing more painting on the back, chest and shoulder plating this week, we'll see where that gets us.
On the magnetic comms unit- we've got something good I think!
Still needs weathering in chipping and washes to match the helmet ubt the lights are working and its light enough that it can hold itself on solidly which is exactly what we're looking for.
Interior view, you'll notice the small 3d printed insert i designed to fit the cutout Titlewave put in the part:
I found these great little twist action battery cell LEDs which allowed me to make the lights small enough that the unit is self contained. I'm using two of these to hit the right spots on this, the fit is decent enough that it can be pulled out easily to turn on and off while not being loose enough to fall out otherwise.
Quick view of the individual unit lights. decent for what was needed!
More updates to come on the marine and whatever additional ODST equipment ideas and functionalities I hallucinate in the meantime.
'Til then.
-Scrapper
Another side quest between waiting for layers of paint to dry on armor and waiting for underlayers to arrive at my door- Finished printing and the test fit install on my SRS99 because I have a serious addiction to making loadout- my garage is gonna end up looking like a super fiesta at this rate! Printed the MACES armory nerf longshot cs-6 mod kit in PETG (with one piece in translucent PLA and the shoulder and cheek pads in TPU) and combined it with an old nerf longshot I got for a real steal on ebay. really great files! IDK what event i'll bring it to though, this thing is like... 4 feet long LOL. Enjoy the pics!


I PROMISE marine updates too, this seems to slowly have devolved into me doing sidequests LOL.
Til next time!
-Scrapper
I PROMISE marine updates too, this seems to slowly have devolved into me doing sidequests LOL.
Til next time!
-Scrapper
Similar threads
- Replies
- 8
- Views
- 642
Similar threads
- Replies
- 8
- Views
- 642