It's beautiful.. amazing work!!
You are using an out of date browser. It may not display this or other websites correctly.
You should upgrade or use an alternative browser.
You should upgrade or use an alternative browser.
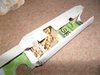
Props SRS99-AM (Wood + Aluminium Halo Reach Sniper Rifle)
- Thread starter Shadow Of Intent
- Start date
- Status
- Not open for further replies.
Heh, yeah.. I can see why most "wood" builds are actually made solely from MDF. Not only do you avoid fighting the grain when cutting straight lines,but you don't end up with a rough surface on anything cut at an angle.
I've never tried priming wood before so I'll need to find some tutorials, but once it's sanded down sufficiently I might gice it a coat of resin or several coats of wood glue
MDF is easier than real wood, for sure, though it has its own problems with edge roughness.
If it was me, I'd:
1) give it a couple very light coats of PVA/wood glue thinned slightly with water to seal and smooth slightly
2) sand it down all over at about 220 grit, spray a couple light mist coats of auto (Rustoleum Stops Rust) primer until you can see the actual shape of it and all the voids
3) grab the filler (wood filler, filler putty, whatever) and have at it. You'll be able to see the problem areas thanks to the initial coat of primer
4) keep priming and filling until it looks right, then move onto painting.
...Something along those lines, anyway. My last real wood prop build didn't look so good, definitely needed sealing and filler before paint.
Razgriz25thinf
New Member
Hey, if you haven't finished the ejection system, i have a tip!
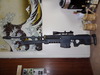
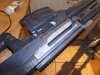
If you want it to look the best it can be, set it up exactly like a real steel ejector. Basically, you have the bolt, and on the right hand side is a little spring-like claw that grabs onto the rim of the casing as it's loaded into the chamber. The cartridge sits right up against a spring loaded pin on the opposite side while in the chamber. When you pull the bolt back, the little spring asserts itself, and because the claw grabbed the cartridge on the right side, it flicks out the ejection port.

You see those little nubs inside the bolt assembly, with the cutout at the bottom? Those nubs are the ejector springs, the cutout is the extractor.

That top diagram is exactly what you want. It's the most basic form of cartridge extraction. Just having the bolt force the cartridge out of the breech usually fails one way or another, as sometimes it doesnt fall out and you have to shake it out.
If you want it to look the best it can be, set it up exactly like a real steel ejector. Basically, you have the bolt, and on the right hand side is a little spring-like claw that grabs onto the rim of the casing as it's loaded into the chamber. The cartridge sits right up against a spring loaded pin on the opposite side while in the chamber. When you pull the bolt back, the little spring asserts itself, and because the claw grabbed the cartridge on the right side, it flicks out the ejection port.
You see those little nubs inside the bolt assembly, with the cutout at the bottom? Those nubs are the ejector springs, the cutout is the extractor.
That top diagram is exactly what you want. It's the most basic form of cartridge extraction. Just having the bolt force the cartridge out of the breech usually fails one way or another, as sometimes it doesnt fall out and you have to shake it out.
FoxtrotZero
Jr Member
This is a very impressive build. I'm seriously blown away. The way you've shaped the stock, you make it look easy. RobTC might have some competition in the wooden prop department.
Sorry I can't give you much in the way of novel solutions for the ejecting cartridge problem, particularly without having the thing in my hands and able to look at where you can and can't fit things. Redshirt's idea seems the best to me, though - as far as I can tell, the only thing stopping you is the structural stability of the barrel, which there are workarounds for, and it gives you the added bonus of ejecting "spent" rounds instead of unfired cartridges.
Have you considered adding any sort of electronics to this? Given that you have an actuating bolt and functional scope, some sort of bright LED muzzle flash and a firing sound would make this really cool, and lend you a lot of realism. Given that you've made this out of what is, from all I can tell, a solid piece of wood, you'd have to find a place to put all these electronics (I'm not sure what the best way to simulate a muzzle flash would be - I guess anything you do would pale in comparison to the five foot jet of flame a real 14.5mm round would create) and I don't know how that would affect your ability to integrate any sort of speakers.
Last edited by a moderator:
This is a very impressive build. I'm seriously blown away. The way you've shaped the stock, you make it look easy. RobTC might have some competition in the wooden prop department.
Sorry I can't give you much in the way of novel solutions for the ejecting cartridge problem, particularly without having the thing in my hands and able to look at where you can and can't fit things. Redshirt's idea seems the best to me, though - as far as I can tell, the only thing stopping you is the structural stability of the barrel, which there are workarounds for, and it gives you the added bonus of ejecting "spent" rounds instead of unfired cartridges.
Have you considered adding any sort of electronics to this? Given that you have an actuating bolt and functional scope, some sort of bright LED muzzle flash and a firing sound would make this really cool, and lend you a lot of realism. Given that you've made this out of what is, from all I can tell, a solid piece of wood, you'd have to find a place to put all these electronics (I'm not sure what the best way to simulate a muzzle flash would be - I guess anything you do would pale in comparison to the five foot jet of flame a real 14.5mm round would create) and I don't know how that would affect your ability to integrate any sort of speakers.
I don't think RobTC will have to worry about competition! His closeups look so clean it's as if they came straight from the game. If you saw mine close up it's a mishmash of barely filled cut errors, asymmetrical chamfering and amateur grade routing. Its one redeeming factor is that it's so big, you'd usually have to appreciate it from at least a couple of metres away lest it swing unpredictably into your noggin!
I'll experiment with lighting and speakers in the barrel, but integrated audio solutions tend to sound tinny and quiet, which wouldn't do the sniper justice. I might look into a larger suit-mounted audio solution with a wide variety of sounds. I made a Halo 3 flash soundboard about 7 years ago which I may be able to import into android somehow. That would work quite well if I could integrate it with the tac pad and the gyro sensor.
Last edited by a moderator:
electricocomics
New Member
This build has progressed a lot since last I saw it!
You used some hinges for the bipod right? And can it stay undeployed at the moment?
You used some hinges for the bipod right? And can it stay undeployed at the moment?
This build has progressed a lot since last I saw it!
You used some hinges for the bipod right? And can it stay undeployed at the moment?
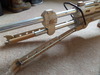
I used some standard 30mm cabinet butt hinges. The bipod feet looked like they should be on a ball and socket joint but I went with a hinge for simplicity, and the upper hinge should be right at the edge of the circle but the clearance would have been too low.
I've added some additional strength enhancements (Bracket right next to the upper hinges to reduce stress on the pivot, and small metal brakets to prevent the metal reinforcing rods popping off) but I haven't yet decided on the best way to lock them into an undeployed position. My plan is to have some sort of 3/4 circular springy metal loop attached orthogonally to the bipod legs that will clip onto the gas tube. I originally wanted both legs to be individually deployable, but the large bracket means they both have to come down at the same time. To avoid bending the hinges back too far I also need to have some sort of limiting rod attached between the two legs, so my plan is to either use 3 more hinges and two 15cm metal strips to create a folding "V" that limits their width to 30cm at their central point and using a single clip on the central hinge, or have individual clips on each leg and limply limit their extension with something like a length of paracord.

Attachments
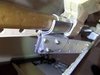
I've finished the bipod un-deployment clip. It's a bit messy witrh all the small bolts, but luckily it'll be mostly hidden from view by the legs themselves.
Since the actual sniper doesn't have the brace at the top or the folding hinge in the middle, I've drilled extra holes to try and match the theme of the bipod:


Since the actual sniper doesn't have the brace at the top or the folding hinge in the middle, I've drilled extra holes to try and match the theme of the bipod:


Attachments


It should do. The aluminium has a fair amount of bend before it enters the plastic region, and it's so thick (Being double walled) that it won't be bent out of shape from being knocked hard. I can even "swoosh" the bipod up while holding the rifle normally and have it lock into place without even touching it!I like that. Simple and foolproof. :thumbsup Hope it retains its "clickiness" over time.
I'm still considering sound solutions. Im leaving the magazine empty for the forseeable future, and may create some bullets for it at a later point, but If I scrap the ejector system, that leaves me with space to store a sound system; although it feels like it's more befitting of tank cannon sounds than those of a rifle!can it go boom like a gun boom if it can you just mad a high power rifle
")
Again, apologies for the lack of updates. I've lost motivation to finish this build quickly since I'm no longer going to the next MCM comic con.
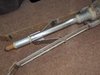
It's almost complete now, but I have a lot more cleanup to do on the surface. Using real wood as a bevelled edge to join larger tubing to smaller ones means it's harder to achieve a consistent diameter for the lip, and it's so thin it chips in places very easily. Also, without a sanding belt the result is less than uniform.
The last piece requiring much work is the scope shroud. I up-scaled the version in the sniper's pep file (Because it was a lot smaller than it should be with the rifle at 1.78m), resined it, reinforced the outside with card while giving it the "fluted" effect, and reinforced the inside with more card, wooden pillard and aluminium "ribs". For a mostly card section, it's very strong, although I still plan to fill it with expanding foam to help it resist denting even further, and then carve out the place for the scope.


Attachments
- Member DIN
- S188
Using real wood as a bevelled edge to join larger tubing to smaller ones means it's harder to achieve a consistent diameter for the lip, and it's so thin it chips in places very easily. Also, without a sanding belt the result is less than uniform.
[url]http://i1218.photobucket.com/albums/dd412/Shadow_Of_Intent/SRS99-AM%20Halo%20Reach%20Sniper/th_35_zpszwxu7tay.jpg[/URL] [url]http://i1218.photobucket.com/albums/dd412/Shadow_Of_Intent/SRS99-AM%20Halo%20Reach%20Sniper/th_36_zpsrsojxzzh.jpg[/URL] [url]http://i1218.photobucket.com/albums/dd412/Shadow_Of_Intent/SRS99-AM%20Halo%20Reach%20Sniper/th_37_zpsurtdn6yz.jpg[/URL]
The fact you are using real wood and aluminum to build this should nullify this completely. Hats off dude.

looks awesome man!
-Ian
-Ian
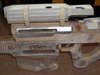
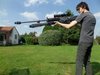
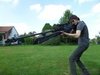
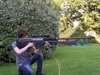
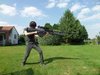
It's finally done! Here are the last couple of WIP photos and the self-photoshoots I took:


And a brief demo of all the functioning parts (I forgot to mention the trigger though!)


And a brief demo of all the functioning parts (I forgot to mention the trigger though!)
Attachments
-
 th_39_zpsruqh0iav.jpg6.9 KB · Views: 331
 -
 th_42_zpsjjj50opo.jpg6.2 KB · Views: 320
 -
 th_43_zpslxgwege9.jpg5.3 KB · Views: 322
 -
 th_41_zpsqnklzhu7.jpg8.1 KB · Views: 308
 -
 th_40_zpsaggiuiue.jpg6.4 KB · Views: 326
 -
 th_44_zps6iul7mpa.jpg5 KB · Views: 301
 -
 th_45_zpsbm3hls2i.jpg6.2 KB · Views: 325
 -
 th_46_zpszlp38wjn.jpg5.9 KB · Views: 306
Last edited by a moderator:
- Status
- Not open for further replies.
Similar threads
- Replies
- 105
- Views
- 12,362
- Replies
- 32
- Views
- 5,192