There's a post on here somewhere for Reach Decals. They were basically printed off on white sticker paper (clear didnr work as the colors were too muted. Then just cut out and pressed on, some rubbing to wear down the ink a little. My Logo and the UNSC logo are Stencils I made via plotter and the color just sponged on to give a bit of a worn look.
There's a post on here somewhere for Reach Decals. They were basically printed off on white sticker paper (clear didnr work as the colors were too muted. Then just cut out and pressed on, some rubbing to wear down the ink a little. My Logo and the UNSC logo are Stencils I made via plotter and the color just sponged on to give a bit of a worn look.
So a little behind the scenes since basically nobody will see this down the line.
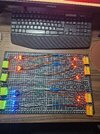
Added felt to the seams, where the hot staples are. Also added felt to the hardcase and made a backplate for it. Did it add much space? No but just enough to carry ID, spare batteries and some minor repair stuffs.
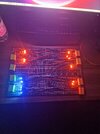
Added padding to the gauntlets. And added the white LED foam in prep for the LEDs.
So a little behind the scenes since basically nobody will see this down the line.
Added felt to the seams, where the hot staples are. Also added felt to the hardcase and made a backplate for it. Did it add much space? No but just enough to carry ID, spare batteries and some minor repair stuffs.
Little more inactive atm, dealing with some life issues.
Finished the boots, wanted to keep them removable. Goal here was to keep the mobility of the boots and walk normally hence everything being raised up a little
Magnets have been added to the chest, little bit of shifting when moving so will probably add more velcro.
Looks awesome, always love an EOD! For the Hardcase, did you do a backing for it or is it left open against your leg? Didn't see too many photos of it besides the beginning, guessing would give more some more room but if something would slip out.
Looks awesome, always love an EOD! For the Hardcase, did you do a backing for it or is it left open against your leg? Didn't see too many photos of it besides the beginning, guessing would give more some more room but if something would slip out.
Molds courtesy of Instinctcreative are coming along. Truck bed liner saved me so much sanding. Reprinting the neck since i did a silly snd mixed part a 20 and part b 70 of the vytaflex. Whoops
Ran into a problem with the molds... atleast the neck.... since its a 2 part molds with top and bottom half it locked ... so I think im gonna not mess around with urethane any longer and just wait until I have some money for dragon skin. But thats another 400.
I could probably do the most of the parts in urethane except the neck but im not sure if I want to mess with that anymore...
So please don't take what I'm about to say as negative because it's not - its a legitimate curiosity question since I started out doing what you're doing -full silicon undersuit for my TV Show MC build but realized wearing a silicon undersuit was going to be terribly hot and uncomfortable to wear for 8-10 hrs at a time so I abandoned it. my question is: have you done this before and worn something similar?
I did cast my boots in a Smooth-on Flex 45D flexible resin so that I could walk normally and they came out great. However, while researching what I was going to do for an undersuit I found videos of how the undersuit for the show was actually done and discovered it was sewn not silicon, in 3 pieces, pants, long sleeve top and a vest so that's what I decided to do even though I had literally zero sewing experience.
Here's where I am currently in the build
Anyway, a very impressive build, good luck with completing it!