You are using an out of date browser. It may not display this or other websites correctly.
You should upgrade or use an alternative browser.
You should upgrade or use an alternative browser.
Starting my ODST build
- Thread starter chaos cre8ions
- Start date
- Member DIN
- S519
looks like a good size to me!

- Member DIN
- S027
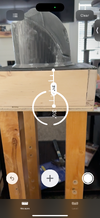
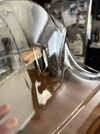
To... what? what are we looking at?A little distorted. Is this normal or should I try to do a Bondo or a resin layer?
I think we're looking through a visor of some type. Is it vacuum formed? Bought or self made?
Bondo layer on a visor? Huh?
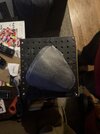
This is the vacuum formed visor using the buck that the crescent Cs showed up on. I’m not sure if the visors tend to get clearer than this or if I did something wrong.To... what? what are we looking at?
I think we're looking through a visor of some type. Is it vacuum formed? Bought or self made?
Bondo layer on a visor? Huh?
- Member DIN
- S027
Ok. Now I'm with ya. I had to back up a page and catch up.
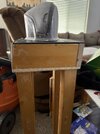
The Cs are grinding from the electric sander on a coarse grit.
So the "resin or bondo layer" comment was in respect to the buck. Gotcha.
So... you didn't coat or smooth the buck at all since those earlier photos, is what I'm getting looking at the video.
The still photo looks like there's visible "pillowing" in the buck. It looks like you can see where you sanded some of the high spots (the hills), but they aren't even with the valleys.

If I had to guess by those photos... To me it looks like a wavy buck resulted in a wavy pull. The blinds in the window have almost the same grid pillowing distortion as seen on the buck.

If it were me... I'd work to smooth out that buck. If resin is an option I'd probably use a black resin and then sand that to a glossy finish. Let the gloss of the resin be your guide as to how smooth the pull will be. I mean... an extra hour of sanding beats wasted hour and material on the pull, right? At the very least a beautiful smooth buck takes one variable out of the equation.
The Cs are grinding from the electric sander on a coarse grit.
So the "resin or bondo layer" comment was in respect to the buck. Gotcha.
So... you didn't coat or smooth the buck at all since those earlier photos, is what I'm getting looking at the video.
The still photo looks like there's visible "pillowing" in the buck. It looks like you can see where you sanded some of the high spots (the hills), but they aren't even with the valleys.
If I had to guess by those photos... To me it looks like a wavy buck resulted in a wavy pull. The blinds in the window have almost the same grid pillowing distortion as seen on the buck.
If it were me... I'd work to smooth out that buck. If resin is an option I'd probably use a black resin and then sand that to a glossy finish. Let the gloss of the resin be your guide as to how smooth the pull will be. I mean... an extra hour of sanding beats wasted hour and material on the pull, right? At the very least a beautiful smooth buck takes one variable out of the equation.
Last edited:
I might have a glowing addiction!
I might have a glowing addiction!
Im curious what you plan to do with the glowing parts when it comes time to paint the armor. Are you just leaving the glowing 3d print as is so as to not cover the glow? I saw some companies like montana spray paint have lines of glow in the dark spray paint as well. Ive been following your posts for a bit now and it had me thinking which one might be better? Im looking forward to the final product though!Now to finish my buck")
glow in the dark fill!! dude epic!! love the cat eyes idea.. been lost plenty of times in the woods and those little glow in the dark eyes help a ton.
Resin is completed. It sounds like my next step is to hit the buck with a wet sand? Do I want to sand it all the way to 3000 grit? The last pull I did went pretty well, but it could be a lot better.
As for the glow in the dark, I’m planning to keep the helmet pretty much as is, but I picked up the H2D. That will allow me to print the helmet in one solid go.
I would like to incorporate the glow filament into other parts of the armor, but I’m not sure where I could add it. I’m open to suggestions.
Attachments
Love the idea of using glow in the dark filament. Add a whole new depth! And some sweet dusk pictures!
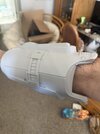
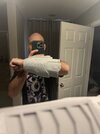
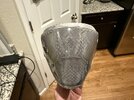
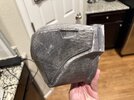
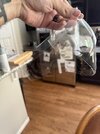
Vacuum forming help needed! I’m having difficulty getting a full seal on my visors. I don’t know what exactly I’m doing wrong. If I use the thin plastics it tends to sag and bubble but it gets an ok pull. On the thicker plastic, the detail on the edge of the buck doesn’t seem to take… what can I do to increase the suction on the bed? And I using the wrong material? Am I just going insane?
I finally get the buck nice and smooth, I just can’t get a good pull. Any help would be great!
I finally get the buck nice and smooth, I just can’t get a good pull. Any help would be great!
Attachments
-
 IMG_8122.png4.3 MB · Views: 151
 -
 IMG_8121.jpeg1.7 MB · Views: 158
 -
 IMG_8120.jpeg1.8 MB · Views: 136
 -
 IMG_8119.jpeg1.9 MB · Views: 148
 -
 IMG_8128.jpeg1.7 MB · Views: 147
 -
 IMG_8127.jpeg1.7 MB · Views: 144
 -
 IMG_8126.jpeg1.7 MB · Views: 142
 -
 IMG_8125.jpeg1.9 MB · Views: 141
 -
 IMG_8124.jpeg1.7 MB · Views: 157
 -
 IMG_8123.jpeg1.9 MB · Views: 151
OrangeCrush
New Member
Thank you for this thread! I know you are having issues and I hope you sort them out.
The good news, your issues, and the replies, are providing invaluable information.
I will soon be going through this same process and am currently working through the 'How Hard Can it be?' phase
It's rapidly approaching this 'what can go wrong WILL go wrong' phase.
#1, 5 walls & PETG
#2, Sanding, smoothing, finishing, like your life depends upon it. (I'm thinking the buck will end up the best looking surface of the entire build)
#3, The vacuum box, Fill the cracks & Seams. There shall be NO air leaks
#4, the buck MUST be smooth
#5, PETG 0.03 thick
#6, The better the buck is, the better the vision will be
BTW, you should have seen the look I got from my wife when she realized I would be using HER oven... LOL, Priceless.
With my limited knowledge, I’m not sure if I should rebuild the box with 2-2.5” walls instead of the 4” walls. I don’t know if reducing the size will cause the suction to increase. I’m trying to make sure the plastic is evenly heated, but the oven appears to warm 1/2 more than the other… any thoughts?Thank you for this thread! I know you are having issues and I hope you sort them out.
The good news, your issues, and the replies, are providing invaluable information.
I will soon be going through this same process and am currently working through the 'How Hard Can it be?' phase
It's rapidly approaching this 'what can go wrong WILL go wrong' phase.
#1, 5 walls & PETG
#2, Sanding, smoothing, finishing, like your life depends upon it. (I'm thinking the buck will end up the best looking surface of the entire build)
#3, The vacuum box, Fill the cracks & Seams. There shall be NO air leaks
#4, the buck MUST be smooth
#5, PETG 0.03 thick
#6, The better the buck is, the better the vision will be
BTW, you should have seen the look I got from my wife when she realized I would be using HER oven... LOL, Priceless.
- Member DIN
- S410
Here are my thoughts. Anyone else with vacuum forming experience please chime in.Any help would be great!
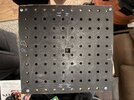
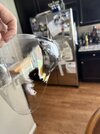
Seems you're having trouble getting the plastic to come all the way down to those sharp nearly 90 degree bends near the edges of the visor. Looking at your vacuum forming box, the holes around the edges are directly over top of the frame, meaning there will be no suction coming from them. Your buck goes all the way up to these no-suction holes, which means it's impossible for the air to be sucked away from those areas.
Try carefully positioning your buck to make sure that there is a hole as close as possible to the buck that can actually suck the air down.
A Shop Vac should be enough suction, so I doubt upgrading it will make all the difference.
Vacuum forming doesn't always get a perfect pull; sometimes there are gentle curves. Try lifting the buck up a little bit so that even if the plastic has a gentle curve to it, it doesn't affect the useful part of the visor. Place the buck on top of a few small pieces of wood. Be sure to not cover any holes. I recently had to do this for an ODST visor i was forming.
I will admit, this is a large visor and your vacuum forming box is on the smaller side. Ultimately this means there is only a little bit of plastic that has to stretch a long way. A larger vacuum forming setup would likely have a higher success rate.
How much larger should I make the next one?Here are my thoughts. Anyone else with vacuum forming experience please chime in.
Seems you're having trouble getting the plastic to come all the way down to those sharp nearly 90 degree bends near the edges of the visor. Looking at your vacuum forming box, the holes around the edges are directly over top of the frame, meaning there will be no suction coming from them. Your buck goes all the way up to these no-suction holes, which means it's impossible for the air to be sucked away from those areas.
View attachment 361616
Try carefully positioning your buck to make sure that there is a hole as close as possible to the buck that can actually suck the air down.
A Shop Vac should be enough suction, so I doubt upgrading it will make all the difference.
Vacuum forming doesn't always get a perfect pull; sometimes there are gentle curves. Try lifting the buck up a little bit so that even if the plastic has a gentle curve to it, it doesn't affect the useful part of the visor. Place the buck on top of a few small pieces of wood. Be sure to not cover any holes. I recently had to do this for an ODST visor i was forming.
I will admit, this is a large visor and your vacuum forming box is on the smaller side. Ultimately this means there is only a little bit of plastic that has to stretch a long way. A larger vacuum forming setup would likely have a higher success rate.
- Member DIN
- S410
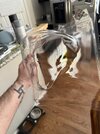
I can't say for certain. I would guess an extra 6" in each dimension would allow for more plastic to bend. I would try those other things first though, namely raising the buck up a bit.How much larger should I make the next one?
How would you raise the buck? Should I try rotating the buck?I can't say for certain. I would guess an extra 6" in each dimension would allow for more plastic to bend. I would try those other things first though, namely raising the buck up a bit.
- Member DIN
- S410
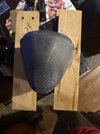
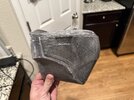
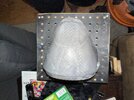
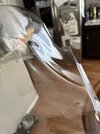
I was having touble with an ODST visor just a few days ago. I took a piece of scrap wood to raise one side up because I was getting creases. Here's what that looked like:How would you raise the buck?
You could do the same but raise both sides. It also allows for better suction near the edges because the holes under the buck are being used now.
The indents in the buck have holes to help suction. If I cut these wood pieces to cover the corners, would that work?I was having touble with an ODST visor just a few days ago. I took a piece of scrap wood to raise one side up because I was getting creases. Here's what that looked like:
You could do the same but raise both sides. It also allows for better suction near the edges because the holes under the buck are being used now.