Master Chara
New Member
Hello to you, 405th community!
I've been a lurker for a long time. I came to stumble upon this place a long while back while browsing halo.bungie.org I'm excited to finally be joining and trying to give back to the persons responsible for helping accomplish a dream of mine since 2001 - a Spartan in the flesh.
I hope with this post I can improve what I'm working on with your feedback.
") Good or bad, your input is necessary to me: criticism, comments, support, or whatever. It al;so happens to be a good form of inspiration.
Good or bad, your input is necessary to me: criticism, comments, support, or whatever. It al;so happens to be a good form of inspiration.This post will also help me keep track of my progress. I still have a great journey ahead of me. (Ha! :eek)
If you have questions for me then do not be afraid to ask them! Going from A--->B takes time, and I have made (and will make
) plenty of mistakes. And sooner or later I'll probably attempt to fix them.
Oops.
Chaper 1: Doing the Paperwork
Pepakura and I have a love/hate relationship.
Not knocking it in the least, it's an amazing program. The process of printing, cutting, folding, and gluing is pretty time consuming though. I suppose I could have started with fancy things like building a mold or scrapping it together from foam. After some consideration however, I chose Pepakura because I liked the prospect of sanding and painting fiberglass. We'll see how fun it really is when I get to it. :cool


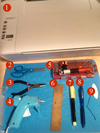
1. Printer & 110 lb card stock.
2. Tiny safety scissors. Maneuverable and accurate. I use these for most of my cutting.
3. Pliers. Handy when you need to pull a tab into position in a tough spot.
4. Low temperature glue gun & low temperature glue sticks. Holds it all together.
5. Precision knife & cutting board. Good for spots scissors can't reach.
6. Small metal ruler. I use this for folding. On larger folds I have to roll the folding line onto the edge and then crease it.
7. Highlighter. When I do happen to accidentally rip something, I use this to mark where the pieces go back together.
8. Pen. I like to draw symbols for parts that are on multiple pieces of paper.
9. Bobby pin. Sometimes I don't need the pliers, I just need to bring the tab to the other piece and its hard to reach.
Completed thus far:
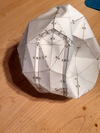
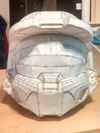
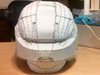
Mark VI Helmet
Status: Completed.
Notes: Like most, I decided to start with the iconic helmet. This was my fourth attempt. The first was too small, the second is a mystery :confused, and the third died in an unfortunate mailing accident. I started from the opening at the bottom, though in hindsight if I knew it was large enough I should have started from the top and worked down.


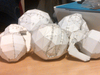
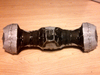
Grenades
Status: (Mostly) completed.
Notes: Looking ahead at the things I wanted to build, I noticed a few appeared to be entirely closed parts. Remembering how difficult the helmet was I chose to make the grenades next. Unfortunately I have a problem with destroying plasma balls. Out of five, only two survive, and one of which is the wrong size. The result of an unfortunate scaling accident while trying to change printer margins for crop marks.

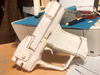
M6D Pistol
Status: Completed!
Notes: (Mostly) satisfied with the grenades, I decide to tackle the pistol next. One of my all-time favorite weapons.
At first glance I thought it was all one piece, but later I found out it was a couple pieces that sort of slide into each other. The clip is the only thing that doesn't go into its proper place. That might be a challenge later.


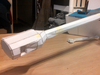
Energy Sword Handle
Status: Completed!
Notes: Not sure if I had phenomenal folds or what, but this came together quickly and easily, and even looks pretty good if I do say so myself. Not sure what I'm actually going to do for the blade though. I glued the outsides, then then middle, and slid the parts together without a hitch.


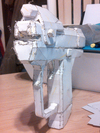
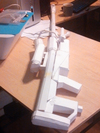
Halo 2 Sniper Rifle
Status: Well... It's... pepped, I guess?
Notes: One of my other all-time favorites! Chances are if you played matchmaking back in the day, I was either sniping my way through your team or bouncing grenades into your face. Or getting killed by other people shooting through walls and jumping miles in the air. :angry Expletive! The pieces don't conveniently come together like the pistol's, I suppose I'll have to figure a proper way of mounting them later. The barrel is also pretty curved. I'll have to find a way around that as well. And the clip comes separately again. -_-


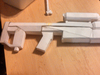
Left: Pistol clip. Right: Sniper clip.
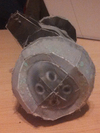
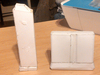
Plasma Pistol
Status: Completed!
Notes: Unlike the sniper & pistol, this gun was all one part with a hollow middle when complete like the grenades. Undaunted, I begin making the grip. Soon however, I realize that the tabs and their respective numbers end up on the inside of the weapon, where they are hard to see. Slightly confused, I press on in the name of !SCIENCE! (name that reference?
) I finally glued it together in three pieces: the top, the midsection, and the bottom while minding to keep the whole thing as straight as possible. Surprise! It came out nice, I think.


Pew pew!
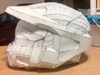
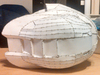
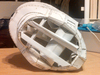
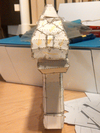
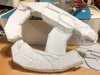
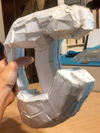
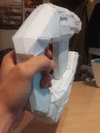
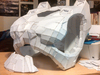
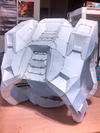
Mark VI Chest
Status: Everything but the struts.
Notes: The most recent part to be assembled. While it had about the same amount of pieces as the helmet, it was comprised of much larger pieces, and used way more paper. (Poor trees.
) I also seemed to be missing a lot of pieces for some reason, causing me to sort through them and print out what I didn't have when I started getting down to the last couple. The smaller piece is held on by the struts, possible to make the armor easier to put on later. And speaking of the struts! :eek A couple of them span three pages, not just two. I'll put them on when I get bored of putting it on. :cool Overall I think it turned out nicely.


That's all I have so far! Next up on my agenda...
Needler
Mark VI Codpiece
Mark VI Thigh Armor
Mark VI Shin Armor
Mark VI Forearm Armor
Mark VI Boots
Mark VI Shoulder Armor
Mark VI Handplates
Please help me decide what I should do next! Except maybe the Needler, it looks scary. :eekeek:eek
Also, if anybody wants I can provide step by step construction with these pieces. All you have to do is ask nicely.
In the Future:
Look into sanding and painting techniques.
Research undersuit materials and assembly.
Figure out a way to make a glowing energy sword blade.
Accurate (READ: boss status) visor for the helmet.
Install lights and various electronics.
Last but not least, add incognito liquid containment and consumption. I heard the suits can get hot!
Ah, who am I kidding? Who wants to get hammered without taking off their helmet?! This guy. :cool
I look forward to hearing from you all!
To be continued...Attachments
-
 IMG_20140711_213849_404_zps0a5de0ac.jpg343.9 KB · Views: 167
 -
 IMG_20140711_235458_496_zps5e65c8d7.jpg177.6 KB · Views: 170
 -
 IMG_20140712_240836_973copy_zps2648d889.jpg354.7 KB · Views: 154
 -
 IMG_20140712_021418_669_zpsb68410c4.jpg323 KB · Views: 159
 -
 IMG_20140712_021532_007_zps877d26fb.jpg342.9 KB · Views: 151
 -
 IMG_20140712_021630_848_zps363f4dbd.jpg329.8 KB · Views: 166
 -
 IMG_20140712_021749_003_zpsf4649722.jpg327 KB · Views: 154
 -
 IMG_20140712_022110_796_zps66e91743.jpg334.1 KB · Views: 158
 -
 IMG_20140712_021929_062_zps743e84a8.jpg356.3 KB · Views: 154
 -
 IMG_20140712_022748_255_zps77fff43b.jpg320.8 KB · Views: 161
 -
 IMG_20140712_023120_455_zps6c6ee054.jpg345.1 KB · Views: 163
 -
 IMG_20140712_023514_125_zps0662324a.jpg355.7 KB · Views: 143
 -
 IMG_20140712_023423_814_zpsfcf73e17.jpg345 KB · Views: 163
 -
 IMG_20140712_024255_339_zps62d25e7c.jpg208.5 KB · Views: 159
 -
 IMG_20140712_023953_030_zpsa77f8c01.jpg356.6 KB · Views: 161
 -
 IMG_20140712_024429_677_zpsebe6b96f.jpg200.3 KB · Views: 160
 -
 IMG_20140712_024849_053_zps67eec000.jpg177.5 KB · Views: 154
 -
 IMG_20140712_025138_449_zps10cabdc8.jpg328.3 KB · Views: 144
 -
 IMG_20140712_025240_660_zpsf364733f.jpg299.3 KB · Views: 155
 -
 IMG_20140712_025408_853_zps3253c59b.jpg321 KB · Views: 144
 -
 IMG_20140712_025531_330_zpsc3415d7d.jpg326.1 KB · Views: 149
 -
 IMG_20140712_025733_261_zpsf2109662.jpg348.3 KB · Views: 151
 -
 IMG_20140712_025622_871_zpsa040d3b7.jpg211.5 KB · Views: 169
 -
 IMG_20140712_030318_243_zpsf32d6bd1.jpg311.7 KB · Views: 167
 -
 IMG_20140712_030430_646_zps74f73563.jpg339.7 KB · Views: 167
 -
 IMG_20140712_030150_839_zps159cf3ab.jpg319.6 KB · Views: 171