1st Build The 'Stitching' of my First O.D.S.T.!

BloodyDelta

New Member
Hello Everyone! It's a pleasure to make my first thread here, and I hope you'll all follow along with me on this crazy journey of cosplay!

A little backstory if you will. I grew up on Halo since my first endeavor playing the game a local 'video game arcade' for home consoles. My friend was having their birthday party with a 16 player LAN set up for Halo: CE all in one room with La-z-boy chairs, perfect for shouting across each other. Then, they had set up a few Online enabled Halo 2 systems for play. From the moment I played my first few online matches, I was hooked. And so I got my first Xbox 360, had a hilarious time watching my parents try to set up the internet for the thing, and play my first home console online. And the rest is history. The countless hours of Halo 2 and Halo 3 Online multiplayer, custom games, campaigns, you name it!

I've been cosplaying since 2011, and one of the all time 'big dream' cosplays was a suit of armor, but it always seemed so out of reach. Now, with the ease of use of a 3D printer, but far more importantly, the funds and time to devote to this endeavor, it's time to make the kid in me scream with excitement! This isn't just fulfilling a childhood dream though. This is also a learning experience for myself. Relearning that I am fully capable of learning new skills and breaking my comfort zone to try and get the results I've been scared to fail on. I look forward to earning my place with you all in this awesome community!

I'm in the 405th discord under the same name, so feel free to say 'Hey!'

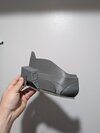
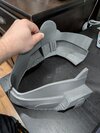
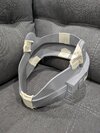
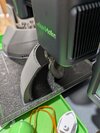
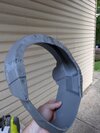
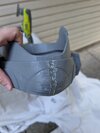
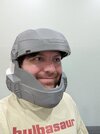
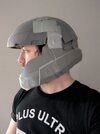
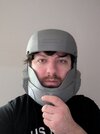
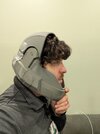
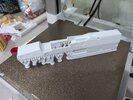
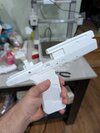
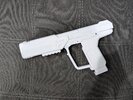
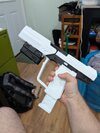
The armor I am printing for this is Galactic Armory's ODST Rookie Set! Anything relevant, I'll try to make sure to post links for references to help others and myself for tracking!

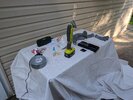
The first pictures here are some of my first attempts to print the helmet on an AnkerMake M5. It all began with the first step of learning a new medium.
 

Attachments

  • PXL_20240616_130122536.MP.jpg
    PXL_20240616_130122536.MP.jpg
    4.2 MB · Views: 66
  • PXL_20240617_132757904.jpg
    PXL_20240617_132757904.jpg
    2.4 MB · Views: 63
  • PXL_20240617_225613581.jpg
    PXL_20240617_225613581.jpg
    3.5 MB · Views: 63
  • PXL_20240618_125706104.MP.jpg
    PXL_20240618_125706104.MP.jpg
    4.5 MB · Views: 67
  • PXL_20240618_125710005.jpg
    PXL_20240618_125710005.jpg
    2.2 MB · Views: 68
> Galactic Armory ODST rookie set

That's the same (mostly) files I used for this build - if there's anything there that helps ya.
 
The progress pictures I'll be posting are from last year till I get up to date on current progress! But I think it's important to document the whole journey!

I started the first helmet in the summer, still printing from my Ankermake M5 in PLA. Since I was still fairly novice at printing, and with the printer not being the best, I figured I'd start with the most iconic part. I used the pre-split files from Galactic Armory and printed at odd orientations, all things I've learned from as you'll see! But once I had the bottom pieces done, I wanted to attach them. I researched some different binding methods with adhesives and settled on a combination of hot glue for a temp hold and plastic welding. This was my first attempt to plastic weld and try some mechanical sanding. It didn't quite go the way I expected, beginner's mistakes. But that's how you learn! Very rough on the seam welding, and trying to fix the bottom of the helmet with scrap plastic form the supports. The next helmet will come out MUCH smoother, as you'll see!
 

Attachments

  • PXL_20240627_233723858.jpg
    PXL_20240627_233723858.jpg
    1.7 MB · Views: 52
  • PXL_20240627_233701461.jpg
    PXL_20240627_233701461.jpg
    1.6 MB · Views: 45
  • PXL_20240627_233644158.jpg
    PXL_20240627_233644158.jpg
    1.8 MB · Views: 50
  • PXL_20240627_233640405.jpg
    PXL_20240627_233640405.jpg
    1.6 MB · Views: 28
  • PXL_20240627_221715245.jpg
    PXL_20240627_221715245.jpg
    2.5 MB · Views: 48
After the first round of plastic welding, I was excited to see the whole thing in my hands. Thankfully 100% scale worked well for the size of my head! (Foreshadowing the rest of the build..) I printed out the Dome pieces and held them together with tape to get a general sense of how it'd fit. For a first time cosplay printing, it was pretty exciting! I have yet to incorporate, let alone build around, 3D printing for my cosplay. So this being the first foray into this medium is a steep learning curve. Gotta remember to be patient with yourself when prints fail or something doesn't work right the first time.

I won't lie, the way it looks right here felt like such a hard vibe to me. With the respirator (minus filters) holding it in place, it really felt like I was armoring up!
PXL_20250326_173123466.jpg


But there is still a lot of learning to do. Remember, don't put the cart before the horse, and don't count your chickens before they hatch! I
 

Attachments

  • PXL_20250325_054847397.jpg
    PXL_20250325_054847397.jpg
    1.7 MB · Views: 15
  • PXL_20250109_150627513.jpg
    PXL_20250109_150627513.jpg
    1.4 MB · Views: 13
  • PXL_20250109_150616774.jpg
    PXL_20250109_150616774.jpg
    1.4 MB · Views: 16
  • PXL_20250109_051528404.MP.jpg
    PXL_20250109_051528404.MP.jpg
    3.4 MB · Views: 16
I took quite a hiatus from the project in June of 2024, since I was facing some pretty deep difficulties with prints sustaining on the AnkerMake M5. Print bed failures, calibrations not working, and the Y Axis Rod starting to create this awful grinding noise, it was too much! Sure it's possible to fix, but I simply haven't had the time to learn how to take an entire axis spring off and figure out why it was grinding. Even putting in a support ticket didn't go as hoped, since it was gift. So I put it away for a later date and got myself a Bambu Lab A1 3D Printer! Funnily enough, when I first got into 3D printing, a friend of mine was interested in the hobby, and I've gotten him so invested, he has Seven Printers. 4 of which were the Bambu Lab A1! Couldn't argue with the results either! Consistent, quick, and printing in 4 colors?! And the entire combo being cheaper than the Ankermake M5 by itself?? Easily justified purchase. With it purchased January of this year, I was Raring to go again!

After some test prints and some practical pieces for around the house to get a handle on the Lab A1, I decided to start working on the prop! Can't be a stealthy O.D.S.T. without your silenced sidearm!

I personally love to fidget and play with the things I make, and have a pretty big enjoyment for toy firearms! So when I saw From The Brinks Studios Modular Halo Magnum, I was instantly sold! Removable Magazine, Racking Slide, Interchangeable Barrel/Shroud??? Sign me UP! In order for this particular model to work, I had to buy myself a set of springs to give proper function to the Magazine Release and Slide. It's not the cleanest print I've done, and it'll probably take a few more iterations and some Real elbow grease of post processing, but I was happy to have it in my hands regardless!
 

Attachments

  • PXL_20250310_020042346.jpg
    PXL_20250310_020042346.jpg
    3.1 MB · Views: 17
  • PXL_20250310_021023490.jpg
    PXL_20250310_021023490.jpg
    1.6 MB · Views: 15
  • PXL_20250311_044802282.jpg
    PXL_20250311_044802282.jpg
    4.8 MB · Views: 19
  • PXL_20250316_192405594.jpg
    PXL_20250316_192405594.jpg
    1.9 MB · Views: 19

Your message may be considered spam for the following reasons:

If you wish to reply despite these issues, check the box below before replying.
Be aware that malicious compliance may result in more severe penalties.
Back
Top