TomcatHeavy
New Member
Hello all!
I've been biding my time while sorting things out through a recent return from overseas, but after all the necessities were taken are of I decided it was time to break ground with my own build and give back to the community in sharing my own project and experiences along the way. That said, let's have at it.
Most people here are accustomed to the rigors of patterning and pep work, well, you still don't entirely get away from it working with EVA foam (for anyone that is still waiting to take the first step). But, I wanted to take my project a different direction from "go," so here's how that is working.
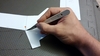
First, having a good medium to make patterns out of is essential I've found. I haven't wandered far enough or wide enough to come by any honest card stock, but I did find that photo paper works decently well. I got two packs that were on sale, and as an additional plus it plays pretty well with tape. Photo paper is pretty 'closed cell,' so it might make a fairly good pep material too (for reference, photo papers hang around the 70-74lb weight). But, this build will be in foam so I don't suppose it matters!
Second, even though there are 'foam friendly' templates out there they are not a 100% solution to doing a foam build. Unwrapping a 3d image always yields a 2d template; inherently, 2d is just that, the X and Y axis. Thusly, even a "foam friendly" unwrap does not and will not take into account the thickness of the material you are using (the Z axis). So, I'm starting with the largest assemblies, and going to work from the "outside" toward the center.
Third, going about a build this way will be more expensive. I am cutting big pieces - that means less of them fit on a single mat! I'll be saving money on glue, but even though I haven't done the numbers I am pretty sure one glue stick is going to be cheaper than one foam mat. Depending on your ultimate plans, this may or may not be the way you want to roll, but I would encourage anyone to 'consolidate' their pattern pieces as much as is possible under any circumstance - you spend more time with a knife in the long run, but each piece you can combine is one less joint that has to be glued, and one less joint you have to worry about strengthening, or finishing.
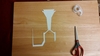
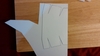
Below, I'm working with a few shapes that have been cut out, but I've also made a reverse pattern of each of the pieces and have begun extrapolating parts that technically "aren't there" in the pep model - letting the material's thickness work for me, as well as joining those two 'wings' that extend off of the center panel with a length that will provide good strength.

Oh, and save yourself time and effort wherever you can! If you have long straight-aways, align those to the finished edge of the paper (or foam, if yours has one) when you are tracing.

Back in the Year of our Lord 1997, I was a lot younger and in high school woodshop. I had a teacher that looked like Jesus - that's really the the best way to describe him; Mr. Vargo. But, Mr. Vargo was one heck of a carpenter (ironically enough). One of the lessons he drove home whenever he could was to work with the biggest piece of material that you possibly can. When working around powered saws that was great advice, particularly to the people that were trying to make some custom wooden dice and trying to cut those dice one at a time. Apart from being a lot safer, when working with material like EVA foam, a solid contiguous piece is going to be a lot stronger, and will present a better surface to finish. I want to enjoy this build for a good while, so building it as strong as can be allowed with EVA is entirely in my interests.
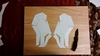
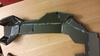
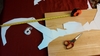
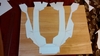
You can see the pattern taking shape as I build it out! Everything that is taped together I intend to cut out as one piece, yes, even with all the fold lines. I will actually have to manually transfer the printed fold lines as they lay (which wasn't a problem to do with a straight-edge on the templates), but the nice part about this is I will be able to take a hobby knife and cut the joined pieces along their taped sides and not destroy any of the individual piece templates; I'll be able to trace-in the taped lines on the foam (once separated) without having to grab a ruler and manually plot them. If I need to, I can always tape the individual templates back together in the same spot to re-create the 'master' template. Lastly, as you can see even though I wanted this piece to be one solid cut, it pretty easily got past the 24"x24" of usable area on my foam pieces; I'll have to cut it in half, but that isn't so bad because the center will be behind the 'front panel' and neck collar piece.

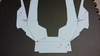
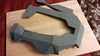
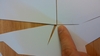
But, as is want to happen on any 3d shape transformed to 2d, sometimes there will be hiccups. The way the unfolds work together is not always ideal, as can be seen in this next pic. Joining the faces that go together on a 2d plane is bound to - at some point - create overlaps; basically when two pieces of the template are trying to occupy the same space at the same time.

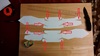
The two template pieces are joined perfectly everywhere else, but if I go through with cutting this in foam I will clip off the little piece that the shadow is cast over. In this case, I am going for it - what I am giving up for having a continuous piece offsets that little sacrifice, and since I am taking the long road to finishing (PVA and SmoothCast) I should be able to fill the little gap that will leave. It took a little while, but I decided on how I wanted to handle the primary 'collar' piece, and it'll fit on a single mat!

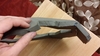
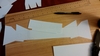
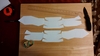
And now the lower 'channels' running along the bottom edge of the rib cage.

Well, that's it for now! Once I have these pieces into foam and joined, I will have a lot more options on what I'll be tackling next.
I've been biding my time while sorting things out through a recent return from overseas, but after all the necessities were taken are of I decided it was time to break ground with my own build and give back to the community in sharing my own project and experiences along the way. That said, let's have at it.
Most people here are accustomed to the rigors of patterning and pep work, well, you still don't entirely get away from it working with EVA foam (for anyone that is still waiting to take the first step). But, I wanted to take my project a different direction from "go," so here's how that is working.
First, having a good medium to make patterns out of is essential I've found. I haven't wandered far enough or wide enough to come by any honest card stock, but I did find that photo paper works decently well. I got two packs that were on sale, and as an additional plus it plays pretty well with tape. Photo paper is pretty 'closed cell,' so it might make a fairly good pep material too (for reference, photo papers hang around the 70-74lb weight). But, this build will be in foam so I don't suppose it matters!
Second, even though there are 'foam friendly' templates out there they are not a 100% solution to doing a foam build. Unwrapping a 3d image always yields a 2d template; inherently, 2d is just that, the X and Y axis. Thusly, even a "foam friendly" unwrap does not and will not take into account the thickness of the material you are using (the Z axis). So, I'm starting with the largest assemblies, and going to work from the "outside" toward the center.
Third, going about a build this way will be more expensive. I am cutting big pieces - that means less of them fit on a single mat! I'll be saving money on glue, but even though I haven't done the numbers I am pretty sure one glue stick is going to be cheaper than one foam mat. Depending on your ultimate plans, this may or may not be the way you want to roll, but I would encourage anyone to 'consolidate' their pattern pieces as much as is possible under any circumstance - you spend more time with a knife in the long run, but each piece you can combine is one less joint that has to be glued, and one less joint you have to worry about strengthening, or finishing.
Below, I'm working with a few shapes that have been cut out, but I've also made a reverse pattern of each of the pieces and have begun extrapolating parts that technically "aren't there" in the pep model - letting the material's thickness work for me, as well as joining those two 'wings' that extend off of the center panel with a length that will provide good strength.
Oh, and save yourself time and effort wherever you can! If you have long straight-aways, align those to the finished edge of the paper (or foam, if yours has one) when you are tracing.
Back in the Year of our Lord 1997, I was a lot younger and in high school woodshop. I had a teacher that looked like Jesus - that's really the the best way to describe him; Mr. Vargo. But, Mr. Vargo was one heck of a carpenter (ironically enough). One of the lessons he drove home whenever he could was to work with the biggest piece of material that you possibly can. When working around powered saws that was great advice, particularly to the people that were trying to make some custom wooden dice and trying to cut those dice one at a time. Apart from being a lot safer, when working with material like EVA foam, a solid contiguous piece is going to be a lot stronger, and will present a better surface to finish. I want to enjoy this build for a good while, so building it as strong as can be allowed with EVA is entirely in my interests.
You can see the pattern taking shape as I build it out! Everything that is taped together I intend to cut out as one piece, yes, even with all the fold lines. I will actually have to manually transfer the printed fold lines as they lay (which wasn't a problem to do with a straight-edge on the templates), but the nice part about this is I will be able to take a hobby knife and cut the joined pieces along their taped sides and not destroy any of the individual piece templates; I'll be able to trace-in the taped lines on the foam (once separated) without having to grab a ruler and manually plot them. If I need to, I can always tape the individual templates back together in the same spot to re-create the 'master' template. Lastly, as you can see even though I wanted this piece to be one solid cut, it pretty easily got past the 24"x24" of usable area on my foam pieces; I'll have to cut it in half, but that isn't so bad because the center will be behind the 'front panel' and neck collar piece.
But, as is want to happen on any 3d shape transformed to 2d, sometimes there will be hiccups. The way the unfolds work together is not always ideal, as can be seen in this next pic. Joining the faces that go together on a 2d plane is bound to - at some point - create overlaps; basically when two pieces of the template are trying to occupy the same space at the same time.
The two template pieces are joined perfectly everywhere else, but if I go through with cutting this in foam I will clip off the little piece that the shadow is cast over. In this case, I am going for it - what I am giving up for having a continuous piece offsets that little sacrifice, and since I am taking the long road to finishing (PVA and SmoothCast) I should be able to fill the little gap that will leave. It took a little while, but I decided on how I wanted to handle the primary 'collar' piece, and it'll fit on a single mat!
And now the lower 'channels' running along the bottom edge of the rib cage.
Well, that's it for now! Once I have these pieces into foam and joined, I will have a lot more options on what I'll be tackling next.

") Besides, in many ways I think the angles inherent with the Reach armor are one of its endearing qualities and serve to set it apart from the MK VI "Master Chief" armor. Still, I'm going to continue trying to combine major assemblies where I can to make life easier and the build stronger.
Besides, in many ways I think the angles inherent with the Reach armor are one of its endearing qualities and serve to set it apart from the MK VI "Master Chief" armor. Still, I'm going to continue trying to combine major assemblies where I can to make life easier and the build stronger.