- Member DIN
- S041
Hello everyone,
You can call me Bargo. I'm a cosplayer from Germany and a proud member of the Mandalorian Roughnecks. I've been part of the cosplay scene for many years now, and it all started with the idea of building my own Halo armor.
Back then, I tried to make a helmet using Pepakura, but my attempts always failed – the helmets were always too small. At one event, I saw some Mandalorians and thought, “That looks a lot easier.” And just like that, I spent the next 10 years exclusively building and wearing Mandalorian armor.
Now, after a full decade, I’ve decided to go back to my roots and finally build that Halo armor I originally dreamed of. With all the knowledge and skills I’ve gathered over the years, I feel ready to create a suit that I’ll love – and hopefully others will too.
Instead of going the usual 3D printing route, I really wanted to build the entire suit (except the helmet) out of EVA foam, making it as comfortable and flexible as possible. This is my first EVA armor build, and so far, it's been going surprisingly well!
Thanks to this forum, I was able to create a Blender render of my Spartan.


The armor I’m building is a Mark VII Spartan armor, featuring:
The kama will be worn on the right side, hanging under the belt, reaching from the belt down to the knee. It will cover the rear, ending at a slanted angle at the back. The fabric will be sand/brown-colored to match my scarf, with black trim and a black UNSC logo printed on it. It adds a bit of character and functionality, almost like a warrior’s cloak, and covers my butt
I purchased the helmet files from Galactic Armory and printed them on my Kobra Max. I did some custom work on the vent details, as I plan to integrate LED headlights from RC modeling kits. In general, the helmet will be fully kitted out with electronics:


The rest of the armor is being built from 10mm UHD EVA foam, 10mm HD, 5mm, and 2mm HD foam.
I’ll be working on the thigh armor next, moving from the limbs inward. The final piece will be the chest armor, including the UA Relic Plate attachment (as seen in the render above). I found a 3D model for it that I was able to adjust in Armorsmith.
Speaking of Armorsmith – what a cool piece of software! It's a shame I only discovered it recently. Until now, I’ve been scaling armor parts in a much more complicated way. That said, my method actually worked better for the helmet, since Windows 3D Builder allows an x-ray view that helps check the fit precisely.
Well, this post has gotten long enough that I feel like I should leave a potato here... but I’ll spare you.
I’ll keep you all updated on my progress!
So far, I’ve spent around:
With excited and friendly greetings,
Bargo~
You can call me Bargo. I'm a cosplayer from Germany and a proud member of the Mandalorian Roughnecks. I've been part of the cosplay scene for many years now, and it all started with the idea of building my own Halo armor.
Back then, I tried to make a helmet using Pepakura, but my attempts always failed – the helmets were always too small. At one event, I saw some Mandalorians and thought, “That looks a lot easier.” And just like that, I spent the next 10 years exclusively building and wearing Mandalorian armor.
Now, after a full decade, I’ve decided to go back to my roots and finally build that Halo armor I originally dreamed of. With all the knowledge and skills I’ve gathered over the years, I feel ready to create a suit that I’ll love – and hopefully others will too.
Instead of going the usual 3D printing route, I really wanted to build the entire suit (except the helmet) out of EVA foam, making it as comfortable and flexible as possible. This is my first EVA armor build, and so far, it's been going surprisingly well!
Thanks to this forum, I was able to create a Blender render of my Spartan.
The armor I’m building is a Mark VII Spartan armor, featuring:
- Grenadier helmet
- ODST shoulder pieces
- A UA Relic Plate chest attachment
- A thigh pouch
- And as a unique addition: a half kama
The kama will be worn on the right side, hanging under the belt, reaching from the belt down to the knee. It will cover the rear, ending at a slanted angle at the back. The fabric will be sand/brown-colored to match my scarf, with black trim and a black UNSC logo printed on it. It adds a bit of character and functionality, almost like a warrior’s cloak, and covers my butt
I purchased the helmet files from Galactic Armory and printed them on my Kobra Max. I did some custom work on the vent details, as I plan to integrate LED headlights from RC modeling kits. In general, the helmet will be fully kitted out with electronics:
- Improved hearing (using a tutorial I found here)
- Better voice projection using a Bluetooth mic and an Anker speaker
- LEDs
- A complete ventilation system with 3 fans
The rest of the armor is being built from 10mm UHD EVA foam, 10mm HD, 5mm, and 2mm HD foam.
Progress so far:
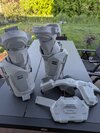
- Boots: Done (just need to add elastic for better form)
(Please ignore the mess in my shed workshop) - Shin armor: Finished today! Though the pictures are still from yesterday – more coming later this week.
- Hand plates and knee armor are also completed and all parts are already sealed with Kwik Seal and ready for Plasti Dip.
Next steps:
I’ll be working on the thigh armor next, moving from the limbs inward. The final piece will be the chest armor, including the UA Relic Plate attachment (as seen in the render above). I found a 3D model for it that I was able to adjust in Armorsmith.
Speaking of Armorsmith – what a cool piece of software! It's a shame I only discovered it recently. Until now, I’ve been scaling armor parts in a much more complicated way. That said, my method actually worked better for the helmet, since Windows 3D Builder allows an x-ray view that helps check the fit precisely.
Well, this post has gotten long enough that I feel like I should leave a potato here... but I’ll spare you.
I’ll keep you all updated on my progress!
So far, I’ve spent around:
- 6 hours on scaling
- 20 hours on research
- 40–50 hours on building
With excited and friendly greetings,
Bargo~
 Total spent so far: €589
  Working Time
 MA40 Electronics Update