Yet another first time build ODST

Status
Not open for further replies.

UnrealPaprika

New Member
Well I've been pondering the idea of doing an ODST Cosplay since fall 2020 or so. I did some light reading at the time and then kinda shelved it. Since then I bought a 3d printer and the idea sort of made its way back to the realm of possibility.

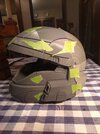
I considered the different methods people used to make costumes and realized that 3D printing was exactly the way for me to do it. Nothing against foam, but if you aren't Michelangelo, which I'm not, then it doesn't have the level of detail/ accuracy I wanted. Once I started printing I found this sight, and lurked in the background taking in information. Now that I've successfully completed the helmet and want to finish the armor I figured I'd better make an account here.

The basic plan is that the suit is going to be accurate to the Rookie in terms of shape and armor pieces but with my own unique color scheme and such.
I'll put the details and steps taken for all the parts in separate replies on this thread.
 
Obviously I started with the helmet. I'm ashamed to say I don't remember who's STL file I found online and used so I can't give the credit that is due. If I find out I'll edit this.

I'm not going to explain every step in detail but for those who want more regular updates and steps I do a pretty good job documenting on my Instagram (Login • Instagram) It's not exclusively ODST build but I will keep posting my build there.
IMG_20211209_095927210.jpg
IMG_20211224_154017199.jpg
IMG_20211225_133327198.jpg
IMG_20211228_160209928.jpg
IMG_20220103_164648576.jpg
IMG_20220107_170842620.jpg


One thing I'd do next time is to probably drop the fiberglass interior shell. It was a huge hassle and I'm not sure it really added that much integrity.
For the visor I bought a reflective blue plastic sheet from IconProps on Etsy and very carefully cut it into 5 pieces and hot glued it together. Honestly it looks pretty good from a distance. In the future I'll make a vacuum former and use the buck that came with the STL files to make a single piece visor.

I haven't yet, but I'll probably ad fans. I thought about communications but so far you can hear stuff outside the helmet pretty well and people can hear me so there doesn't seem to be a need.
 

Attachments

  • IMG_20211215_173532711.jpg
    IMG_20211215_173532711.jpg
    2 MB · Views: 159
I'm currently working my way down from the head. ish. Next will be shoulders and arms. Before I get much farther I need more filament and armorsmith. The plan is for the shoulder that canonically has the blood type on it to have that with my blood type, which I need to find out. Guess I should go donate blood. On the other shoulder I will deviate from canon and have a tribute to my late grandfather. He was an airborne soldier during the Korean War and so I shall put the unit patch of the 11th airborne on the other shoulder. It seemed fitting since ODST are the airborne of the Halo universe.
IMG_20220205_131352316_HDR.jpg
1644627024190.png
 
The other thing I'm starting to plan is the soft bits.

For the undersuit I'm thinking I'll get a black flight suit/ coveralls to which I'll attach the various pieces of armor. It seems like the shoulder straps should also be soft, I don't know if I'll make them from scratch or modify backpack straps yet. It all depends on how my sewing skills develop. I know the ODST suit for H3 doesn't have much of a collar/ neck that goes up into the helmet, but I'm planning to exaggerate that and sew some sort of tall color to the flight suit so it hides my neck going into the helmet.

For the boots I'll find some cheap but comfortable black combat style boots.

For the gloves I'll probably find reasonably accurate looking tactical finger-less gloves and maybe 3d print some parts to glue on to improve accuracy.
 
I'm currently working my way down from the head. ish. Next will be shoulders and arms. Before I get much farther I need more filament and armorsmith. The plan is for the shoulder that canonically has the blood type on it to have that with my blood type, which I need to find out. Guess I should go donate blood. On the other shoulder I will deviate from canon and have a tribute to my late grandfather. He was an airborne soldier during the Korean War and so I shall put the unit patch of the 11th airborne on the other shoulder. It seemed fitting since ODST are the airborne of the Halo universe.
View attachment 314075View attachment 314076
I love how many 405th people donate blood for the first time because they want the right UNSC MEDREF decal. Enjoy the cookies and treats afterwards!
 
Well I had started doing the shoulders using 3D files I found here (posted by Moe Sizzlac) for free, but those shoulders were for a Reach ODST. After some more digging I decided that the best course of action for the rest of the armor was to buy from WhenInMaine (FromTheBrinkStudios) on Etsy. His work looks amazing and I think it is well worth the price considering the effort he went to.
 
Well I had started doing the shoulders using 3D files I found here (posted by Moe Sizzlac) for free, but those shoulders were for a Reach ODST. After some more digging I decided that the best course of action for the rest of the armor was to buy from WhenInMaine (FromTheBrinkStudios) on Etsy. His work looks amazing and I think it is well worth the price considering the effort he went to.

I can't fault the Brink Studio files! They're top notch and what i'm using for my build! Love the guide hes got to go with them too!
 
Obviously I started with the helmet. I'm ashamed to say I don't remember who's STL file I found online and used so I can't give the credit that is due. If I find out I'll edit this.

I'm not going to explain every step in detail but for those who want more regular updates and steps I do a pretty good job documenting on my Instagram (Login • Instagram) It's not exclusively ODST build but I will keep posting my build there.
View attachment 314066View attachment 314068View attachment 314069View attachment 314070View attachment 314071View attachment 314072

One thing I'd do next time is to probably drop the fiberglass interior shell. It was a huge hassle and I'm not sure it really added that much integrity.
For the visor I bought a reflective blue plastic sheet from IconProps on Etsy and very carefully cut it into 5 pieces and hot glued it together. Honestly it looks pretty good from a distance. In the future I'll make a vacuum former and use the buck that came with the STL files to make a single piece visor.

I haven't yet, but I'll probably ad fans. I thought about communications but so far you can hear stuff outside the helmet pretty well and people can hear me so there doesn't seem to be a need.
Wow, I thought I was cool for using that same visor material and making it with TWO seperate pieces, but whatever you did with it looks so much better!! :0 I definately thought that was a vaccuformed acrylic visor at first. Props to you
 
Wow, I thought I was cool for using that same visor material and making it with TWO seperate pieces, but whatever you did with it looks so much better!! :0 I definately thought that was a vaccuformed acrylic visor at first. Props to you
Thanks, It was certainly a lot of effort. Basically I have a 3d printed buck that went with the helmet so I made a template using that and then cut out the reflective pieces from that. Eventually I will go vacuform because I'd like a single piece without the hot glue bits on the inside. And it would look better close up. But this is good for now.
 
Thanks, It was certainly a lot of effort. Basically I have a 3d printed buck that went with the helmet so I made a template using that and then cut out the reflective pieces from that. Eventually I will go vacuform because I'd like a single piece without the hot glue bits on the inside. And it would look better close up. But this is good for now.
Templates from the buck was a big brain move tbh it looks great! But yeah, cant go wrong with vacuform, one cohesive piece looks too nice!
 
Also hopefully arriving tonight is the black flight suit that I've purchased to be the basis of the under-suit. If I'm satisfied with it, I'm planning to sew Velcro to it and glued to the armor for attaching those. I'll buy extra fabric and add detail to the parts visible under the armor for an overall more realistic look. I guess I have to learn how to sew...
 
Wow your armor is turning out good.
Also how do you like the prusa mini? Ive been thinking about trying another printer at some point.
The prusa mini is solid. It's reliable, and turns out good prints with minimal baby-sitting. It is pricier and has a smaller build plate which can be annoying. I think now that I have experience with it I'd feel comfortable buying a cheaper larger printer that needs more hand holding.
 
Status
Not open for further replies.
Back
Top