1st Build 3D printed ODST Armor

Skidmorpheus

Active Member
Member DIN
S728
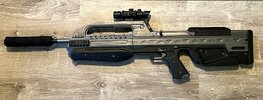
I was a member here many moons ago. I have been lurking around again here for a few months. I finally have something to show for it. I’m excited to see this on through to the end.

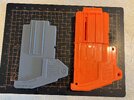
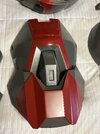
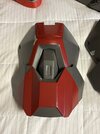
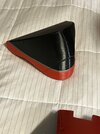
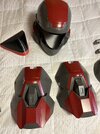
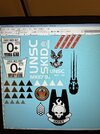
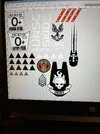
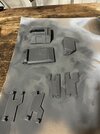
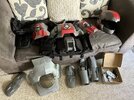
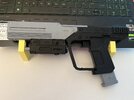
I’m using files by @from_the_brink_studios on Instagram. I am printing the parts in Ovature PETG on my Ender 3 and Ender 5+

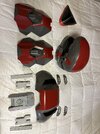
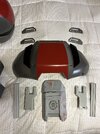
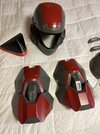
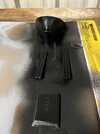
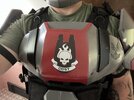
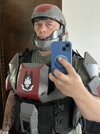
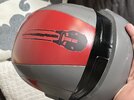
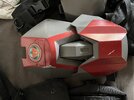
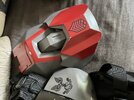
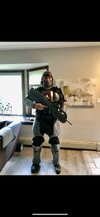
I’ve got the helmet chest piece and shoulders built and painted waiting for weathering.

I don’t have many still pictures of the build but I have been cataloging it on TikTok under the same name.
 

Attachments

  • IMG_9682.MOV
    9.4 MB
Here are the pieces I have so far.

A few more bits and bobs for that abdomen area dress off the printer

I was test printing a gauntlet but it failed half way through. It least that still let me know it was a bit oversized.
 

Attachments

  • 43847386-2C4D-4E0E-B04D-408CDCC2DE57.jpeg
    43847386-2C4D-4E0E-B04D-408CDCC2DE57.jpeg
    1.9 MB · Views: 157
  • BC33C03D-FEC5-4BE6-80D1-ADD1A82F5684.jpeg
    BC33C03D-FEC5-4BE6-80D1-ADD1A82F5684.jpeg
    1.9 MB · Views: 154
  • BA0C246B-1CEC-4047-B4B3-C1CF6164E9D0.jpeg
    BA0C246B-1CEC-4047-B4B3-C1CF6164E9D0.jpeg
    1.4 MB · Views: 150
  • 305F1590-4E15-4B63-9E8A-7E26C7E65F77.jpeg
    305F1590-4E15-4B63-9E8A-7E26C7E65F77.jpeg
    1.3 MB · Views: 151
  • 4B3E641E-2850-4B58-87C4-F10E21C68AC3.jpeg
    4B3E641E-2850-4B58-87C4-F10E21C68AC3.jpeg
    1.2 MB · Views: 142
  • 62C57D80-68DF-469B-AF97-832DC272EC5C.jpeg
    62C57D80-68DF-469B-AF97-832DC272EC5C.jpeg
    1.5 MB · Views: 150
  • F722FCAB-627C-4C0C-84FE-71AF41718A3E.jpeg
    F722FCAB-627C-4C0C-84FE-71AF41718A3E.jpeg
    1.7 MB · Views: 150
  • E1643C6F-2DD9-4B24-86BA-44047B3B7B93.jpeg
    E1643C6F-2DD9-4B24-86BA-44047B3B7B93.jpeg
    1.8 MB · Views: 152
You're in for a project! I just retired my Brink suit, and pippon has a fantastic example of that suit done right. What you've got so far is looking great, so keep at it! Welcome to the fold Helljumper!
 
Damn, good work on that smoothing.... even with filler primer, you can still see some of the layer lines on my bigger parts. Jelly.
 
Here are the pieces I have so far.

A few more bits and bobs for that abdomen area dress off the printer

I was test printing a gauntlet but it failed half way through. It least that still let me know it was a bit oversized.
Looks great! Can't wait to see it complete!
 
Hey Thanks for the complements. I will take me a while. I have 4 Printers and they always seem busy with other things. Tonight I have been measuring the actual dimensions of the armor in locations where I will add decals. I'm going to go with the water transfer method I saw on here. That way I can weather everything together before I clear them. I also worked on sanding and painting a few more parts for the belt and the visor buck so I can heat form a visor. The blue background is only so you can see the details of the white text better.
 

Attachments

  • IMG_9737.jpeg
    IMG_9737.jpeg
    912.9 KB · Views: 126
  • IMG_9736.jpeg
    IMG_9736.jpeg
    1 MB · Views: 142
  • IMG_9738.jpeg
    IMG_9738.jpeg
    885.3 KB · Views: 124
  • IMG_9739.jpeg
    IMG_9739.jpeg
    829.5 KB · Views: 130
Well, I’m real good at this Internet thing! I printed it on a household printer, but it only prints in cyan, yellow, magenta and black so it won’t print any of the white, or very light silver, didn’t actually print on the transfer paper. Maybe if you used something that has toner like LaserJet it would work, I’m now thinking about using a vinyl to either put the decals in vinyl or have some stencils cut out so I can paint them.
I’ll attach photos here to keep this relevant to the build thread because I have made some progress it’s just extremely slow. I still need to 3-D, print all of the armor from the hips down. I did source an under suit and I have boots, but this is the progress so far.
 

Attachments

  • 27AD5546-CB2C-49A9-880C-E7A6A18121AC.jpeg
    27AD5546-CB2C-49A9-880C-E7A6A18121AC.jpeg
    1.7 MB · Views: 106
  • AF62E9CD-12CE-45AD-8243-087AF2124762.jpeg
    AF62E9CD-12CE-45AD-8243-087AF2124762.jpeg
    1.3 MB · Views: 91
  • 1FEBA41F-4B55-401B-971F-9A0972082ECC.jpeg
    1FEBA41F-4B55-401B-971F-9A0972082ECC.jpeg
    3.5 MB · Views: 89
  • 674EA862-987C-492D-8360-6949E10531D1.jpeg
    674EA862-987C-492D-8360-6949E10531D1.jpeg
    1.8 MB · Views: 73
  • 786335CA-4CF8-4935-A87F-E4849CF9000D.jpeg
    786335CA-4CF8-4935-A87F-E4849CF9000D.jpeg
    3.2 MB · Views: 82
  • 2313BDF9-71F5-4B5C-88AF-19FBAA9B85E8.jpeg
    2313BDF9-71F5-4B5C-88AF-19FBAA9B85E8.jpeg
    3.7 MB · Views: 89
  • 0C8EFCD6-2FD0-4F59-AA19-4AF93FFB9DFE.jpeg
    0C8EFCD6-2FD0-4F59-AA19-4AF93FFB9DFE.jpeg
    3.8 MB · Views: 91
Update:

Started a test print for the thigh pieces to be sure the scale is right. I also printed a M6C Socom from Aguilar Workshop. I think the model is too small so I plan scaling it up to 145%. Since that was the scale when I sized up the round it is supposed to fire. It was a good test print and now I will know how it goes together. I also added some voids to it to put 10x2.6mm magnets in the body and grip. Two to hopefully hold it to the thigh armor and one in the magazine well to hold the magazine in place as there is currently no way to secure it without glueing. We’ll see how that goes. Test printing the grip now to make sure the scale is right on that one also.
 

Attachments

  • 821BADEF-B67D-43B7-AA60-775E22893FAD.jpeg
    821BADEF-B67D-43B7-AA60-775E22893FAD.jpeg
    1.4 MB · Views: 64
  • 1EB0E5E6-24AC-414B-B0B9-7D26243C93FB.jpeg
    1EB0E5E6-24AC-414B-B0B9-7D26243C93FB.jpeg
    3.3 MB · Views: 64
looks really good, helmet seems like a really tight fit, love the detail work, really good stuff.
 
I have the thigh pieces printed and I finished one shin. The scale was to small so I am reprinting now. I also finished some weapons. The sidearm, knife and Battle Rifle I got at Galactic Armory and I also picked Up the Nerf MA40 when it was cheap on Prime day. Right now I am working on designing a cosplay magazine for the Nerf gun that is closer to the game look and fitment.
 

Attachments

  • IMG_3430.jpeg
    IMG_3430.jpeg
    814.7 KB · Views: 79
That's so cool, I hope to get to that stage one day, I just recently started the helmet build of an ODST with a file from thingiverse, I accidentally printed it too big for me but I plan to still use it as practice, what I am struggling with is how to effectively sand down all the little details, how did you manage to achieve that considering your prints like very smooth.
 
That's so cool, I hope to get to that stage one day, I just recently started the helmet build of an ODST with a file from thingiverse, I accidentally printed it too big for me but I plan to still use it as practice, what I am struggling with is how to effectively sand down all the little details, how did you manage to achieve that considering your prints like very smooth.
It just takes time. I first sand with 220 grit with a palm sander especially on larger pieces. Then I clean off the dust off and paint with filler primer. I like rustoleum automotive primer. When that drys I will look for imperfections that need more filling and use bondo spot putty. Then sand down with 400 grit. I repeat the filler primer and the spot putty steps until smooth. Then paint your top colors and sand with 400-600 grit. Any small detail lines you want to preserve you can use a small screw driver or dental pick to clean out between steps to keep those lines sharp.
 
It just takes time. I first sand with 220 grit with a palm sander especially on larger pieces. Then I clean off the dust off and paint with filler primer. I like rustoleum automotive primer. When that drys I will look for imperfections that need more filling and use bondo spot putty. Then sand down with 400 grit. I repeat the filler primer and the spot putty steps until smooth. Then paint your top colors and sand with 400-600 grit. Any small detail lines you want to preserve you can use a small screw driver or dental pick to clean out between steps to keep those lines sharp.
Oh ok awesome, thank you for all that :)
 
Ok here is an update on my armor. I am sanding sanding sanding. I have in my web belt so now I can start rigging the thighs. My battle rifle is finished. I made a prop magazine for the NERF MA40 that can be downloaded from my Printables page for free here . I still need to do something with vacuum forming the visor. But here is a random dump of some progress Pics and Videos.
 

Attachments

  • IMG_3517.jpeg
    IMG_3517.jpeg
    1.3 MB · Views: 61
  • IMG_3457.jpeg
    IMG_3457.jpeg
    1.1 MB · Views: 63
  • IMG_3664.JPEG
    IMG_3664.JPEG
    1 MB · Views: 75
  • IMG_3662.JPEG
    IMG_3662.JPEG
    859.8 KB · Views: 68
  • IMG_3661.JPEG
    IMG_3661.JPEG
    880.7 KB · Views: 68
  • IMG_3660.JPEG
    IMG_3660.JPEG
    1.2 MB · Views: 57
  • IMG_3659.JPEG
    IMG_3659.JPEG
    1.2 MB · Views: 66
  • IMG_3442.jpeg
    IMG_3442.jpeg
    544.2 KB · Views: 65
  • IMG_3443.jpeg
    IMG_3443.jpeg
    533.4 KB · Views: 61
  • IMG_3441.jpeg
    IMG_3441.jpeg
    521.5 KB · Views: 63
  • IMG_3768.jpeg
    IMG_3768.jpeg
    426.4 KB · Views: 57
  • export_1694033558756.mp4
    72.4 MB

Your message may be considered spam for the following reasons:

If you wish to reply despite these issues, check the box below before replying.
Be aware that malicious compliance may result in more severe penalties.
Back
Top