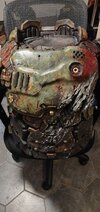
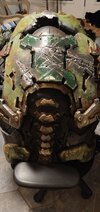
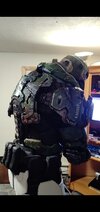
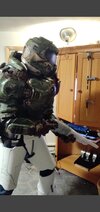
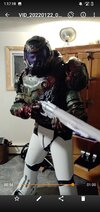
Doom 2016 Praetor suit

In 2016 he's only 6'0" out of the suit, but it looks like he gets another half foot or so with the armor... Makes you wonder, since the helmet only adds about an inch and a half. Looks like he'd get plenty of ankle support, at least.
 
After yet another long break, I've gotten the arms fabricated and up to the base paint coat.
View attachment 303071View attachment 303076View attachment 303077
I am still struggling with the arms for my cosplay. I just can't find a good way. Can you please explain how you attach the arms to the shoulders? I see on your pictures that there is buckle at the top. Is that the only attachment point?
And how do you put the whole armor on? Can you even do it by yourself or is someone helping you to put it on?
I am really wondering, because if I wear my praetor suit, I can't even touch the shoulder with my other arms, let alone close a buckle with one hand.
Or do you put your arms on first and then the rest? Or are the arms permanently attached to the armor and you somehow still manage to put it on like a sweater?
 
Last edited:
I am still struggling with the arms for my cosplay. I just can't find a good way. Can you please explain how you attach the arms to the shoulders? I see on your pictures that there is buckle at the top. Is that the only attachment point?
And how do you put the whole armor on? Can you even do it by yourself or is someone helping you to put it on?
I never really thought about that bit, but I used elastic straps instead of nylon which is probably the key. On the upper arm it's basically just a clip glued as close to the inner top edge of the foam as I could get it, with no slack. Inside the cuirass's shoulder pieces I just hot glued the crap out of an elastic strap so it dangled down, then I threw a clip on and test fit it with the arms until I had it adjusted to the right length. I think I got everything I used out of an old set of knee pads. Since the straps in the shoulders are always at least a little bit stretched, the arm pieces are constantly getting pulled up and the cuirass is constantly getting pulled down, which keeps everything in place.

Getting into the suit kind of sucks, I'll post a video at some point. I have to put the cuirass on, but leave the abdominal section un-velcroed. I then put on an arm, shimmy the foam 90% of the way up, then reach under the abs with my other arm and feel around for the clips. Then I do the same on the other side, but it's much more of a pain since I have to squeeze my already bulked up arm under the abs. Everything kind of self-adjusts after that. Basically, I more or less reach under the armor, instead of over it. I did an oddball way of rigging up the torso, so I have no idea how you'd do it with a plate carrier.

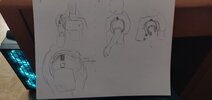
There's a sketch below of a different system I was thinking of at one point, where the armor opens up on the sides and the upper arms are permanently attached at the shoulder. The upper arms are basically a C shape that sits over your arm, with a flexible velcro strap underneath, instead of a tube that you slide into. The forearms would clip on after the fact. That way, you could slide the whole thing on over your head and not have to worry about manipulating any straps or clips outside of your range of motion. This is the method I'd try if I had to redo the praetor suit, but it's probably gibberish outside of my own brain.

If the arms are foam, It honestly might pay to cut out the inner section and put in a similarly colored flexible velcro bit. Nobody would notice, and it would make it far easier to get in and out of the suit. Might even be able to get in with the arms pre-attached, but I have no idea.
IMG_20211117_132938.jpg
 
Thanks for the answer. On the one hand, it reliefs me that you don't have a perfect solution either, but on the other hand it bothers me, because I still have no good solution yet. Your sketch is pretty good (you really have artistic talent, it shows ;)) and I understand what your plan is, but It would still leave the problem that I can not reach to the arms to close a buckle or velcro stuff, when I am wearing the armor. I might need to put on the arms first and the rest, but in that case the arms would not stay in place (If I do not make them super tight fit).

I will look into other cosplays and try to learn from them, I mean we can not be the only people who have similar problems.
 
It is a difficult problem for sure, clearly there is a reason that a lot of people go to events with their own handlers. I really can't think of another way to do the arm strapping without putting together an undersuit to attach to. Rare earth magnets would probably be strong enough to hold, if you could figure out a way to get them to self-attach. They're basically magic, so who knows, but again I haven't tried it.

I did have to get my arm segments padded up quite a bit to stay more or less in place, even with the strap. With suits that only rely on padding, stuff starts slipping around after a while, but obviously it is the easier route and a lot of people just deal with it.

Good luck, I wish I had a better solution.
 
Okay well I guess I am gonna make a solution similar to yours and hope a someone will help me putting it on. This sucks for testing purpose, but well if I ever go to a cosplay event I think a friend can help me out.

I just watched a few videos of this famous cosplayer:
this is where she talks about attachment methods and she basically says that she mostly use Velcro and always relies on a helper.

You can see my exact struggles on here dressing up videos e.g.:
it is just impossible to reach your shoulder once you wear something bulky.

Very dissatisfying, but there seems to be no better solution. I tried to use magnets, like Neodym magnets. But they were keep falling off. The arms just have too much movement to be attached with only magnets.
Definitely something that can be changed later, at least, so if you have a stroke of genius at some point you can modify it. I guess I kind of lucked into a manageable way of doing things, definitely not a thought I had when I designed it though. Yippee
 
Last edited:
I can relate to your pain with putting on a suit. I have an almost finished halo suit, and I can onlyput on the legs and belt. After I put on the chest plate, I become helpless. LOL. After that, your only hope is for someone to help you.
 
Yeah it's so tough to design a costume to be able to put it all on yourself. I got lucky with my ODST where I can put it on without help, but my brother's Spartan III requires a helper, so does his Star Wars Shore Trooper. My Winter Soldier costume definitely requires a second set of hands too.

Gotta use the buddy system when it comes to cosplay.
 
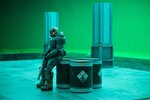
I found Legacy Effects' page for the Fight Like Hell Doom promo they did: Doom — Legacy Effects

Completely forgot a professional Praetor Suit exists somewhere out there. Looks like most of it was 3D modeled, printed (?), and cast into a rubber material in sections. Then some of the more prominent armor panels were separately cast out of a firmer material and attached independently. The pauldrons, shoulder padding, and chest + back plating seem to all be one piece over top of an undersuit. Looking at the trailer, you can see that they had some way of making the pauldrons move with the upper arms; probably some fancy rigging system. At any rate, definitely not a suit that you get in and out of without assistance.

Not many techniques there that are viable for an amateur builder, but I think it's still interesting to see what a real professionally done suit looks like. That undersuit's gotta get crazy ******* hot, too. EVA foam is bad enough, but I feel bad for the guy that had to jump around in the thing under studio lights.
pio-paulo-santana-cgh0swcw4aaqkrj.jpgdoom.jpg
As a side note, that helmet is a little funky... Looks like the suit actor had a smaller head or the mounting system broke. His eyes are actually under the brow of the helmet, if you account for the camera angle. Mine is a bit too tall, if anything, but at least I have an excellent FOV. I guess there's a bit of leeway when you're shooting a dimly lit TV resolution commercial. Wonder if they would have more info on the project, might email to ask.

I have the week off, so I'll probably use those photos for reference images as I do the legs. Very helpful to see how the shape actually translates to human proportions. Need to get my printer running too, which I'm really not looking forward to. Have an offering of brand new PETG for it, since it ruined the last two beds by bonding plastic to them. Hopefully that's enough to get it back up and running (spoiler- probably a hard nope).

Still have that red EL wire, so that will probably go into the right pauldron for that red ring, and maybe I'll snake it around back and throw it in somewhere under the back plate or spine. Generally, the wire glows brighter the shorter you cut it, so I'll look for a happy medium.

Peace, if everything goes as planned I will update soon with some neat stuff.
 
Last edited:
Welp, I forgot how lazy I am during Thanksgiving. Got legs mocked up and connected, along with some light fixes and paint touch-ups. Not much more, but aside from the boots I now have every part of this thing at least in a WIP state. Took a while to figure out how everything went together, since I'm doing it freehand, but in the end I think I have the rough shapes down pretty good. I did end up hanging it all off of the belt, because the low-density foam is significantly lighter than the floor mat stuff. The test fit video is below, but note that I didn't fully suit up for it so there's a lot of wonk.


As far as things that jump out at me as "Yikes":

-Belt sags in front, needs to come up quite a bit. I will end up clipping it directly to the bottom of the torso, I think.
-Torso leans too far back as compared to the in-game suit. I think this is just going to come down to my posture. Especially as I look at Legacy FX's suit, it seems like the hunched look is up to the actor.
-Helmet is taller and slimmer than the in-game version. I'm not too torn up about it, but I'm going to keep it in the back of my mind. I have to eat my words here; I said there must be something wrong with the Legacy helmet but I think they just sat it low on the actor's head for the look.
-Still got some dang asymmetry in the back, but it varies between videos so I think it just shifts around on me. I'm always tweaking the padding, so who knows if I'll manage to get it to cooperate.
-See-through gaps all over, especially in the back. Hopefully I can fill them in with hot glue and call it a day.

It's got a little proportional wonk to it, but less than I would expect for a freehanded foam copy of a videogame suit. Overall I'm quite happy with it so far.

Aside from all that, I think I just have to bulk up the legs a bunch, figure out something for the shoes, and then I'm in good shape. The joints are going to be odd, as the game model just shows a ton of uninterrupted padding at the back of the knee and at the hip. I'll probably layer up really thin foam and maybe velcro it together, but there will have to be a gap at some point unless I do something fancy. At any rate I don't have to worry about that for a while. I would like the boots to fit over normal shoes but still attach firmly, so I'll probably find some thick rubber and figure out how to strap a sneaker to it. I still have to look around, but hopefully someone's already figured out that particular issue.

The other big thing that I did was put more lights into the torso. I basically carved out a big hole in the shoulder, fed EL wire through, and then snaked it up around back to the vent. It's a subtle effect and it doesn't show well under light, but I think it adds a bit of dimension to the back of the suit.

IMG_20211126_213512[1].jpgIMG_20211128_175012[1].jpgIMG_20211128_174138[1].jpgIMG_20211128_175025[1].jpg

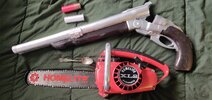
I'll have a bunch more time over December, so hopefully I make good progress then. I wanted to get my 3D printer going, but I forgot to bring the super shotgun files home and I didn't want to open the new filament before I could really get to work. I still have a foot or more of barrel to print on that thing, so I'm sure it will be yet another adventure. Do have a chainsaw, though:
IMG_20211128_174122[1].jpg

Thanks for reading
 
The fact that it's all made out of foam is mind blowing. Can't wait to see what your future cosplays will be.
Hah, you say that as someone who's done far cleaner foam work, I've seen that Infinite suit! Would be interesting to tackle a MK VII Spartan, as 343 took a lot of pains to get the character proportions somewhat realistic this time around. They say you learn from mistakes, so I should be an EVA foam genius by the time I finish this thing.
 
Hey-O,
Hopefully this update represents the last of the petty details. I did get some leg stuff done, but the bulk of the shaping still needs to happen.

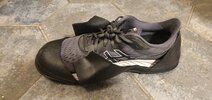
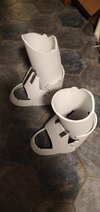
I got caught up on how I was going to do the boots, because it turned out to be yet another problem area that I underestimated. As shown below, I settled on using a rubber overboot instead of gluing directly to a shoe. The latter would have been far easier, but I figure if I ever sell this thing or get a bad case of gout, the shoes can be swapped out easily. Also, I don't want to buy new sneakers. Right now it's pretty bare-bones; basically just a rough shell attached to the shin piece that sits on top of the shoe + overboot. I tried a bunch of methods for attaching foam directly to the rubber before I decided on just making the sole separate. I think I'm going to end up rigging some buckles and snaps to keep the two pieces attached while I walk around, hopefully nothing that will put enough stress on the rubber to tear it. It probably won't be perfect, as the in-game boot has absolutely no joints or flexible areas. To keep the shell from lifting off the top, I'll probably have some sort of a strap running underneath at the arch.
IMG_20220122_004220.jpgIMG_20220122_004319.jpg

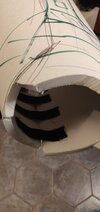
Because the shins and boots are now one piece, the thighs are more or less free-floating. It seems like I shaped them well enough to stay in place on their own, but I can always add more buckles at the hip. I threw in a few elastic straps on the seam instead of a solid joint, again more or less in case of a future change in owners or my own BMI.
IMG_20220122_005124.jpg


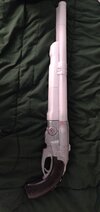
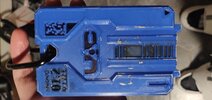
As predicted, most of the last month was spent wrestling my 3D printer. I got through a full roll of PETG without much issue, so I anticipate a catastrophic malfunction any day now. The super shotgun is more or less roughed out, along with a key card that I used up some old filament on. The shotgun is excellent, and I'm toying with the idea of making my own brass shells or at least casting the 3D printed ones. The rims tend to chip off whenever you drop them. On the bright side, I managed to get my barrels 90% dead straight, which is a huge pain when printing cylinders in segments. Everything warps just a little bit too much to sit nicely, and you have to work it into place. I still have to do bondo and paint, but so far it feels very robust.

IMG_20220122_000212.jpgIMG_20220122_000313.jpg


Also, I tweaked a bunch of stuff in the chest, including the light (for the 4th time.) It now looks a bit more 3-D, and I threw in a washer to give the fixture a bit of shine even when the lights are off. Also did a pass on the chest, arms, and helmet with black oil paint, which really helped hide the problem areas and give the whole thing the "pop" that it was missing. It probably doesn't show too well in photos, but it really did help. I went through and did a lot of other little tweaks to the strapping, battle damage, paint, etc, but again none of it is too obvious.
IMG_20220122_004742.jpgIMG_20220122_004918.jpgIMG_20220122_004428.jpg


I did get into it and tool around a bit to see how everything fits together. So far so good, only major issues are the left arm sliding down and catching the shoulder (easy fix), and the codpiece jutting out... because the leather jacket bunches up under it. So I taped it underneath as a temporary measure, but I will probably end up cutting that jacket up anyway because I was absolutely roasting after the effort of getting everything on. Had to take a step outside into 3F windchill to cool down, which is about the only time in my life I've been glad for northeastern winters. Yayy. As a side effect of the heat+fog, my face is all contorted in a conveniently Doom-ish manner, which could be looked at as a silver lining. Beyond that 1/3 of my head, the acting wasn't so great, but there were a couple cool stills I liked. At this point I'm just not going to bother with a decent camera until I get the thing done, I've waited long enough that it'll be a neat surprise to see the suit in any acceptable degree of clarity.

Anyway, I've developed my zen enough to accept whatever asymmetry is left. Still some gaps in the back to seal up, but that's another easy job. Helmet fogged up a bit, but I could still see and I can certainly persuade some more holes into the thing. Everything really is staying in place from the waist up, which I'm shocked by. The boots are going to need wire put in for rigidity, but I imagine it'll all stay centered pretty easily after that. Just a matter of building it all up enough to support itself, but I'll need some flexibility to walk, so who knows.


Screenshot_20220122-010037.jpgScreenshot_20220122-011703.jpgScreenshot_20220122-011718.jpg

Forgot to turn on the lights or grab the chainsaw, and as you can see that shoulder is pretty annoying. I glued the buckle to keep it from slipping down the strap, hopefully that does it. I did do everyone the mercy of cutting out the 35 seconds I spent wrestling with that lamp, but at least it's there. My production value is increasing enormously.

Thanks for reading, pece oot.
 
Last edited:
Who won, you or the lamp? ;)

Geez, that looks so good in motion! Your suit's gonna be terrifying when the legs are complete!

I love the idea you have with attaching to a rubber slip on rather than the shoe itself, gonna steal that one. Being able to remove the shoes and sanitize them seems like it'll make the after-cosplay hygiene easier at least.
Well, the lamp fell onto the visor and roasted my face pretty bad until I could get a good grip on the clamp. I need to put some rubber on the finger pads, otherwise I will be a walking three stooges skit.

And thanks, we will see how the overshoes turn out. That suit gets toasty, and the legs especially will have to be pretty thick, so the removable shoes will be a godsend.
 
Last edited:
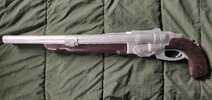
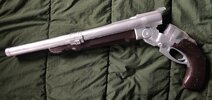
Relatively unexciting update on the super shotgun. The bondo and base coats of paint are down, so now it just needs weathering and a couple little detail baubles I'll print up at some point. The filler has a few error spots, but I was low on time and I figure I'll blend it all in with the weathering passes. The semester ends in three weeks, so I'll be able to get back to work on the suit soon.

IMG_20220417_135000.jpgIMG_20220417_135052.jpgIMG_20220417_135304.jpg

It feels extremely solid after the bondo, especially since the model includes channels for structural steel rods. The camera fisheye makes the barrels look bent upward, but they're pretty much as dead on as I've ever seen a 3D print get. It is a big big boy too, somewhere around a 4 gauge shell. I included a chainsaw and a spoon that was lying around for scale, although now that I think of it I never actually measured the thing. The folks at home will have to dig out their novelty 1914 Deutschland commemorative soup spoons to get an idea of the scale.
 
This thread is more than 3 months old.

Your message may be considered spam for the following reasons:

  1. This thread hasn't been active in some time. A new post in this thread might not contribute constructively to this discussion after so long.
If you wish to reply despite these issues, check the box below before replying.
Be aware that malicious compliance may result in more severe penalties.
Back
Top