- Member DIN
- S128
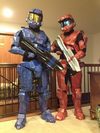
This is a commission from a friend to build a Halo 4 Venator (Assassin) variant helmet and I will be doing it all with Pepakura.

Helmet Completed
I like to catalog my work for my own records, but I am hopeful that others may find it helpful too.
Current Stage (+time):
Rejoicing
Painting & Detailing
-- (9 hours)
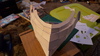
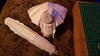
Bondo/Shaping
--(8 hours)
Resining & Fiberglass
--(2 hours)
Pepping
--(19 hours)
Scaling and Measuring (0.5 hours)
Materials & Tools Used (so far):
Fabric Measuring Tape
Pepakura Designer 3 (free)
16pages of 110lb Cardstock
.05 ball point Pen
#1 Xacto knife (+2 blades #11)
Self-healing Cutting Board
Metal/Cork Ruler
Mini Low-temp Hot Glue Gun (+15 glue sticks)
Polyester Resin and Catalyst (19oz)
Respirator
1" and 2" paintbrushes (3 of each)
Acetone (20oz)
Small Space Heater
Clear Plastic Cups (17)
Popsicle Stick for mixing (3)
Fiberglass cloth (about 2 square feet)
Paper Towel soaked with Acetone for cleaning up
Disposable Gloves (22 pair)
Body Filler and hardener (14 golf-ball sized clumps)
Dremel (with several attachments)
Safety Glasses
8" Rasp
8" Bastard File
File Cleaner Brush
Krazy Glue (1.5 gram)
Straight Razor Blade (2)
2" Putty Spreader (4)
Oscilating Tool (Sonicraft) with sanding attachment
Sanding Pads (5@60grit, 2@80g, 2@120g, 2@180g, 1@220g)
Rag for dusting
Small Files (triangle, half round)
4 1/2" PSA Sanding Roll (2ft@320grit)
Wood and Nails for Painting Stand
Rustoleum Gray Spray Primer
Rustoleum Flat Metallic Silver Spray Paint
Rustoleum Advanced Flat Iron Metallic Spray Paint/Primer
Rustoleum Advanced Matte Robin's Egg Paint/Primer
Rustoleum Satin Black Enamel (not recommended)
Krylon MAXX Flat Crystal Clear Acrylic
Painter's Tape (2yds)
Masking tape and plastic bags
Military Helmet Pads (7pc set)
Velco (6" x 1 1/2")
(5) 5mm White LEDs with Resistors (unspecified)
(4) 5mm Metal LED Holders
Red and Black solid .07 Wire
Quick Release Wire Connectors (4)
Wire to 9 volt battery connector (2)
On/off Switch (2)
12V Cooling Fan - 60mm x 15mm
Wire Cutters
Soldering Tool with Flux and Solder
Electrical Tape
Black Duck Tape
Sm. Clear Plastic Storage Container (visor)
Silver mirror Window Tint (20% dark)
Credit Card (for smoothing window tint)
Spray Bottle
Epoxy
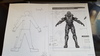
The image below is for reference.
Armor Color: Dark Steel (main) Frost White (secondary)
Light Color: White
Visor Color: Silver
Emblem: from in-game model

To New Members: Before asking general building questions please do some research. There is a lot of information on this site, most questions have already been answered. Start with the New Recruit Sticky found here and click on the first few links. To get an idea of what kinds of materials you may need to get started on a Pepakura build check out this old, but helpful list found here. Also, keep reading as I will try my best to document what I do step by step. Good luck and happy building!
To Veterans and Intermediates: If you have inputs on where my advice or techniques could be improved please share! And thank you for paving the way!


Helmet Completed
I like to catalog my work for my own records, but I am hopeful that others may find it helpful too.
Current Stage (+time):
Rejoicing
Painting & Detailing
-- (9 hours)
Bondo/Shaping
--(8 hours)
Resining & Fiberglass
--(2 hours)
Pepping
--(19 hours)
Scaling and Measuring (0.5 hours)
Materials & Tools Used (so far):
Fabric Measuring Tape
Pepakura Designer 3 (free)
16pages of 110lb Cardstock
.05 ball point Pen
#1 Xacto knife (+2 blades #11)
Self-healing Cutting Board
Metal/Cork Ruler
Mini Low-temp Hot Glue Gun (+15 glue sticks)
Polyester Resin and Catalyst (19oz)
Respirator
1" and 2" paintbrushes (3 of each)
Acetone (20oz)
Small Space Heater
Clear Plastic Cups (17)
Popsicle Stick for mixing (3)
Fiberglass cloth (about 2 square feet)
Paper Towel soaked with Acetone for cleaning up
Disposable Gloves (22 pair)
Body Filler and hardener (14 golf-ball sized clumps)
Dremel (with several attachments)
Safety Glasses
8" Rasp
8" Bastard File
File Cleaner Brush
Krazy Glue (1.5 gram)
Straight Razor Blade (2)
2" Putty Spreader (4)
Oscilating Tool (Sonicraft) with sanding attachment
Sanding Pads (5@60grit, 2@80g, 2@120g, 2@180g, 1@220g)
Rag for dusting
Small Files (triangle, half round)
4 1/2" PSA Sanding Roll (2ft@320grit)
Wood and Nails for Painting Stand
Rustoleum Gray Spray Primer
Rustoleum Flat Metallic Silver Spray Paint
Rustoleum Advanced Flat Iron Metallic Spray Paint/Primer
Rustoleum Advanced Matte Robin's Egg Paint/Primer
Rustoleum Satin Black Enamel (not recommended)
Krylon MAXX Flat Crystal Clear Acrylic
Painter's Tape (2yds)
Masking tape and plastic bags
Military Helmet Pads (7pc set)
Velco (6" x 1 1/2")
(5) 5mm White LEDs with Resistors (unspecified)
(4) 5mm Metal LED Holders
Red and Black solid .07 Wire
Quick Release Wire Connectors (4)
Wire to 9 volt battery connector (2)
On/off Switch (2)
12V Cooling Fan - 60mm x 15mm
Wire Cutters
Soldering Tool with Flux and Solder
Electrical Tape
Black Duck Tape
Sm. Clear Plastic Storage Container (visor)
Silver mirror Window Tint (20% dark)
Credit Card (for smoothing window tint)
Spray Bottle
Epoxy
The image below is for reference.
Armor Color: Dark Steel (main) Frost White (secondary)
Light Color: White
Visor Color: Silver
Emblem: from in-game model
To New Members: Before asking general building questions please do some research. There is a lot of information on this site, most questions have already been answered. Start with the New Recruit Sticky found here and click on the first few links. To get an idea of what kinds of materials you may need to get started on a Pepakura build check out this old, but helpful list found here. Also, keep reading as I will try my best to document what I do step by step. Good luck and happy building!
To Veterans and Intermediates: If you have inputs on where my advice or techniques could be improved please share! And thank you for paving the way!
Last edited by a moderator: