First {Halo} build - Spartan (TV series)

SgtSaint

Active Member
Never played the game so I'm going to do a TV series build as my first Spartan. I'll try to keep this thread updated.

Character: I never cosplay an existing character. I prefer to be myself in that universe/franchise. As I'm ex-army signal corp, I'll probably do something along the lines of a COMs/Tech specialist. Nice thing about being 50+ is I already look grizzled {LOL} and in this case that helps add to the 'veteran operator' persona.

Context: 30 years of cosplay behind me. Mostly soft costumes. One armor before this: The Expanse, Martian marine Goliath MK-III that I did all the modeling of. Nice to have modeled all that in the past, but not looking to go that low-level this time.

Plan: Use existing 3d models for printing much of the hard armor. I don't need to re-invent the wheel. Then model what I want need to do myself my own way. And of course there's all the soft parts like the undersuit that are conventional costuming techniques and materials.
  1. Step 1 - research
    1. Each episode I watch then dismantle to still shots for references and various angles. Thanks to the first two episodes there is already a LOT of good stuff available.
    2. Lots of side-by-side comparisons to see what is the same part and only looks different due to color, paint, age, distressing etc.
    3. Researching 3d model vendors. Paying attention to cross talk about quality and reputations.
  2. Step 2 - R&D { under-suit }
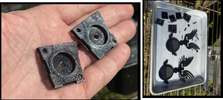
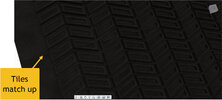
    1. Modeled up some of the first bits for the under-suit. I want to develop a good way of making the various tread patterns. Did a couple draft prints to make sure I like the size and angles. (Tread, Connector greeblie, Shoulder eagle, UNSC tag on the chest, etc.)
    2. Ran them in regular black, made adjustments. I'll run them in flexibles for the actual build.
    3. Working up a pattern for the undersuit plates, panels, attachments and the tubing on the sides, shoulders, hips.
      1. Along with a materials list.
      2. Ordered some items to experiment with to confirm sizes and usability.
  3. Step 2 - R&D { Armor }
    1. There's what you can do on the show. What you can show on a show. And what you can do in the real world, by yourself getting ready for a convention in a hotel room - taking into account real-world circumstances like a 12 hour convention day and trying to 'hit the head' without a team of handlers getting you in and out of your costume.
    2. So... studying all the bits and combinations I like. Forming a plan for both the look of my character (armor modules as well as color and level of distress), as well as it being functional in the world.
 

Attachments

  • Greeblie_001.mp4
    8.1 MB
  • PlateTread_repeating.jpg
    PlateTread_repeating.jpg
    157.4 KB · Views: 258
  • Eagle.mp4
    1.6 MB
  • ScreenGrabsThumb.jpg
    ScreenGrabsThumb.jpg
    198.8 KB · Views: 247
Never played the game so I'm going to do a TV series build as my first Spartan. I'll try to keep this thread updated.

Character: I never cosplay an existing character. I prefer to be myself in that universe/franchise. As I'm ex-army signal corp, I'll probably do something along the lines of a COMs/Tech specialist. Nice thing about being 50+ is I already look grizzled {LOL} and in this case that helps add to the 'veteran operator' persona.

Context: 30 years of cosplay behind me. Mostly soft costumes. One armor before this: The Expanse, Martian marine Goliath MK-III that I did all the modeling of. Nice to have modeled all that in the past, but not looking to go that low-level this time.

Plan: Use existing 3d models for printing much of the hard armor. I don't need to re-invent the wheel. Then model what I want need to do myself my own way. And of course there's all the soft parts like the undersuit that are conventional costuming techniques and materials.
  1. Step 1 - research
    1. Each episode I watch then dismantle to still shots for references and various angles. Thanks to the first two episodes there is already a LOT of good stuff available.
    2. Lots of side-by-side comparisons to see what is the same part and only looks different due to color, paint, age, distressing etc.
    3. Researching 3d model vendors. Paying attention to cross talk about quality and reputations.
  2. Step 2 - R&D { under-suit }
    1. Modeled up some of the first bits for the under-suit. I want to develop a good way of making the various tread patterns. Did a couple draft prints to make sure I like the size and angles. (Tread, Connector greeblie, Shoulder eagle, UNSC tag on the chest, etc.)
    2. Ran them in regular black, made adjustments. I'll run them in flexibles for the actual build.
    3. Working up a pattern for the undersuit plates, panels, attachments and the tubing on the sides, shoulders, hips.
      1. Along with a materials list.
      2. Ordered some items to experiment with to confirm sizes and usability.
  3. Step 2 - R&D { Armor }
    1. There's what you can do on the show. What you can show on a show. And what you can do in the real world, by yourself getting ready for a convention in a hotel room - taking into account real-world circumstances like a 12 hour convention day and trying to 'hit the head' without a team of handlers getting you in and out of your costume.
    2. So... studying all the bits and combinations I like. Forming a plan for both the look of my character (armor modules as well as color and level of distress), as well as it being functional in the world.
Very cool can't wait to see pics of your progress!
 
Sweet! Can't wait to see your progress!

And I also want whatever 3D printer you're using
I have:
  1. Ender3pro for small stuff
  2. Hictop D3Hero IDEX for medium stuff as well as dual head/color/material printing
  3. Creality CR10s-5 for the big stuff. This print is on a CR10s-5 with .8mm nozzle. (I decided on the .8 instead of .6 from the screen shot because adding 2 days for supports sucked). So now its at 6 days with a .8 nozzle)

Would the Ender 3 printer be good for anyone new to 3d printing?
 
Would the Ender 3 printer be good for anyone new to 3d printing?
As Creativity4ever said, Ender3pro is a great intro. I describe it as "if you can't print with an Ender3, you can't print."

Personally I hate sensors like the BL touch. Personally I find them to be more trouble than they are worth and cause too many issues when (not if) they fail. Especially on a small printer like an Ender3. To me, just one old-school opinion, I want to learn to drive on a stick shift with no bells and whistles. I want to actually feel and understand it all. For me, this meant when I moved up to larger printers that didn't support sensors it was no big deal instead of being a learning curve that I should have gone through at the beginning.

Whether you do a sensor or not is up to you. But the Ender3 is a good beginner choice. Just expect and budget to move to something larger in short order. Because you'll be hooked in under 30 days - then ask... Wait: I can't do armor on this unless I carve it up into 20 pieces. Now what? Then you get a bigger printer to set next to the little one. They aren't fast. So small printer for small things and big printer for big things. Going at the same time.
 
Would the Ender 3 printer be good for anyone new to 3d printing?
Just throwing in my two cents, and I say absolutely! If you check out my build thread all of my prints have been done with an Ender 3 Pro. I've had that thing running almost 24/7 since I got it a couple months ago, and it's a beast! So far I have had no issues with the printer that wasn't user error, and the prints have been coming out really well!

Also, in terms of using a BL touch, I personally never bought one and I've been just fine. Manually leveling the print bed really isn't difficult at all once you get the hang of it. Of course, it's all up to personal preference at the end of the day, but if you go through with getting the printer, I recommend holding off on the BL touch and only get it if you are really struggling with leveling the bed yourself. Best of luck!
 
Last edited:
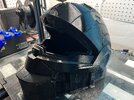
For those not familiar with 3d printers and think they are fast because they've heard the term "rapid protoyping"... Rapid is only in comparrison to traditional industrial methods. Look at the photo at the top showing how the helmet lays on the printer bed. That was Monday midday. Its now Thursday midday. About an inch and a half of height for progress.

Keep in mind, this is a big printer that allows the entire helmet main body to print in one part at 6-10 days. Instead of 6-10 parts at 1 day each.

1649360237493.png
 
For those not familiar with 3d printers and think they are fast because they've heard the term "rapid protoyping"... Rapid is only in comparrison to traditional industrial methods. Look at the photo at the top showing how the helmet lays on the printer bed. That was Monday midday. Its now Thursday midday. About an inch and a half of height for progress.

Keep in mind, this is a big printer that allows the entire helmet main body to print in one part at 6-10 days. Instead of 6-10 parts at 1 day each.

View attachment 316371
What are some of the specs of the nozzle/print? Like nozzle size, layer height, and print speed?
 
What are some of the specs of the nozzle/print? Like nozzle size, layer height, and print speed?
Don't be offended when I say "I don't want to side track my build thread into a 3d print tutorial."

When I have met my 50post/90day probationary period... and after I have actually completed the parts I'm showing in this build log... I'll write up something for the resources forum. But my settings here and now before completion, before a successful print to go with them doesn't help anyone if it fails. I don't want to be responsible for 30 people failing and all saying "But you said..."
 
Progress update: Day 09
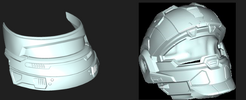
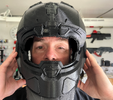
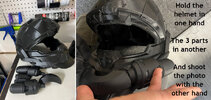
  • Main helmet body: Printed (8 days)
    • Now all the clean up work to start.
  • Helmet neckback: Started (30 hrs ETA)

Under-armor suit (TV style):
  • Shoulder eagle: Done, revised, done again
  • Connector greeblies: Done
  • Tubes & connectors (shoulders, ribs, thighs): First batch too big. Second batch good.
  • Working up the costume base pattern and material selection.
  • Sewing machine set back up after a long hiatus.

Just for fun:
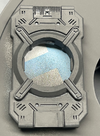
  • Cortana chip (USB compat): Primed ready for paint
    • 128gig mini USB go to in it.
    • Probably just house a copy of my build photos and video. Kinda becomes my service record that way.
 

Attachments

  • EaglesGreeblies.png
    EaglesGreeblies.png
    320.7 KB · Views: 183
  • HelmetThumbs.png
    HelmetThumbs.png
    123.5 KB · Views: 196
  • HelmetFit_001.png
    HelmetFit_001.png
    1.3 MB · Views: 196
  • 2022-04-12_11-03-26.png
    2022-04-12_11-03-26.png
    893.5 KB · Views: 198
  • Helmet_000.JPG
    Helmet_000.JPG
    2.6 MB · Views: 179
I love that you're keeping a detailed build log with the time and measurements included. I find that incredibly helpful for if / when I need to reprint or adjust something down the line. You have a wonderful start, I'm very interested to see how you continue! Welcome to the forums!
 
Day 19. Not a huge amount of progress. Don't you hate it when real life gets in the way of the good stuff?
  • Printed the canisters and HUL for the CQC helmet. Dry fit is spot on. Assembly is aways off. Sanding, cleaning, smoothing, painting first. Assembly last.
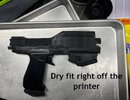
  • Printed the M6G Magnum. Dryfit there looks good too. Scale seems good to the hand.
 

Attachments

  • Canisters_dryfit.jpg
    Canisters_dryfit.jpg
    310.7 KB · Views: 199
  • Magnum_dryfit.jpg
    Magnum_dryfit.jpg
    158.3 KB · Views: 198
Day 23
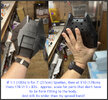
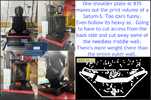
Working one arm of armor to get a feel for the right scale. The armor files I bought is 1:1 for a 7' Spartan. At 5'10" that approximates to 83% but I know each part will have to be scaled to match my build and deviations from 'generic guy'. Parts that aren't form fitting come first. The parts that have to be snug will need the undersuit to be built first, then measure and movement tests off that. Otherwise its just a waste of time and material.
Damn! Just the shoulder is larger than my hand. Now to start the other one for a 33hrs print.
 

Attachments

  • IMG_0642.JPG
    IMG_0642.JPG
    357.8 KB · Views: 198
  • IMG_0638.png
    IMG_0638.png
    1.6 MB · Views: 203
Day 23
Working one arm of armor to get a feel for the right scale. The armor files I bought is 1:1 for a 7' Spartan. At 5'10" that approximates to 83% but I know each part will have to be scaled to match my build and deviations from 'generic guy'. Parts that aren't form fitting come first. The parts that have to be snug will need the undersuit to be built first, then measure and movement tests off that. Otherwise its just a waste of time and material.
Damn! Just the shoulder is larger than my hand. Now to start the other one for a 33hrs print.
Are these your own files?
 
This thread is more than 9 months old.

Your message may be considered spam for the following reasons:

  1. This thread hasn't been active in some time. A new post in this thread might not contribute constructively to this discussion after so long.
If you wish to reply despite these issues, check the box below before replying.
Be aware that malicious compliance may result in more severe penalties.
Back
Top