GEN2 Scout/Palmer 2.0 build - EVA foam

Status
Not open for further replies.
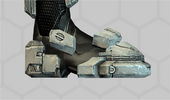
Glued together the first back part of the boot. The tape is only holding in position how it'll fit on the actual shoe.
It isn't finished yet as I have to touch on the seams and also got to do some additional foam details and layers here and there. Figuring out and doing some templates for it (hence the tape holding it in position so it'll all sit nicely together).
Also in the box on the right is the second part all cut out and ready to do some bevels before gluing it together.

Gotta admit I'm kinda falling in love with foam. Really enjoying it and it's relatively stress-free so far... until I'll have to cut out a tiny hole without damaging rest of the piece - doing some tests to prepare myself and I'm sweating hard.

1660696695503.png
 
Did some big progress on the first back piece of the boot. Unfortunately my dremel run out of battery so I'm finished for today and will continue tomorrow most likely. Tbh not much left there - just gotta dremel out the bevels and make it all sit together nicely and just add few more tiny details in few spots.
Btw - the way I've been keeping the sides with tape and then gluing on additional layers with foam was perfect. Even without tape this piece sits just like that and nothing pulls the sides further apart. 10/10 recommend

Also now that I think I should start tracing the middle boot part templates onto the foam.

1660768665254.png
 
Finally... finished those back parts of the boots. They took way longer than I thought. Ugh.
All those tiny details that no one will ever notice but I still had to do it.
Now only thing I'll have to do on them is trimming down the edges on the bottom to fit the shoe but that's it.

Also I already cut out the parts for the small middle section of the boot. I planned to do bevels and prepare them for gluing today but will have to do it tomorrow.
Ideally my plan is to finish them on Saturday and on the weekend start working on the front section of the boot.

1660855823895.png


Here is the reference. As models are flat and it's just textures and shaders I think it turned out as accurate as I could.

1660856546494.png
 
It looks likes you already have a really good understanding of foam, great job!! Learning a new skill is overwhelming but you're already producing awesome work and I'm so happy you're enjoying it, it's such a versatile material! Looking forward to seeing this build take shape ☺️
 
It looks likes you already have a really good understanding of foam, great job!! Learning a new skill is overwhelming but you're already producing awesome work and I'm so happy you're enjoying it, it's such a versatile material! Looking forward to seeing this build take shape ☺️

Thank you so much! I'm trying my best but honestly it's very exciting and stimulating to learn this whole new area. Really enjoye it indeed.
 
Ok. The middle parts of the boot are finished for the most part. Only have to add few details, particularly that additional plate on top of it with 2 tiny small ones on each side. Just debating whether do 2mm or 5mm for the big one.

1660960106238.png


Now I got a dilemma. This is how the whole boot with armor parts is supposed to look like.

1660960247197.png


However this is the boot without armor parts.

1661005122048.png


However the shoe I have seems to be too short in height.

1660960285598.png


So this got me an idea. Perhaps I could use some foam and add a little bit to the height of the shoe?
It could also work pretty nicely to distract from that spot where to shoe ends.

1660960343790.png


By the way I removed those weird side panels on the shoes.

1660960137004.png


I went ahead and wasted some time to cut out some mockup how it could look like. I know it's terrible - I just used in-game model and tried unfolding the shoe myself. I have no idea how to do so it's the best I could do.
It's just a mock up to get the idea of the shapes and how they should be.

1660960169066.png


Put the armor pieces on it to show.

1660960201050.png


So.
I'm really tempted to try to do this and now just brainstorming on how to potentially I could do it best way.
What I came up with is to not make it as one piece to not put too much stress on the foam.
I could follow the markings on the in-game model and do those sections as separate pieces and glue them on separately.
I want the shoe to be flexible so I was thinking of doing majority of the side pieces with 2mm foam and only the top section that's supposed to be raised with 5mm.
 

Attachments

  • 1660960262731.png
    1660960262731.png
    401.4 KB · Views: 79
Last edited:
Have you seen the duct tape pattern making method? It's where you cover something - be it base armour, an accessory, or even yourself - in a layer of cling wrap, then duct tape (though for a shoe you could skip the clingwrap). Once it's covered in duct tape, you draw your patterns on it, add registration marks and then cut them out into templates (remember to take pictures first!).
 
Have you seen the duct tape pattern making method? It's where you cover something - be it base armour, an accessory, or even yourself - in a layer of cling wrap, then duct tape (though for a shoe you could skip the clingwrap). Once it's covered in duct tape, you draw your patterns on it, add registration marks and then cut them out into templates (remember to take pictures first!).
Yes. I'll try to use the duct tape. The shape itself just won't go closely over the boot (the very top should be at least 1cm raised) so that's why I tried to do it out of pepakura to get the feel for the general shape first.
Looking at references in the game now too.
 
Well. I started working on the front plate. Only one at a time because it has so many pieces and it would be too chaotic to work on both.
Also I went ahead and painted the hexagons on the shoes where it'll be visible to make it blend better together with the undersuit. That elastic panel on top was the worst tbh.

1661033164631.png
 
Finished constructing the front armor part of the shoe. At first I thought it was going to be so easy but those two small side panels were such a pain. So many tiny little pieces... One side panel consists of 14 small pieces.
Ugh. And now I have to do all of it again for the second shoe.
Oh and also will have to add all the details but I'll probably do that after I'll have both pieces finished.
Weekend's done and new week is starting tomorrow so less time and I just hope I'll be able to finish the second front in the upcoming days.

1661109834095.png


Put the front, middle and back sections together for a picture. It's starting to look pretty good together.

1661109852368.png
 
Also I've been browsing some old threads and I found (here) something that could be very cool and practical. I was actually mindblown.
Those tiny things. Just. Look.


So. Last time I used normal buckles. Thinking there is no better alternative I was going to use such buckles again to connect armor to the undersuit. BUT.

1661120778578.png


Those things. Oh damn. Gotta admit they look so much more practical. Potentially work same way as normal buckle only difference would be easier and faster to strap onto and off. Gotta admit it got me very interested.
Could potentially attach one to the nylon strap and the other to a piece of nylon that's glued onto the undersuit. So many possibilities. Definitely gonna put it on the list and keep it in mind for later.

1661120673575.png
1661120604193.png


Also btw - seeing how incredibly light the EVA foam is I'm just mindblown. I'm holding almost all of the pieces for 2 shoes and they don't weigh even close to what one actual shoe weighs. Just mindblowing. You want to tell me that you all were wearing feather-weight armor while I've been wearing around 15kg? Haha.

And now with all the perspective how light it's all going to be I'm also rethinking my strapping system. Actually debating if I'll be needing straps for all armor pieces or perhaps just a buckle would do without pulling on the undersuit. It's a thought for much later in the future tho.
 

Attachments

  • 1661120236580.png
    1661120236580.png
    44.2 KB · Views: 73
Did the big middle section of the second shoe today so only the nightmarish side panels remain.
Also did a details for the smaller middle section of the shoe. Not glued on yet as you can see it's sitting glued with a piece of tape, just cut out and I'll have to make them more rounded and beveled tomorrow.

1661210192325.png
 
Getting closer to finishing shoe armor. Tomorrow gotta finish the other side panel on the front part and all that'll be left will be to add all the details.

But I finished all the details on the middle sections. Really happy how these turned out - I've made myself a template for those buckles because the whole armor has quite lot of them so I'll use it again in the future. Tried to make it more interesting and dimensional than last time where I just did them quickly by just gluing 2 pieces of 2mm foam together (picture below). Now they look much better, have more dimensions and look more interesting and more like some buckles.

1661294347857.png


1661295186184.png
 
Last edited:
I've been doing foam work for close to 5 years, and none of my stuff has got anything on what you've made. These boots look immaculate!!!! great job Reclaimara! I'm excited to see how the rest of it goes.
 
Welcome back Mara! I've always felt a connection since we built our suits a similar way around the same time. I too want to remake my same suit to be more comfortable and easier to manage. I'll be watching you here. Good luck!
 
I've been doing foam work for close to 5 years, and none of my stuff has got anything on what you've made. These boots look immaculate!!!! great job Reclaimara! I'm excited to see how the rest of it goes.

Wow thank you so much! I'm just honestly trying to learn foam and taking my time. My tip: don't rush haha.

Welcome back Mara! I've always felt a connection since we built our suits a similar way around the same time. I too want to remake my same suit to be more comfortable and easier to manage. I'll be watching you here. Good luck!

Thank you so much, Duke! I missed you! Oooh. A remake? I'm very looking forward to it. What you gonna use now? 3d? Foam?
 
Missed you too! ❤️ My goal is to 3d print. I still like the look of rigid armor, but I'm hoping 3d modeling will help me maximize how small the armor can store and really dial in the scale / pinch points better.

I have a $600 printer and I just got a PC that should be able to model once assembled. I just have to get past a few "real life" hurdles before I can devote a lot of attention to it. I currently have the time, just not the mental capacity. Lol.
Oh wow. You're getting into 3d printing too? That's great to hear, Duke.
Wow. I hope you'll be posting updates here on the forum on your build. I'm very looking forward to your remake.
I'd love to get into 3d printing myself too but I don't have space for a printer so I finally gave foam a real try haha.
I can totally understand everything about real life taking away from building. I've had that for last couple of years. I hope all your issues will be solved soon. Hope you'll be ok soon, Duke.
 
Status
Not open for further replies.
Back
Top