Grenadier Spartan III

This morning I removed the tape to see how my 4am paint job turned out and I'm pretty happy with it! It's not perfect and there's some areas I still need to paint but it's mostly good for Denver FanExpo. I also still need to do weathering which I think will help really nail the look.
20220629_143853.jpg
20220629_143911.jpg


Also since I couldn't get a properly made visor in time I figured I'd use a temporary failed visor and lean into the damaged, current objective: survive look. I can't remember if I mentioned that in this thread before yet, so many late nights recently. I will be replacing this after the con.
20220629_143932.jpg


Maybe 30 min after removing the tape, Spitz and I left for the airport which lead to a whole adventure on it's own and maybe a story for later. We did bring our helmets as our personal items. I'd say we got a lot more excited complements than we did confused and weird stares like I was expecting lol.
20220629_164213.jpg
 

Attachments

  • 20220629_164213.jpg
    20220629_164213.jpg
    1.3 MB · Views: 85
Put some magnets in for the neck seal today with some JB weld.
20220704_173540.jpg
20220704_173546.jpg


I then added padding to the inside
20220704_184336.jpg


After that I did more weathering on some spots I felt I could have hit better
20220704_210945.jpg
20220704_211013.jpg
20220704_211017.jpg


I dropped my helmet as I was about to get this last pic and it landed on the UA, which popped off and absorbed all the impact. Just hot glued it back on and all is good!
20220704_213641.jpg
 
Sanded the parts from the previous post some more and filler primered them.
20220708_101451.jpg


I also did some test paint for my gold secondary color. Used my tacpad since I want to make a new one anyway. I'm going to go with the one on the right.
20220708_152110.jpg
 
what software do you use for sizing the armor?
Late update time!

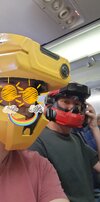
I feel like not much has happened lately due to classes starting again but I still wanted to make an update since it's been a while. A while back I posted this model below in the free 3d model index, which I plan to use for this build. It's Moe's Carter chest, but I (with the help of Moe) modified it using Meshmixer, Blender, and Microsoft 3d Builder to add holes and slots for lights.
View attachment 303360View attachment 303361

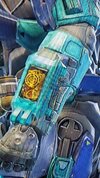
Also, as I'm sure a lot of you saw, there was a new Armorsmith update! So with that I did some slight modifications to the scaling of the parts I have yet to print, mainly the new chest piece. I also started color coding a bit, the orange parts are the ones that are already printed out, that way I can keep track of what I've already made.
View attachment 303364

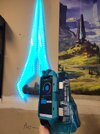
I've also added the vents made by TurboCharizard on the back, using light blue to represent the part that will be printed in resin so it can light up.
View attachment 303365
 
That visor looks incredible. Love the color choice of it. How much can you see through it?
I was able to see through it decently well. For the color I just lightly sprayed chrome gold rustoleum paint on the inside. I had to eyeball it to make it look solid on the outside but where I can still see through. This was actually a really last minute solution so I could get the helmet done before Denver Fan Expo. I am redoing the visor so that the buck doesn't warp when vacuum forming it and I'll probably try dying it for the color instead. Kinda shows you can lean into mistakes and still make them look good lol
 
After spending a week in Denver, I immediately went to Europe for 2 weeks, got back to my college apartment last night, and now have about 3 days to move out of my apartment and back home on the other side of the state. So naturally I got up this morning and finished sanding those parts I reprinted. Going to try getting new visors vacuum formed on campus before I move since I don't know where else I can use a vacuum former for free.
20220727_085114.jpg
 
Quick update time!

I realized that the data pad model that I had for the arm was completely solid so there wouldn't be a way to place a screen/phone inside once I print it out, without just going ham and cutting through a bunch of PLA. So after an hour of trying different ways to import the model into Solidworks to shell it only to find out once I got it loaded in as an object that my Surface Pro 4 still couldn't really process shelling the imported model. So instead, I just ended up spending the last 4 hours recreating the part in Solidworks. In the end it turned out that I still had issues shelling it so instead I used an extruded cut and got close enough to what I wanted. I'm not sure what phone/electronics I want to put in there yet, but once I figure it out I know I can easily make space to adjust for it and add a back cover.

View attachment 291155

View attachment 291156

Now you're probably wondering "Is there and easier way you could have done this?" and the answer is "Probably". Either way, my goal was to have a hole in the data pad that I could put electronics into and I accomplished that.

P.S. If anyone does know an easier way to do this I would very much appreciate you letting me know to make things easier in the future.
I just finished up with my GPS wrist attachment. I hollowed out a shell into the model and it attaches together with magnets.
 

Attachments

  • 20220717_000832.jpg
    20220717_000832.jpg
    2.7 MB · Views: 89
  • Resized_20220719_153904.jpeg
    Resized_20220719_153904.jpeg
    266.9 KB · Views: 69
This thread is more than 4 months old.

Your message may be considered spam for the following reasons:

  1. This thread hasn't been active in some time. A new post in this thread might not contribute constructively to this discussion after so long.
If you wish to reply despite these issues, check the box below before replying.
Be aware that malicious compliance may result in more severe penalties.
Back
Top