H3:ODST Build #2: Electric Boogaloo

Status
Not open for further replies.

CrimsonViper97

Active Member
Member DIN
S097
Hello everyone! The world is shut down, so you know what that means? It's ODST REBUILDBUILD TIME!!!!! *air horn noises*

I'm taking the inordinate amount of free-time this pandemic has provided me to either update or replace every piece of my ODST armor. The new set will be more accurate and more comfortable.


Link to my original build thread: EVA ODST Armor (Completed)


Links to my ODST resources
Undersuit Reference: Reference Thread: H3: ODST Undersuit and Soft Parts
Hip Hardware Details: ODST Hip Hardware STLs


So far I have one shin assembled, and a lot of other stuff in the works. Here's a sneak peak:

IMG_20200429_032152.jpg

IMG_20200429_211336.jpg
IMG_20200429_211543.jpg
IMG_20200429_211601.jpg
IMG_20200429_211633.jpg
IMG_20200429_211737.jpg
IMG_20200426_161944.jpg


Keep it clean,
Viper
 
Nice! Do you just slide those shins on or is there some sort of attachment? I gotta figure that out for my armour.
 
They slide on. In order for the proportions to be correct they fit pretty tight, but they're comfortable.
 
Wow, can you please take a photo from the back side of the shin, because I'll make my shins by making levels, and I want to see how you did it.
 
Thanks! Definitely some crimes going on that I'm not super proud of, but that's what the second one is for, right?
Second shin is always the better looking one when I made my shin it came out crooked but thankfully no ones noticed yet hahaha but you did a great job on this one and that back of the shin is something that im just amazed by the cleaness of those seams!
 
Update #1

Both shins are more or less complete. You can see in the pictures below that I've left the top open. I'm a warm human, so I've been thinking about putting fans in them, or at the very least leaving that area partially open with some kind of mesh over top to allow for passive cooling.

IMG_20200507_012221.jpg
IMG_20200507_012231.jpg
IMG_20200507_012302.jpg


In other news, I have a new brain bucket which I'm very excited about. Its about halfway through clean up.

IMG_20200507_012353.jpg
IMG_20200507_012441.jpg


Lastly, my favorite part: electronics.

All of the electronics for this suit run on 5V power supplied by 2 rechargeable USB batteries.

Pictured below is the power distro board for the helmet, a JST plug I wired to the end of some fan leads, and a couple USB connectors I build. JST connectors are super easy to build and conveniently tiny as well.

IMG_20200505_020245.jpg
IMG_20200505_020257.jpg
IMG_20200505_020601.jpg
IMG_20200505_020545.jpg
IMG_20200505_172756.jpg
IMG_20200505_180409.jpg


Time to get some sleep.
 

Attachments

  • IMG_20200505_020251.jpg
    IMG_20200505_020251.jpg
    3.3 MB · Views: 224
Wow! That is some clean foam work on those shins! Other then fans what are you all hooking up to the distro board?
Edit: Also I am hoping for a Hawaiian shirt odst build now haha
 
Wow ok I've gotten so much done since my last post- yay for neglecting thread updates- so this is going to be a

C H O N K Y T H R E A D U P D A T E P O S T

Thighs
The thigh armor is done with the exception of the inner thigh. You can find the 3d printed hardware available for download here.
IMG_20200512_001754.jpg IMG_20200512_001802.jpg IMG_20200515_190357.jpg IMG_20200515_190409_1.jpg

Torso
Planning the torso has been quite the adventure. I acquired a sewing machine and have started teaching myself how to use it by building a couple (maybe test, maybe final) pieces of the flak vest.
IMG_20200810_043559.jpg IMG_20200831_040826.jpg IMG_20200831_064103.jpg

I also constructed the back plate.
IMG_20200520_193703.jpg IMG_20200520_193706.jpg (Shoutout Chicago photobombing in the background)

Fanny Pack
The jazzy boy fanny pack was a pain. Nothing more to say about that. I have straps made for it which I will be attaching after painting.
IMG_20200525_185216.jpg IMG_20200525_185208.jpg IMG_20200525_185229.jpg IMG_20200526_145908.jpg IMG_20200526_145943.jpg IMG_20200831_112440.jpg

Gauntlets
I actually had a lot of fun building these, although the vents are tough.
IMG_20200914_103130.jpg IMG_20200911_102835.jpg IMG_20200911_102039.jpg IMG_20200911_102046.jpg IMG_20200918_115825.jpg IMG_20200920_105219.jpg IMG_20200920_124625.jpg

Shoulders
Overall, I'm happy with the way the shoulders turned out. They're fanned out a little wide though, and I really really don't want to rebuild them, so I'm going to shape them in a little bit.
IMG_20200924_052243.jpg IMG_20200924_064430.jpg IMG_20200926_124109.jpg IMG_20200926_124119.jpg IMG_20200926_124124.jpg IMG_20200926_130710.jpg IMG_20200926_141535.jpg

Stay tuned for the helmet and electronics. To keep things cleaner I'm going to throw all of that in another post.
 
Last edited:
**ITS ELECTRIC**

It wouldn't be an electric boogaloo without some electronics and oh boy does this suit have electronics. In one of my previous updates I talked about the power system for my suit, but now I have it really nailed down some I'm going to do a thorough overview of all the little bits and bobs I'm jamming into my brain bucket.

Power Distribution
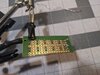
Our journey starts with two rechargeable USB batteries which will live somewhere in the torso area of the suit, probable the chest. These get plugged into a power distribution board that lives in the chest, which is just a glorified power strip. A similar board lives in the helmet. In my last electronics post these were sloppily assembled with some protoboard. Since then, I taught myself how to use EasyEDA, a free PCB layout program, and had a small batch of them manufactured.

Chest distribution board prototype vs final:
IMG_20200918_110414.jpg IMG_20200918_113911.jpg IMG_20200918_113917.jpg

Helmet distribution board prototype vs final:
IMG_20200914_130611.jpg

The two power distro boards are connected with a 4 pin mini din cable. Two of the pins on this cable are + and - for circuit 1, and the two others are + and - for circuit two. Circuit one powers fans, lights and basically any other non-audio electronics and circuit two is entirely audio. This serves a dual purpose, increasing overall battery life, and isolating the audio circuits from electrical noise that is created by the fans. The noise problem is entirely solvable with some decoupling capacitors, but I'm not an electrical engineer and the ripple caused by my fans is significant so that's a problem to work through once the suit is done. For now, the two circuit solution is working just fine.

Here's how the two boards are connected:
IMG_20200927_101521.jpg

10 JST-PH 2mm connectors are soldered into each board, 5 for each circuit. I didn't add any to the chest board pictured above because I have nothing to power in the chest yet, although I do have some stuff planned (the feature creep on this project has been real). I like the PH connectors because they are reasonably durable (although I wouldn't go yanking on the wires toooo much) and very compact. I add female PH connectors to the + and - leads of all my fans, lights, amplifiers, etc. so they can plug right in. And if I want to move them around, change out a part, or just experiment, no de-soldering or ungluing is required.

Audio
There are two separate audio systems in the helmet: one for talkin' and one for listenin'.

Capture.PNG


System 1 is pretty similar to MoeSizzlac's simple helmet speaker system which can be found here, with a couple of small changes to improve volume and clarity. I had initially planned on using an electret microphone, but wasn't happy with the volume level I was getting. Electret microphones are quite sensitive, so you can't turn your amplifiers up very far before the system starts feeding back. I hopped on Ebay and for about 10 bucks found a microphone designed for handheld radios. This microphone is dynamic which tend to be less sensitive and more directional than electret mics. I also ordered some cheap preamp boards, since the mic didn't have a built in preamp like the electret mic. From the preamp I wired up two little amplifiers, the same ones Moe used I think, and hooked up a speaker to each one. I mounted the grills of the ODST helmet, and crammed the amplifiers and preamp into the right cheek. The microphone attaches to the helmet right in front of my mouth with some velcro.

The talkback system before I added the second amplifier:
IMG_20200827_085129~2.jpg

Microphone mounting:
IMG_20200906_173547.jpg

Amplifier and speaker mounting:
IMG_20200906_173540.jpg

Speaker grill from the front:
IMG_20200906_173602.jpg

So, this design is pretty loud, but I'm a sound guy and I figured it couldn't hurt to try getting it a little louder. I designed a notch filter centered at the frequency of the feedback I was getting (about 1500HZ), and added it into the signal chain. It does eliminate feedback at that frequency, but is a little too drastic in the way it effects the overall sound. I think I may try designing a little equalizer to put in the left cheek.

The Filter board:
IMG_20200927_114322.jpg


Capture 1.PNG


I was going to design the hearing assist circuit myself, but TheBraus just ripped apart a pair of shooting headphones and shoved it into his helmet and that worked just fine, so I figured why reinvent the wheel. The pair I bought were cheap. The point to point wiring was fragile, and the solder joints were bad, so I replaced it with heavier gauge stranded wire and reflowed all the solder joints.
IMG_20200906_170114.jpg

You can see in this picture that some of the broken connections before rewiring:
IMG_20200909_140420.jpg

Another small problem was that the headphones ran on 3v, and I didn't want to use separate battery pack just for them, so I built an MPC1702 circuit to step down my 5v supply power to 3.3v, and wired that to the power leads on the headphone board.
IMG_20200927_113828.jpg

I drilled two holes in the helmet, one on each side, for the microphones to stick out of, then added extensions to the microphone leads so they would reach. The headphones drivers were uncomfortable so I replaced them with a headphone jack.
IMG_20200927_113839.jpg

The headphone board lives in the left cheek:
IMG_20200907_062835.jpg


As for the fans, those are pretty simple, they just plug in.
IMG_20200906_173626.jpg

Ok, that's all for today. Hopefully I'll have some other cool stuff to show off within the month.
 
Status
Not open for further replies.
Back
Top