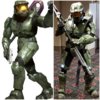
Halo 3 Chief - "Finishing this fight"

Status
Not open for further replies.

master_colt_117

Well-Known Member
Lord Hood - "Chief, you mind telling what you're doing posting this thread?"

Chief- "Sir, finishing this fight.."

IMG_20190811_193039_825.jpgIMG_20190811_193039_826.jpgIMG_20190811_193039_828.jpgIMG_20190811_193039_842.jpgIMG_20190811_193039_838.jpg

Ok, I know you guys are thinking.. why?? Well, I've said it from the start, I won't rest till my Halo 3 suit is perfect. I consider my experience of debuting the armor at Philly Outpost much like the ending to halo 2. Sure it was epic, but the fight was not finished and here with Halo 3 Chief, we plan to finish the dang thing!

With that said, I've learned alot and I've had time to really think of ways to improve the armor from an atheistic point of view and wearability.

The topics in this thread will be short and sweet. My goal is not to have another 30 page thread, by any means, and hopefully offer guidance to those looking to tackle the many challenges of halo 3 armor.

Outline:
Main goal is finishing the undersuit exposed pieces mainly focusing on the separation between the armor pieces in the game. I have been practicing with many promising techniques revolving around Leak Seal coated upholstery foam. Its extremely flexible and can be shaped and assembled similar to regular eva foam build techniques using Barge contact cement.
20190802_192203.jpg20190802_192059.jpg20190709_221947.jpg

Next, shoulders and arms. You all have heard me say it many times. "Don't be sentimental with the piece, but be sentimental with the execution of the piece" meaning if it doesnt fully meet expectations don't be afraid to rebuild it better. Well, I'll admit, my current shoulder pieces are not quite big enough compared to the game, they fit my arms tight which is good for fit but it leaves me no room for under suit and I cant stand having "skinny elbows" with bulky armor surrounding. Plus the current shoulder plates are definitely smaller than in the game, only by a little.

Halo 3 chief has huge muscular arms with bulging shoulder plates. So I have gotten a hold of ultra high def shoulder files and edited them to work with foam similar to my current ones but with full game accuracy. The shoulder plates will be bigger like in halo 3 where my current ones just aren't quite meeting my expectations. I also did miss some important detail on my original upper arm pieces that I will be fully capturing this time, such as my current biceps are not curved enough like the game.

Screenshot_20190812-224232_Gallery.jpg

These slightly larger scaled upper arms will allow me to fully integrate the arm undersuit into the shoulders. I will have full shoulder cap undersuit detail, underarm detail and of course, thick undersuit elbows. All of which will be built into the upper arm and will connect to the forearms when in place.

The good news is I have found new love for barge contact cement for assembly and high density eva foam is a GAME CHANGER! I still use my 5 second super glue for hard to reach areas, but I will admit the Barge is amazing! The upper arm armor will be built with 10mm high density foam and the undersuit detail will be done with 6mm high density foam. Hard to explain, but hopefully I'll have pics up in the next couple of weeks showing what's in my head. The goal, bulky arms that make me wide like Chief and really capture his muscularity and shoulder detail. I feel that I have done this well with the legs and torso, just need to get the upper arms up to par so I look like the walking tank he is.

20190804_140824.jpgIMG-20190812-WA0004.jpeg20190812_164751.jpg20190812_170527.jpg20190812_170535.jpg20190812_165020.jpg20190812_165020.jpg20190812_165014.jpg20190812_164755.jpg20190812_165832.jpg

I've also come up with better materials and assembly of my neck seal that I will be showing once I get some progress building on that. The 1/4 upholstery foam worked great on my first one, but the thin elastic vinyl I used was a little to shiney for my taste and did get a little sticky with sweat. The new fabric will have better flexibility and breathability.

I'm also going to investigate making undersuit shorts to capture hip and butt undersuit detail and have ideas for that as well. My plan is to completely ditch my current 1 piece neoprene skin suit and go to a 2 piece suit that is a little more comfortable and also make it possible to gain access for when "nature calls". With knowing how I'm going to capture all exposed undersuit detail, what I wear underneath won't be as important now once complete.

So there you have it, a basic outline of how I plan to finish this suit fully. If you have stuck in there this long on this introductory then I hope you know I really appreciate it! I promise this will be kept short and sweet and my feelings won't be hurt if you all decide not to comment. This is meant to offer guidance for myself and to others on how to finish out a halo 3 suit to the fullest.

Thank you, Colton
 
Last edited:
Lord Hood - "Chief, you mind telling what you're doing posting this thread?"

Chief- "Sir, finishing this fight.."

View attachment 275988View attachment 275989View attachment 275990View attachment 275991View attachment 275992

Ok, I know you guys are thinking.. why?? Well, I've said it from the start, I won't rest till my Halo 3 suit is perfect. I consider my experience of debuting the armor at Philly Outpost much like the ending to halo 2. Sure it was epic, but the fight was not finished and here with Halo 3 Chief, we plan to finish the dang thing!

With that said, I've learned alot and I've had time to really think of ways to improve the armor from an atheistic point of view and wearability.

The topics in this thread will be short and sweet. My goal is not to have another 30 page thread, by any means, and hopefully offer guidance to those looking to tackle the many challenges of halo 3 armor.

Outline:
Main goal is finishing the undersuit exposed pieces mainly focusing on the separation between the armor pieces in the game. I have been practicing with many promising techniques revolving around Leak Seal coated upholstery foam. Its extremely flexible and can be shaped and assembled similar to regular eva foam build techniques using Barge contact cement.
View attachment 275985View attachment 275986View attachment 275987

Next, shoulders and arms. You all have heard me say it many times. "Don't be sentimental with the piece, but be sentimental with the execution of the piece" meaning if it doesnt fully meet expectations don't be afraid to rebuild it better. Well, I'll admit, my current shoulder pieces are not quite big enough compared to the game, they fit my arms tight which is good for fit but it leaves me no room for under suit and I cant stand having "skinny elbows" with bulky armor surrounding. Plus the current shoulder plates are definitely smaller than in the game, only by a little.

Halo 3 chief has huge muscular arms with bulging shoulder plates. So I have gotten a hold of ultra high def shoulder files and edited them to work with foam similar to my current ones but with full game accuracy. The shoulder plates will be bigger like in halo 3 where my current ones just aren't quite meeting my expectations. I also did miss some important detail on my original upper arm pieces that I will be fully capturing this time, such as my current biceps are not curved enough like the game.

View attachment 276002

These slightly larger scaled upper arms will allow me to fully integrate the arm undersuit into the shoulders. I will have full shoulder cap undersuit detail, underarm detail and of course, thick undersuit elbows. All of which will be built into the upper arm and will connect to the forearms when in place.

The good news is I have found new love for barge contact cement for assembly and high density eva foam is a GAME CHANGER! I still use my 5 second super glue for hard to reach areas, but I will admit the Barge is amazing! The upper arm armor will be built with 10mm high density foam and the undersuit detail will be done with 6mm high density foam. Hard to explain, but hopefully I'll have pics up in the next couple of weeks showing what's in my head. The goal, bulky arms that make me wide like Chief and really capture his muscularity and shoulder detail. I feel that I have done this well with the legs and torso, just need to get the upper arms up to par so I look like the walking tank he is.

View attachment 275993View attachment 275994View attachment 275995View attachment 275997View attachment 275998View attachment 275999View attachment 275999View attachment 276000View attachment 276001View attachment 275996

I've also come up with better materials and assembly of my neck seal that I will be showing once I get some progress building on that. The 1/4 upholstery foam worked great on my first one, but the thin elastic vinyl I used was a little to shiney for my taste and did get a little sticky with sweat. The new fabric will have better flexibility and breathability.

I'm also going to investigate making undersuit shorts to capture hip and butt undersuit detail and have ideas for that as well. My plan is to completely ditch my current 1 piece neoprene skin suit and go to a 2 piece suit that is a little more comfortable and also make it possible to gain access for when "nature calls". With knowing how I'm going to capture all exposed undersuit detail, what I wear underneath won't be as important now once complete.

So there you have it, a basic outline of how I plan to finish this suit fully. If you have stuck in there this long on this introductory then I hope you know I really appreciate it! I promise this will be kept short and sweet and my feelings won't be hurt if you all decide not to comment. This is meant to offer guidance for myself and to others on how to finish out a halo 3 suit to the fullest.

Thank you, Colton


Read the whole dang thing. *whew!*

I like where you're going with this. As Liam Neeson once said "...overkill is underrated."

My next point of order is this: ARE YOU NUTS?! Your suit is amazing. But I also totally understand the drive to have a 100% Tier 3 build, so I won't question your sanity all that much....for now.

Leak Seal coated upholstery foam

Actually this is a wonderful idea and I'm interested to see where you're going with this. Will you please document everything really well? I'd like to follow the undersuit build but am having trouble visualizing what you're concocting.
 
Read the whole dang thing. *whew!*

I like where you're going with this. As Liam Neeson once said "...overkill is underrated."

My next point of order is this: ARE YOU NUTS?! Your suit is amazing. But I also totally understand the drive to have a 100% Tier 3 build, so I won't question your sanity all that much....for now.


Actually this is a wonderful idea and I'm interested to see where you're going with this. Will you please document everything really well? I'd like to follow the undersuit build but am having trouble visualizing what you're concocting.

Absolutely man, thank you for the continued support on this suit! I was reluctant to even make a new post, but for all the items I have thoroughly planned out, I figured it would be best to start a new thread that was much easier to follow, summarized with major check points of completion. I'm really excited to show you all what I have planned for the upper arms. Pics will really be the best way to describe it once the time comes.

As for the undersuit. Luckily I already have the most important part of the undersuit covered. The midsection. The only improvement I've made to this post-show is I added suspenders to it to help keep it up high on me and keep it from wanting to slide down, I will post pics of how I've got that working soon. Phil with Evakura actually announced he is planned to stop making these, so i ordered another one yesterday.
IMG-20190713-WA0061.jpg

My bro had to help me out once or twice during the show and pull the midsection back up. Haha
IMG-20190726-WA0017.jpg

The current neck seal I have was a huge success at the show, but I saw room for improvements on material choice and fine tune my assembly process using 1/4 upholstery foam and 3M #77 spray adhesive to adhere fabric to the foam template patterns.

On the new neck seal, I have found a better fabric that I will upholster the foam with and I will use a sewing machine to sew the panels together instead of sticky spray adhesive and fabric on the inside like I did before. Here is a pic of my old one used at the show. It held up and worked great, even Blue Whales Studios who created Hazel and Owen really liked the design over a balaclava
IMG-20190714-WA0018.jpg
IMG-20190720-WA0034.jpg

For the knees and ankles, I'm going to use the rubber coated upholstery foam method as its flexible and pretty neat looking. I will make templates to cut and assemble knee and ankle sleeves with game detail. I have already ran test runs on the ankle pieces with much great success. Gives me those nice thick ankles like the game and also armor separation between shin and boot.
Screenshot_20190726-051100_Gallery.jpg
Screenshot_20190726-051203_Gallery.jpg
20190802_192203.jpg
20190804_223645.jpg

**So the remaining undersuit needing to be captured**

- shoulders - being fully integrated into the new shoulder upper arm armor

- elbows - also integrated into the upper arm armor and will join to the forearm pieces.

- hip/butt area - the very last thing I'll tackle most likely in the form of sewn up shorts that have detail and flexibility.
 
First major update to my long list of improvements to my suit. I have a new found love for high density foam and Barge contact cement, it produces the cleanest seams and sharpest angles. Still use the 5 second super glue for hard to reach areas though.
This new shoulder piece is now scaled to perfection and fully captures halo 3 Chief's muscularity and shoulder width. They are also ultra high def detail and have all the game detail I missed on my last ones. I cannot wait to get the built in undersuit working on this thing! I have just enough room inside like I had planned. Now time to start building the other one

20190820_185834.jpg20190820_201041.jpg20190820_201029.jpg20190820_195157.jpg20190820_201315.jpg20190820_195150.jpg20190820_201258.jpg20190820_185911.jpg20190820_185840.jpg20190820_201101.jpg20190820_201007.jpg20190820_200929.jpg20190820_195237.jpg20190820_201350.jpg20190820_195213.jpg20190820_201324.jpgScreenshot_20190812-224232_Gallery.jpg
 
First major update to my long list of improvements to my suit. I have a new found love for high density foam and Barge contact cement, it produces the cleanest seams and sharpest angles. Still use the 5 second super glue for hard to reach areas though.
This new shoulder piece is now scaled to perfection and fully captures halo 3 Chief's muscularity and shoulder width. They are also ultra high def detail and have all the game detail I missed on my last ones. I cannot wait to get the built in undersuit working on this thing! I have just enough room inside like I had planned. Now time to start building the other one

View attachment 276694View attachment 276695View attachment 276696View attachment 276697View attachment 276698View attachment 276699View attachment 276700View attachment 276701View attachment 276702View attachment 276703View attachment 276704View attachment 276705View attachment 276706View attachment 276707View attachment 276708View attachment 276709View attachment 276710
Jeez. That's a big difference in size. Your work is already super clean. With HD foam it's just immaculate. :eek:
What kind or sorcery are casting???
 
Jeez. That's a big difference in size. Your work is already super clean. With HD foam it's just immaculate. :eek:
What kind or sorcery are casting???
Yeah and believe it or not, it's only scaled a half inch bigger than my previous ones. Crazy how much a half inch and prop assembly paying close attention to measuring makes a big difference. The new one fits perfectly and once the undersuit is built I can actually see where I'll have more range of motion then my current one. Thanks man! I definitely recommend sending the the extra coin for the high density, I dont even like using the floor mat foam anymore, this new stuff is seriously almost like woodworking.
 
Rescuing my thread from the 4th page... Lol I know I've been pretty quiet on this lately, I've been getting alot of work done but it is all the little stuff, that I know will make big improvements at the end, but currently feel trivial and not worth posting. I did finish my second upper arm shoulder piece and both have been shoe gooed nice and strong. Now it's just ALOT of trial and error figuring ways to accomplish this built in undersuit. Definitely happy with the new pieces and definitely pass off the bulky muscularity of halo 3 Chief much better. They are even more comfortable to wear and move it, believe it or not.

20190907_103602.jpg20190907_103514.jpg20190907_103702.jpg20190905_180227.jpg20190905_180425.jpg20190905_180324.jpg20190905_180311.jpg20190905_180246.jpg20190905_180511.jpg20190905_180311.jpg20190907_103721.jpg20190905_180440.jpg
 
Last edited:
Had a pretty successful breakthrough on my new neck seal. The last one from the show served its purpose but was crazy hot, and prevented air from getting into my helmet.

This new one is based off of the Evil Ted neck pattern using 5mm foam but to hide all the skin, I had to freehand my own templates to wrap around the jaw line and base of my head. I used flexible 2mm foam for this. Once assembled, quick little heat score lines for game detail and a light coat of Leak seal to rubber coat it and there ya have it, a pretty darn comfortable neck seal, and I can now breath!! Also, the magnetic closure on the back is crazy cool for easy on off, but it holds very strong!

Also made some updates to my helmet padding and even made a little more face room inside too. Little improvements that will pay off big time!

20190911_175852.jpg20190911_175844.jpg20190911_175832.jpg20190911_175823.jpg20190911_180928.jpg20190911_180922.jpg20190911_180938.jpg20190911_173600.jpg20190911_175448.jpg20190911_175429.jpg20190910_155139.jpg
 
Last edited:
Had a pretty successful breakthrough on my new neck seal. The last one from the show served its purpose but was crazy hot, and prevented air from getting into my helmet.

This new one is based off of the Evil Ted neck pattern using 5mm foam but to hide all the skin, I had to freehand my own templates to wrap around the jaw line and base of my head. I used flexible 2mm foam for this. Once assembled, quick little heat score lines for game detail and a light coat of Leak seal to rubber coat it and there ya have it, a pretty darn comfortable neck seal, and I can now breath!! Also, the magnetic closure on the back is crazy cool for easy on off, but it holds very strong!

Also made some updates to my helmet padding and even made a little more face room inside too. Little improvements that will pay off big time!

View attachment 277760View attachment 277761View attachment 277762View attachment 277763View attachment 277765View attachment 277766View attachment 277764View attachment 277767View attachment 277768View attachment 277769View attachment 277771
The padding in that helmet looks sweet! And I adore the neck seal, that's the most impressive I've seen.
 
Looks excellent, and I wouldnt expect less from you, but would that not get hot?
Well "hot" is relative when wearing armor, but honestly dude it's 100x's more comfortable I actually love how it feels! It actually breathes very well because air gets between it and my neck on the inside because its rigid enough to stay off my neck. It also allows air into my helmet so much better than my last one too! My last one was thin upholstery foam with stretchy vinyl type material on it, it was like wearing a trash bag around my neck and would get stuck and constricted on my neck. This new eva one has a ton more mobility because it supports itself and allows me to turn my neck easier without gripping to my skin. Air getting in my helmet now is a huge win!
 
Last edited:
Status
Not open for further replies.
Back
Top