1st Build Halo infinite mark 7 progress

Status
Not open for further replies.

Creativity4ever

Member
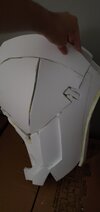
Hello 405th. I am currently doing my first halo project and I would like to show off some progress so far. I am doing the mark 7 gen 3 from halo infinite. As of now I have gotten the helmet,
16341664306038738272891150294398.jpg
a leg,and chest piece done. I'm working with foam BTW as it is easy to use.
16341661341617268196303186399223.jpg
16341661640448131466035685829560.jpg
1634166222842107979348400080167.jpg
16341663132468806462816595076619.jpg

The chest piece and leg did not glue properly when gluing pieces diagonally or into circles. Some pieces did not fit altogether.
16341660351315479487828653485412.jpg
 

Attachments

  • 16341664003559088817042841361394.jpg
    16341664003559088817042841361394.jpg
    581.3 KB · Views: 125
I would switch glues as yours seems to be…less effective
The glue might be alright, but may I provide some constructive feedback Creativity4ever ? You've made a strong start to the armour, but you could get cleaner edges by using bevels on your cuts. They can be a little tricky to figure out at first but can really help with making the edges align neatly. Also remember to heat form the foam first for rounded parts so they don't pull apart from the seam as you try and stick them. And finally, when using contact cement, make sure to wait until the adhesive is dry (not tacky), and it may require a couple of coats.
Looking forward to seeing progress!
How do I know if the glue is tacky? And how do I glue on diagonal pieces?
 
How do I know if the glue is tacky? And how do I glue on diagonal pieces?
You can lightly touch the glue to see if it's tacky or dry - you'll be able to feel the difference. For cutting out bevels, take a look at this video from Punished Props:

Our very own Random Ranger can gives us a hand too:

To figure out the right angle to cut/glue it at, you may have to just eyeball it, based on reference images. If you get contact cement right up to the outer edge of the foam, when dry, tack the outer edges together first to get as clean a seam as possible. You can then press the rest of the foam together. If you find you didn't cut it at the right angle, never fear - you can fill any gap behind the seam with something like hot glue.
 
I went back and made some fixes to the 1st leg piece. Some proportions are off, but I'll take it as it is. I'll be sure to get all the pieces right on the second leg. Though it does seem a little big on me
16344031375067744374916425768305.jpg
 
2nd Shoulder for the Mark_VII is done!View attachment 310848
Are you applying heat and curving your parts? Against the carpet and the shape of the piece it's a bit difficult to tell the curvature of everything at the top of the shoulder but it looks like there's some stress at the bottom where parts are being pulled outward. If you have a heat gun just warming pieces and pre-bending them into shape before gluing will help a lot.
 
Are you applying heat and curving your parts? Against the carpet and the shape of the piece it's a bit difficult to tell the curvature of everything at the top of the shoulder but it looks like there's some stress at the bottom where parts are being pulled outward. If you have a heat gun just warming pieces and pre-bending them into shape before gluing will help a lot.
It is curved its just the wrong angle
 
16350204667231084409257337547404.jpg
Today I got 2 whole leg pieces done. These are the re sized to the correct length as the last one did not fit. Some parts look iffy because the 3d model I got looked like some parts were either directly on top or on the side of each other. Next step will be adding the last chest pieces then building the forearms and Bicep parts plus any other unfinished parts
 
Pink spray paint will be used for the whole suit after using plasti dip. I chose pink because I watched some Red vs Blue a while ago
 
Status
Not open for further replies.
Back
Top