Catsbegaming24
New Member
Hello! As stated in the title I am beginning my Halo reach custom build. After months of waiting and waiting, I have finally done the most minuscule amount of work to be able to post a thread. The build will mainly be made with an Ender3 Pro 3d printer with a couple of pieces and missing details in foam which I will talk about more when we get there. I also hope to add ( if permitting ) LEDs.
*My plan is to get it finished before Galaxycon 2024 and possibly some earlier ones if I get it finished on time.
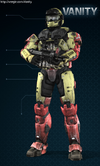
This is the build I'm planning on making ( image ) The only missing details are the HUL, CNM, and UA attachments on the helmet.
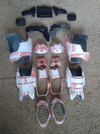
The only physical work I have to show so far is a too small forearm piece.
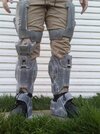
Here is unfortunately where I have reached a standstill. I have remeasured that piece in both Cura and Armorsmith and my own arm multiple times to try to get it the right size and it has not worked out. I was wondering if some of yall have some tips, tricks, or ideas on how to fix this problem.
Thank you!
*My plan is to get it finished before Galaxycon 2024 and possibly some earlier ones if I get it finished on time.
This is the build I'm planning on making ( image ) The only missing details are the HUL, CNM, and UA attachments on the helmet.
The only physical work I have to show so far is a too small forearm piece.
Here is unfortunately where I have reached a standstill. I have remeasured that piece in both Cura and Armorsmith and my own arm multiple times to try to get it the right size and it has not worked out. I was wondering if some of yall have some tips, tricks, or ideas on how to fix this problem.
Thank you!
Attachments
Last edited: