Rock Lobbster
Sr Member
- Member DIN
- S098
Hello everyone, I recently painted a needle rifle and figured I’d take photos throughout the process to help out anyone trying to improve their covenant arsenal!
Supplies
Airbrush
Lets get cracking!
Preparation

I glued all parts together using super glue for the majority and 2 part epoxy for the parts that would be under more stress. Right after that I sanded 60 grit and 120 grit with a mouse sander before applying fiberglass resin to the entire body.

I only did 1 coat as it has moving components.
Once the resin is dry… sand, die, sand again. Working up from 120 I did a 180, 240, 320, 500 wetsand to get a smooth surface with bondo and filler primer being applied after the initial sanding passes as needed.


Paint Stage
Finally the gloss black was applied as a basecoat for the main coloring. 2 light coats were used at this step, alternatively you can also use a chrome coloring for a lighter base color to apply the colorshift to.
I painted the secondary colors first starting with the silver, then gunmetal, and finally black. All gloss black parts that were not getting the blue coloring were painted over at this stage. Leave to dry for 24 hours then I masked it off to begin the main show!


Applying the Primary Paint
Starting with the pearlized blue I applied 3-4 coats to get a nice consistent coloring. The createx paints require a bit of creative thinning so really get a smooth flow before moving onto the actual piece.


Colorshift:
Next up I started applying the custom colorshift mix. To create this I used a combination of the blue gradient and blue purple colorshift powder mixed into a jar with the gloss clear coat. Vallejo flow improver was also mixed in to thin out the paint and get a better flow. It requires about 5-7 passes with this mix to get a good consistent color building up.


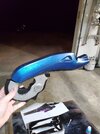
Hex Patterning & Clearcoat
Next up pull out your hex template and get to work! The Caribbean blue color is used at this point to get the color differentiation, you can go as heavy or as light as you'd like at this stage but keep in mind the more blue applied the less you’ll see the color shift. After this application I went back and sprayed 2 coats of the gloss clear coat to seal the paint and voila! The main stages of painting were completed.
 View attachment 320288


Final Touches
After giving them 24 hours to dry I went back and installed the fairy lights under the main “hood” of the needler rifle to give it that pink glow.

I hope you all enjoyed it and feel free to ask any questions that you may have!
Finished Project


Supplies
- Oddworks Needle Rifle
- 3-4kg PLA+
- 1kg Pink “glass” filament
- Fiberglass resin
- bondo
- Lots of sandpaper
- Hex pattern template
- Super glue
- 2 part epoxy
- Mouse sander (optional)
- LED fairy lights
Airbrush
- Createx Pearlized Blue
- Createx transparent caribbean blue
- Mica colorshift powder (blue gradient & purple to blue)
- Createx gloss clear coat
- Tamiya gunmetal
- Vallejo model air silver
- Tamiya black
- Gloss black
- Rustoleum filler primer
Lets get cracking!
Preparation
I glued all parts together using super glue for the majority and 2 part epoxy for the parts that would be under more stress. Right after that I sanded 60 grit and 120 grit with a mouse sander before applying fiberglass resin to the entire body.
I only did 1 coat as it has moving components.
Once the resin is dry… sand, die, sand again. Working up from 120 I did a 180, 240, 320, 500 wetsand to get a smooth surface with bondo and filler primer being applied after the initial sanding passes as needed.
Paint Stage
Finally the gloss black was applied as a basecoat for the main coloring. 2 light coats were used at this step, alternatively you can also use a chrome coloring for a lighter base color to apply the colorshift to.
I painted the secondary colors first starting with the silver, then gunmetal, and finally black. All gloss black parts that were not getting the blue coloring were painted over at this stage. Leave to dry for 24 hours then I masked it off to begin the main show!
Applying the Primary Paint
Starting with the pearlized blue I applied 3-4 coats to get a nice consistent coloring. The createx paints require a bit of creative thinning so really get a smooth flow before moving onto the actual piece.
Colorshift:
Next up I started applying the custom colorshift mix. To create this I used a combination of the blue gradient and blue purple colorshift powder mixed into a jar with the gloss clear coat. Vallejo flow improver was also mixed in to thin out the paint and get a better flow. It requires about 5-7 passes with this mix to get a good consistent color building up.
Hex Patterning & Clearcoat
Next up pull out your hex template and get to work! The Caribbean blue color is used at this point to get the color differentiation, you can go as heavy or as light as you'd like at this stage but keep in mind the more blue applied the less you’ll see the color shift. After this application I went back and sprayed 2 coats of the gloss clear coat to seal the paint and voila! The main stages of painting were completed.
Final Touches
After giving them 24 hours to dry I went back and installed the fairy lights under the main “hood” of the needler rifle to give it that pink glow.
I hope you all enjoyed it and feel free to ask any questions that you may have!
Finished Project
Attachments

Last edited: