Iron Man Mark 50 custom version

Status
Not open for further replies.
What do you mean by "just eva foam"? I wasnt aware there was another material available!

For timeline, it will take me about 1 hour per part now. The templates are cut out and sorted into levels ready for transfering to foam so all the working is finished. Ill need to go slower on the right side parts so i dont end up with 2 lefts again!

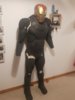
Ill have the legs done next week, then ill need to assemble the entire suit and mark any trimmings, amend those parts, deal with any seams and sand anywhere that needs it. While working on the foam im gonna continue to trial my paint to get it perfect. Id hope to start painting next weekend. Ill need 4 coats on everything then a seal coat. With each coat taking 3 hours to dry it will be a few days probobly.

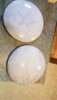
Ive still to design the feet and hands. My last boots where too big so im hoping a simple scale drop will do. For a frame im gonna try and build them round some old crocks. The hands are in development still as i dont have the lights sourced.. which is concerning now... until i have that i cant build palms. The fingers are designed and ready however.

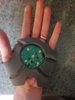
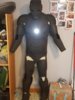
Im working on making a chest light atm, but technically i can add that later as i just filled the gap with foam for structure till now.

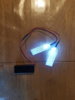
Time is getting short. Thankfully a 2 week holiday looms. The electronics are my main concern now
 
Okay, so perhaps I misspoke when I said that last statement. There are different types of EVA foam, but there are different ways of making this armor.

You could go with the Pepakura method and glue the strips together, but you will have to try and reinforce it with fiberglass material to strengthen it.

You can also use the Pepakura method with different pieces of foam at different thicknesses.

Worbla could also create a suit of armor as well, but you will need to heat it up to give it its shape.

3d printing is the most costly and time consuming method since you will have to smooth out the print lines that could occur.


I've done 3 of the four methods mentioned, but I was not meaning to confuse you like that. As I stated before, you had better success in making a suit of armor out of foam than I did last year.
 
Ah! I thought i was missing a trick there! I tried the pepakura fiberglass method but didnt like it. I started with low density foam and enjoyed working with it but found it flimsy. High density was the next iteration and i loved it. I am using 2mm and 5mm, certain parts arnt possible with the 5mm, like the neck.. ita a perfect fit but in 5mm its so tough i couldnt breathe or swallow. 2mm gives it flex without loosing structure. Fingers were the same. I also use the 2mm for underlay. Its tough enough that poppers can connect it to the 5mm foam and it wont tear too.

The high density also sands down like olive wood! I bought a set of sanding pads starting at 120 grit, then 220, and so on up to 3000. Ive not used anything over 800 so far. The 120 sands the foam very fast but leaves it rough, once i use the 800 and treat it with the heat gun its all but impossible to tell it was touched. A dremmle is used for the ledges to remove excess contact cement, but its rarely needed.

All in all, after a year practicing, foam is very forgiving. I made a set of shields for my kids using the foam, a captain america for the boy and a wonder woman one for my daughter. im on layer 3 of flexi paint, im still working on a way to minimise brush marks but the surface is like glass, and it doesnt crack even when bent 180 degrees! Just need to get the colour are smooth as the texture, my aim is a finish lile the car, but i may be aiming too high!

If i could i would buy a 3D printer. Im loving this new hobby!
 

Attachments

  • IMG-20191002-WA0000.jpeg
    IMG-20191002-WA0000.jpeg
    1.3 MB · Views: 274
Looks like everything is going well so far. But 3d printing can be an interesting investment once you get the settings right. Took me a while to hone mine in. You just have to pay attention when it goes on sale. I'm only 10 months into this method and if you don't mind waiting for each print to be done, it's like getting a present every time it's complete.
 
Here's the thing about 3d printing. It depends on what you are printing, the size of it, and the complexity of it. All of this is considered when printing 3d objects. For example, the object I printed, which is a weapon prop for a costume I'm putting together, took me over all 56 hours and 25 minutes and that's the combined total of both the handle and the guard. So it varies from minutes to days sometimes. You can print armor using 3d filaments, but the amount you need for the armor you are making will take maybe weeks at a time. As far as flexibility goes, there are flexible plastics out there for you to print, but they can be sometimes more costly than regular filament. One in particular is called NinjaFlex. You might want to take a look at that when you have the time.
Finally, as far as placing something underneath, that would be a good idea to give the covered parts some comfort. So adding some padding is recommended.
 
Update. Its true practice makes perfect! Every part i make is faster and cleaner! Today I made both thighs, the right shin and both feet.

I also painted the helmet as it was the only stand alone part that needed no modifications!

I still need to adjust the legs for a comfee fit, same with the arm housings where they attach to the torso, there is a little friction there that needs taking care of.

The model for this is a chap named foamy, he had to have some lypo surgery as somehow as ive been building this ive lost about 4 inches across the waist.. he just fits inside the suit now and will be the model for storage!

Ive got the knees and hands left now. Ive not done the knee as i will adjust the legs. I was hoping to have them as slide ons, but i may have to make them open at the side so they are slimer, same with thighs.

The hands arnt built yet as the electronics are DELAYED! They sent them to the wrong city... ive ordered some LED wireless lights, like the ones you get under worktops. Im going to dismantle them and use them as hand lights, as they are only 3 inches wide and 1cm thick! But ill build the glove around the board to be safe!

Im really happy with the colours, they could ideally be a touch darker but thats fixable with a top coat.

3 weeks remain till deadline!
 

Attachments

  • 20191009_172215.jpg
    20191009_172215.jpg
    890.8 KB · Views: 275
The hands aren't built yet as the electronics are DELAYED! They sent them to the wrong city... I've ordered some LED wireless lights, like the ones you get under worktops.

Ugh... That's a bummer! Well, at least you had an alternative plan.
 
Help and support:

I bought these lights that specifically state they are for cosplay helmets. Problem is that when they are on you cant see anything. The light is dazzling regardless of what way round they are.

I was hoping they would be a lot better then they are, its basically 2 leds and a battery case. With what appears to be a rectangle of plexiglass.

Am I missing something obvious here? Whats the point of the lights if you cant see!
 

Attachments

  • 20191010_164637.jpg
    20191010_164637.jpg
    1.5 MB · Views: 272
  • 20191010_164642.jpg
    20191010_164642.jpg
    1.3 MB · Views: 270
Help and support:

I bought these lights that specifically state they are for cosplay helmets. Problem is that when they are on you cant see anything. The light is dazzling regardless of what way round they are.

I was hoping they would be a lot better then they are, its basically 2 leds and a battery case. With what appears to be a rectangle of plexiglass.

Am I missing something obvious here? Whats the point of the lights if you cant see!
I've seen these before and someone did demonstrate how to use them.

Follow this video:

 
I puzzled most of that out before hand, and right at the end stated the problem i have, in reduced light your blind.. im somewhat dissapointed that its never been mentioned anywhere that these lights mean you cant use them when your out, the effect is best in the dark yet in the dark you cant use it
 
I puzzled most of that out before hand, and right at the end stated the problem i have, in reduced light your blind.. im somewhat dissapointed that its never been mentioned anywhere that these lights mean you cant use them when your out, the effect is best in the dark yet in the dark you cant use it

Yeah, that's a huge problem there. Sometimes, research on a product is needed before you make a purchase. Try and see if you can find another product or setup similar to the product, but allows you to see out of the eyes. Also keep in mind that having that much light in the eyes can be dangerous when you are using it. I'll try and see if I can find any more safer products or setups like that through out the day.
 
Last edited:
Yeah, that's a huge problem there. Sometimes, research on a product is needed before you make a purchase. Try and see if you can find another product or setup similar to the product, but allows you to see out of the eyes. Also keep in mind that having that much light in the eyes can be dangerous when you are using it. I'll try and see if I can find any more safer products or setups like that through out the day.
Also if a product states that it is for use in cosplay, look for the cheaper alternative that is the same thing minus that text tag and save about 20% or get better quality for the same price. Products made for cosplay have stupid markup.
 
The only work around is either slits in the eye reflectors to look through or a hole under the wyes to look through. Neither is handy...

1 way reflective plexiglass would work, like police stations use, other then that i fear electeical eyes are not practical..

My hand lightsare promising however! Need some fiddling still though. They should be the perfect size and will be wired to activate when you flex your fingers back to make your hand flat. Not sure where ill put thw batteries yet, maybe under the handplate...
 

Attachments

  • 20191011_152652.jpg
    20191011_152652.jpg
    1.2 MB · Views: 247
So here are a few ideas that can help you out on your situation. They may help spark some sort of way to get the effect:


To piggy back on the statement that TurboCharizard said, you can find ways to make the effect cheaper. That's what I did for the internal cooling fan for my helmet. For example, there's a helmet fan that I was interested in buying before that costs 17 bucks. So I tried to replicate the system using different parts.

1 ball baring 12 volt fan costs me 6.99 at Micro Center.
16 feet of electrical costs me 4.99
The 9 volt battery to make it spin costs me 1.99.
The switch costs me 1.49.

If you round things up to the nearest dollar, it actually costs me 15.50. That's at least 1.50 less than I would have bought and that's before taxes. So what's the difference between what's stated and that product that's ready go?

Convenience.

A lot of people don't have the time to sit down, plan everything out, and build things from the ground up. After taking time out make this helmet I'm working on, I understand why people charge the amount for their work. It's to recoup not only the materials made, but time and effort itself.

In any case, back to the topic at hand. As much as you want to capture that effect, believe me I've been chasing a "whale" all this summer for a special look, you may have to reconsider your approach to that. Again, I hope these videos can give you some sort of idea on how to obtain it.
 
Last edited:
Update:

As all major parts are complete im now moving onto underlayers and joins. Im also finding the joys of elastic! Most parts are held together using elastic strapping and buckles. The elastic is set to hold the suit in a neutral position, but then stretches to allow movement and a range of motion.

The shoulders are now mounted to the torso and ive made a custom neck that extends to each shoulder to prevent thw parts catching. It also let me make the neck the right size!

Im still not totally happy with the torso holding, im thinking some velcro to hold the edges in place. Strapping holds it down but it feels insecure. I have however added the chest light into it. Ill need to make a tighter cover for it but its housing is done.


Next part will be attaching strapping to the arms so they can lock in place but still move. Then moving on to the shin/boot conponent and how it will connect to the thigh. Finally doing the hands as with 15 fonger components per glove i don't want to loose any so they will be made/painted and assembled all at once!
 

Attachments

  • 20191013_153309.jpg
    20191013_153309.jpg
    1.1 MB · Views: 252
Update:

As all major parts are complete im now moving onto underlayers and joins. Im also finding the joys of elastic! Most parts are held together using elastic strapping and buckles. The elastic is set to hold the suit in a neutral position, but then stretches to allow movement and a range of motion.

The shoulders are now mounted to the torso and ive made a custom neck that extends to each shoulder to prevent thw parts catching. It also let me make the neck the right size!

Im still not totally happy with the torso holding, im thinking some velcro to hold the edges in place. Strapping holds it down but it feels insecure. I have however added the chest light into it. Ill need to make a tighter cover for it but its housing is done.


Next part will be attaching strapping to the arms so they can lock in place but still move. Then moving on to the shin/boot conponent and how it will connect to the thigh. Finally doing the hands as with 15 fonger components per glove i don't want to loose any so they will be made/painted and assembled all at once!
Any brighter and you can use that thing as a flashlight! I can't wait to see this being painted.
 
Ive started working with the flexi paint now and have to say its easy to apply, and essentially sets like plasti dip!

Im only painting parts that are complete and have all adjacent parts complete to be safe.

To test the paint i also made a captain america shield for my 3 year old, then used the gloss seal to remove the tack.

He was thrilled and this is how the paint colours sre looking for red, silver and blue!

Im doing the paint for a matching wonder woman shield too so I can see the gold, but its a nice vibrant colour!
 

Attachments

  • 20191016_162743.jpg
    20191016_162743.jpg
    1.6 MB · Views: 241
Update:

Not had much time for pictures as its been an all hands on deck deal for getting this done in time.

Gloves are pending the lining arriving which should hopefully be today. Other then that all i need to make is the knees and to resize the thighs a little.

I do wish i could airbrush it but i can always do that in the future.

1 week remains so fingers crossed!
 

Attachments

  • 20191025_100418.jpg
    20191025_100418.jpg
    1 MB · Views: 257
Status
Not open for further replies.
Back
Top